Add Facemoods Emoticons To Your Blogger Comments

Want to add Facemoods emoticons in your Blogger comments? Then follow the next steps:Step 1.

If you are using the old Blogger interface:

  • Go to Dashboard – Design – Edit HTML – Expand Widget Template (make a backup)

If you are using the new Blogger interface:

  • Go to Dashboard – Template – Edit HTML – Proceed – Expand Widget Template (make a backup)


Step 2. Search (CTRL + F) for this code:


Read Also : Add �Email Subscription Form� To Blogger Blogspot

  • For previous commenting system: 

<h4 id=’comment-post-message’><data:postCommentMsg/></h4>

  • For threaded comments:

<div class=’post-footer-line post-footer-line-3′>

Step 3. Add the below code just above it
(for threaded comments, add the code after):

<b:if cond=’data:blog.pageType == “item”‘>
<div style=’ width: 450px; text-align: left; border: 1px dashed #0084ce; background: transparent; padding: 10px; color:#000000; font-weight:bold; ‘>
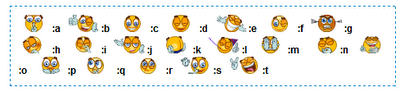
<img border=’0′ src=’http://1.bp.blogspot.com/-zY65UBxSl6w/T67AajI_U6I/AAAAAAAACIc/fCV19C1627Q/s1600/helplogger.blogspot.com(1).gif’/> :a
&#160;
<img border=’0′ src=’http://4.bp.blogspot.com/-M8aBZtLjGqY/T67Ai2d8eAI/AAAAAAAACIk/PrDerObloAw/s1600/helplogger.blogspot.com+(2).gif’/> :b
&#160;
<img border=’0′ src=’http://3.bp.blogspot.com/-HfIjCWOuxwo/T67Ar7HZiHI/AAAAAAAACIs/RgwvdPP4JSc/s1600/helplogger.blogspot.com(3).gif’/> :c
&#160;
<img border=’0′ src=’http://4.bp.blogspot.com/-98YuuiC8MIc/T67AzJ3Xf0I/AAAAAAAACI0/UtaFpgTb_PM/s1600/helplogger.blogspot.com(4).gif’/> :d
&#160;
<img border=’0′ src=’http://3.bp.blogspot.com/-ikCFMFesIrE/T67BAtTQGhI/AAAAAAAACI8/AisqU7R–Yc/s1600/helplogger.blogspot.com(5).gif’/> :e
&#160;
<img border=’0′ src=’http://2.bp.blogspot.com/-VSY5nbsSEIs/T67BK3G-B6I/AAAAAAAACJE/n_fhk-2Ihqc/s1600/helplogger.blogspot.com(6).gif’/> :f
&#160;
<img border=’0′ src=’http://3.bp.blogspot.com/-e9hytPNLXeY/T67BSj27JJI/AAAAAAAACJM/Rwonrid9oiQ/s1600/helplogger.blogspot.com(7).gif’/> :g
&#160;
<img border=’0′ src=’http://4.bp.blogspot.com/-mT-nqGFvXec/T67BZDPxvxI/AAAAAAAACJU/fgTPtQNxMK8/s1600/helplogger.blogspot.com(8).gif’/> :h
&#160;
<img border=’0′ src=’http://3.bp.blogspot.com/-xcMDAiCizIE/T67BfnBeWSI/AAAAAAAACJc/_OqmXLGhjLg/s1600/helplogger.blogspot.com(9).gif’/> :i
&#160;
<img border=’0′ src=’http://3.bp.blogspot.com/-XJUn74vJTwo/T67BrafHO3I/AAAAAAAACJk/B40nJjxUxNE/s1600/helplogger.blogspot.com(10).gif’/> :j
&#160;
<img border=’0′ src=’http://3.bp.blogspot.com/-JgARtAx7IHo/T67B2Db6LjI/AAAAAAAACJs/U1EWgczqOYY/s1600/helplogger.blogspot.com(11).gif’/> :k
&#160;
<img border=’0′ src=’http://2.bp.blogspot.com/–K1Z6RvN57w/T67CCzlaGcI/AAAAAAAACJ0/iF2-osmFALE/s1600/helplogger.blogspot.com(12).gif’/> :l
&#160;
<img border=’0′ src=’http://4.bp.blogspot.com/-c0DJDg4M2n4/T67CTf-xShI/AAAAAAAACJ8/BqUmJYoDBLI/s1600/helplogger.blogspot.com(13).gif’/> :m
&#160;
<img border=’0′ src=’http://1.bp.blogspot.com/-zrvYy6caFXM/T67CZi7etnI/AAAAAAAACKE/iPJsX_duWjE/s1600/helplogger.blogspot.com(15).gif’/> :n
&#160;
<img border=’0′ src=’http://3.bp.blogspot.com/-F2LUTd1hG_o/T67CfNLnIlI/AAAAAAAACKM/UHuPyigCX24/s1600/helplogger.blogspot.com(16).gif’/> 😮
&#160;
<img border=’0′ src=’http://3.bp.blogspot.com/-Vd6U_2eq_Gk/T67CosaWm8I/AAAAAAAACKU/JgnYMS4AJOc/s1600/helplogger.blogspot.com(14).gif’/> :p
&#160;
<img border=’0′ src=’http://1.bp.blogspot.com/-faDYi6E_d6E/T67CybEuj1I/AAAAAAAACKc/nHxSH7KMSwY/s1600/helplogger.blogspot.com(17).gif’/> :q
&#160;
<img border=’0′ src=’http://2.bp.blogspot.com/-2QiwXpJ7gxk/T67C41ItlCI/AAAAAAAACKk/8sba1I9fZOY/s1600/helplogger.blogspot.com(18).gif’/> :r
&#160;
<img border=’0′ src=’http://2.bp.blogspot.com/-KUlSaDVWqW8/T67C_4ITH-I/AAAAAAAACKs/e6N7K2jJvl8/s1600/helplogger.blogspot.com(19).gif’/> :s
&#160;
<img border=’0′ src=’http://2.bp.blogspot.com/-UC_5gE8LgaQ/T67DGU12FBI/AAAAAAAACK0/oHA628PaDhk/s1600/helplogger.blogspot.com(20).gif’/> :t   <a href=’http://helplogger.blogspot.com/2012/05/add-facemoods-emoticons-to-your-blogger.html’ style=’color: rgb(30, 122, 183); font-size: x-small;’>Add smileys to Blogger + </a>
</div></b:if>

Step 4. Now search for this piece of code:

</body>


Step 5. And add the following code immediately above it:

  • For previous commenting system:

<script type=’text/javascript’ src=”http://helplogger.googlecode.com/svn/trunk/facemood emoticons.js”/>

  • For threaded comments: 

<script type=’text/javascript’ src=”http://helplogger.googlecode.com/svn/trunk/facemood emoticons threaded.js”/>

Step 6. Save the Template. And enjoy your comments 🙂Enjoy Guys! and don’t forget to post your comments. � MyTricksTime.com

How To Add �Email Subscription Form� To Blogger Blogspot

If you are providing useful information in your blog, then every visitor will want to get latest updates from your blog. For that purpose you need a Email Subscription Form in your blog, so that interested visitors can easily get latest updates. And to add email or feed Subscription Form to your blogger blog (blogspot) it’s a very easy thing to do. So let’s begin:

1. Log in to Blogger, then go to Design > Page Elements > click on “Add a Gadget” link. 
2. From the pop-up window, click on the “HTML/JavaScript” gadget. 
3. Paste the following code inside the empty box:

<style>
.hl-email{
background:url(http://4.bp.blogspot.com/-u3UaeUufpmI/T8lFuelsg8I/AAAAAAAACQY/tOWbHsgTYKc/s1600/mail.png) no-repeat 0px 12px ;
width:300px;
padding:10px 0 0 55px;
float:left;
font-size:1.4em;
font-weight:bold;
margin:0 0 10px 0;
color:#686B6C;
}
.hl-emailsubmit{
background:#9B9895;
cursor:pointer;
color:#fff;
border:none;
padding:3px;
text-shadow:0 -1px 1px rgba(0,0,0,0.25);
-moz-border-radius:6px;
-webkit-border-radius:6px;
border-radius:6px;
font:12px sans-serif;
}
.hl-emailsubmit:hover{
background:#E98313;
}
.textarea{
padding:2px;
margin:6px 2px 6px 2px;
background:#f9f9f9;
border:1px solid #ccc;
resize:none;
box-shadow:inset 1px 1px 1px rgba(0,0,0,0.1);
-moz-box-shadow:inset 1px 1px 1px rgba(0,0,0,0.1);
-webkit-box-shadow:inset 1px 1px 1px rgba(0,0,0,0.1); font-size:13px;
width:130px;
color:#666;}
</style>
<div class=”hl-email”>
Subscribe via Email <form action=”http://feedburner.google.com/fb/a/mailverify” id=”feedform” method=”post” target=”popupwindow” onsubmit=”window.open(‘http://feedburner.google.com/fb/a/mailverify?uri=mytrickstime‘, ‘popupwindow’, ‘scrollbars=yes,width=550,height=520’);return true”>
<input gtbfieldid=”3″ class=”textarea” name=”email” onblur=”if (this.value == &quot;&quot;) {this.value = &quot;Enter email address here&quot;;}” onfocus=”if (this.value == &quot;Enter email address here&quot;) {this.value = &quot;&quot;;}” value=”Enter email address here” type=”text” />
<input type=”hidden” value=”mytrickstime” name=”uri”/><input type=”hidden” name=”loc” value=”en_US”/>
<input class=”hl-emailsubmit” value=”Submit” type=”submit” />
</form>
</div>

Read Also :Speed up our blog by hosting CSS files externally

Settings 

  • Replace the url address in green if you want to change the email icon
  • Increase/Decrease the 130 width value for a wider text area
  • Replace http://feedburner.google.com/fb/a/mailverify?uri=mytrickstime with your Feedburner Email Feed link. You can get it by visiting your feedburner account then navigate to Publicize and then to Email Subscriptions.
  • Replace mytrickstime with your feed title. It appear at the end of your feed link. In my case it is http://feedburner.google.com/fb/a/mailverify?uri=mytrickstime

4. Save your widget and check your blog.Enjoy Guys! and don’t forget to post your comments. � MyTricksTime.com

Review : Karbonn A30

GENERAL 2G Network GSM 900 / 1800 / 1900 – SIM 1 & SIM 2
3G Network HSDPA 2100
SIM Dual SIM (Mini-SIM)
Announced 2012
Status Available

BODY Dimensions 166 x 91 x 10.7 mm (6.54 x 3.58 x 0.42 in)
Weight 280 g (9.88 oz)
DISPLAY Type TFT capacitive touchscreen, 256K colors
Size 480 x 800 pixels, 5.9 inches (~158 ppi pixel density)
Multitouch Yes
SOUND Alert types Vibration, MP3, WAV ringtones
Loudspeaker Yes
3.5mm jack Yes

MEMORY Card slot microSD, up to 32 GB
Internal 4 GB, 512 MB RAM

DATA GPRS Yes
EDGE Yes
Speed HSDPA, 7.2 Mbps
WLAN Wi-Fi 802.11 b/g/n, Wi-Fi hotspot
Bluetooth Yes, with A2DP
USB Yes, microUSB v2.0

CAMERA Primary 8 MP, 3264×2448 pixels, autofocus, LED flash
Features Geo-tagging, face detection
Video Yes
Secondary Yes, 1.3 MP
FEATURES OS Android OS, v4.0.4 (Ice Cream Sandwich)
CPU Dual-core 1 GHz
Sensors Accelerometer
Messaging SMS(threaded view), MMS, Email, Push Email, IM
Browser HTML
Radio FM radio
GPS Yes, with A-GPS support
Java Yes, via Java MIDP emulator
Colors Black/White
  – SNS integration
– MP3/AAC/WMA/WAV player
– MP4/WMV/H.264/H.263 player
– Organizer
– Document viewer
– Voice memo/dial
– Predictive text input
BATTERY   Li-Ion 2500 mAh battery
Stand-by Up to 600 h
Talk time Up to 10 h
MISC     SAR EU 0.45 W/kg (head)   

Enjoy Guys! and don’t forget to post your comments. � MyTricksTime.com

How To Set Default Video Player In Mac OS X?

How can I set the default player for video is to VLC player? In my Mac OS X, Quicktime is the default media player.
Each and every video I need to manually set VLC as default player.
Are you facing the above mentioned problem?
If so, here is the solution to fix this problem.


Setting Default Media Player in Mac

  • Right click on the file you wish to always open in VLC.
  • Click �Get Info�.
  • In the �Open With� section, select VLC from the drop down menu. In the below screenshot �The Bourne Legacy� movie with *.mp4 file format�s default media player is changed.

  • To apply this change to all files of this type, click the �Change All� button.

Enjoy Guys! and don’t forget to post your comments. � MyTricksTime.com

How to Install Windows quickly

How to Install Windows quickly OR Save your time while installing new windows

How to Install Windows quickly

RICK TO SAVE YOUR TIME WHILE INSTALLING WINDOWS

  • Boot through windows XP CD.
  • After all the files are completely loaded, you get the option to select the partition. Select �c�.
  • Now Format the partition, whether it is normal or quick with NTFS or FAT
  • Once the formatting is completed, All the setup files required for instllation are copied.Restart your system by pressing Enter.Now, here begins the Simple trick to save 10-15 minutes.
  • After rebooting, you get a screen where it takes 40 minutes to complete or finalize the OSinstallation.
  • Now, Press SHIFT + F10 Key -> This opens command prompt.
  • Type �Taskmgr� and press enter. This will open Task Manager.
  • Click the Process Tab, here we find a process Setup.exe. Right Click on Setup.exe and Set Priority -> Select High or Above Normal. Initially it will be Normal

Enjoy Guys! and don’t forget to post your comments. � MyTricksTime.com