PayPalis the largest payment gateway in the world, and millions of people are using it to send and receive money. But PayPal needs you to have a credit card, or at least a bank account for you to add money to your PayPal account and then transfer or spend it. If you don’t have a bank account or a credit card, then you can still add funds to PayPal using GreenDot MoneyPak. With it, you can either load money to an issued PrePaid card, or add money directly into your PayPal account without getting into the hassle of bank transfers and what not. It is perhaps the only way to add money without a bank account.
What is MoneyPak?
MoneyPak is a great and efficient financial service that lets you use load your PayPal account with money with live cash. Originally, it was intended for GreenDot issued PrePaid cards, which work just likePayza PrePaidor any other PrePaid cards. You could buy a MoneyPak, and add it directly to the PrePaid card, which could then be used to make purchases or transfer money to another card. Adding money to PayPal works the same way.
MoneyPak is a convenient way of adding funds to PayPal. You don’t need to have a bank account or a credit card. There are no bank fees or Credit Card interest charges. This is the only way you can add funds to PayPal without a bank account. And once you’ve added the money, you can transfer or use it instantly!
How to add money to PayPal?
It is quite simple really. You first have to buy a MoneyPak. You can buy this in the U.S or abroad from any major retailer such as Walmart, Walgreens, CVS/pharmacy, Rite Aid, Kmart, 7-Eleven, Kroger and Meije etc. You buy this with live money, so no credit card or bank transfer hassle. It’s your choice on how much money you want to put into the MoneyPak, which you then pay at the counter.
Once purchased, simply log on to your PayPal account, and click on Add Money. Select the MoneyPak option from there, and add the required information. You may first need to provide your name, address, date of birth and Social Security Number so that you can be verified by GreenDot. You can then add your purchased MoneyPak into your PayPal account, and the money will be transferred almost instantly.
Here’s a video explaining the process.
Fees and limits
You can put any amount of money into a MoneyPak ranging from $20 to $500. At Walmart, you can add up-to $1,000. Each MoneyPak has its own convenience fee of $4.95. For security reasons, PayPal restricts the amount you can add through MoneyPaks to $4,000 per month. There are no other hidden charges for adding funds into PayPal.
Unfortunately, MoneyPak is only available in places where there is a partner retail store. You can check whether it’s available in your area by visiting the MoneyPak Store Locator.
Once your money is transferred from your MoneyPak to PayPal, it will instantly be added to your PayPal account balance. You can then check your PayPal balance to see for yourself that the money has arrived. Now you can spend your money anywhere PayPal is accepted, including ebay!
Enjoy Guys! and don’t forget to post your comments. � MyTricksTime.com
Windows 8 is rife with features and behaviors that conspire to perplex even the most experienced PC users. Not all of them are bad, per se, but few of them are immediately intuitive. Making matters worse, the OS was primarily designed for touch control, and as a result, many mouse and keyboard commands feel like tacked-on afterthoughts.
But help is on the way.
Zoom in tight
See all your tiles and groups at once with semantic zoomThe Start Screen is full of nice, big, chunky tiles that represent all your apps. The tiles are easy to see in small groups, but what if you have hundreds of apps installed? Most will be hidden from view, unless you want to do a lot of scrolling. Enter the new semantic zoom feature. If you�re using a touch display, squeeze the Start screen with two fingers to receive a bird�s eye view of your entire screen contents. And the feature is also available to mouse and keyboard users: Simply hold down the Ctrl button, and use your mouse wheel to zoom in and out.
Categorize your apps
Start screen customization for the organized.
Your Start screen can become a cluttered mess if you collect too many apps and other elements that have been pinned to the screen as tiles, so take advantage of built-in organization tools that let you divide everything into labeled groups.
First, drag all the tiles you want to assign to a single group to the far right-hand side of your Start screen in vacant territory; the OS should sequester the tiles together. Once you’re satisfied with your assembly, use semantic zoom (described above) to get a bird’s eye view of your desktop. Now right-click the group (or simply drag down on it), and select the “Name group” option on the left of the bar that appears below. Type in the name, and enjoy your newly organized Start screen!
Close an application
Closing an app sounds simple enough, but you’ll quickly notice that close buttons are hard to find in Windows 8. That’s because Microsoft encourages us to run apps in the background where they’ll take up minimal resources, but still be accessible at any time.
Nonetheless, if you insist on being rebellious, you can close an app by dragging it with your mouse or finger from the top of the screen all the way down to the bottom.
As you drag the app will miminize into a thumbnail, and when you reach the bottom, it will disappear from view. Alternatively, you can still close apps via Alt + F4 and through the Task Manager.
Use centralized, contextual search
Search for anything in any app from one place.
The Search function located on the Charms bar is packed with power, letting you search the directories of not only your Windows 8 machine, but also the greater Windows ecosystem. Simply choose the bucket of data you want to sift through�it could be all your installed apps, your system settings, your files, your mail messages, or even an external service like the Windows Store or Bing Maps�type in a keyword, and hit Enter. The Search function will then return the results, perfectly contextualized for the database you�ve addressed
Oh, and how’s this for cool? You don’t even need to hit the Charms bar to access Search. From the Start screen, simply start typing, and you’ll be quickly whisked to the text-entry field for search queries. Try it. It works!
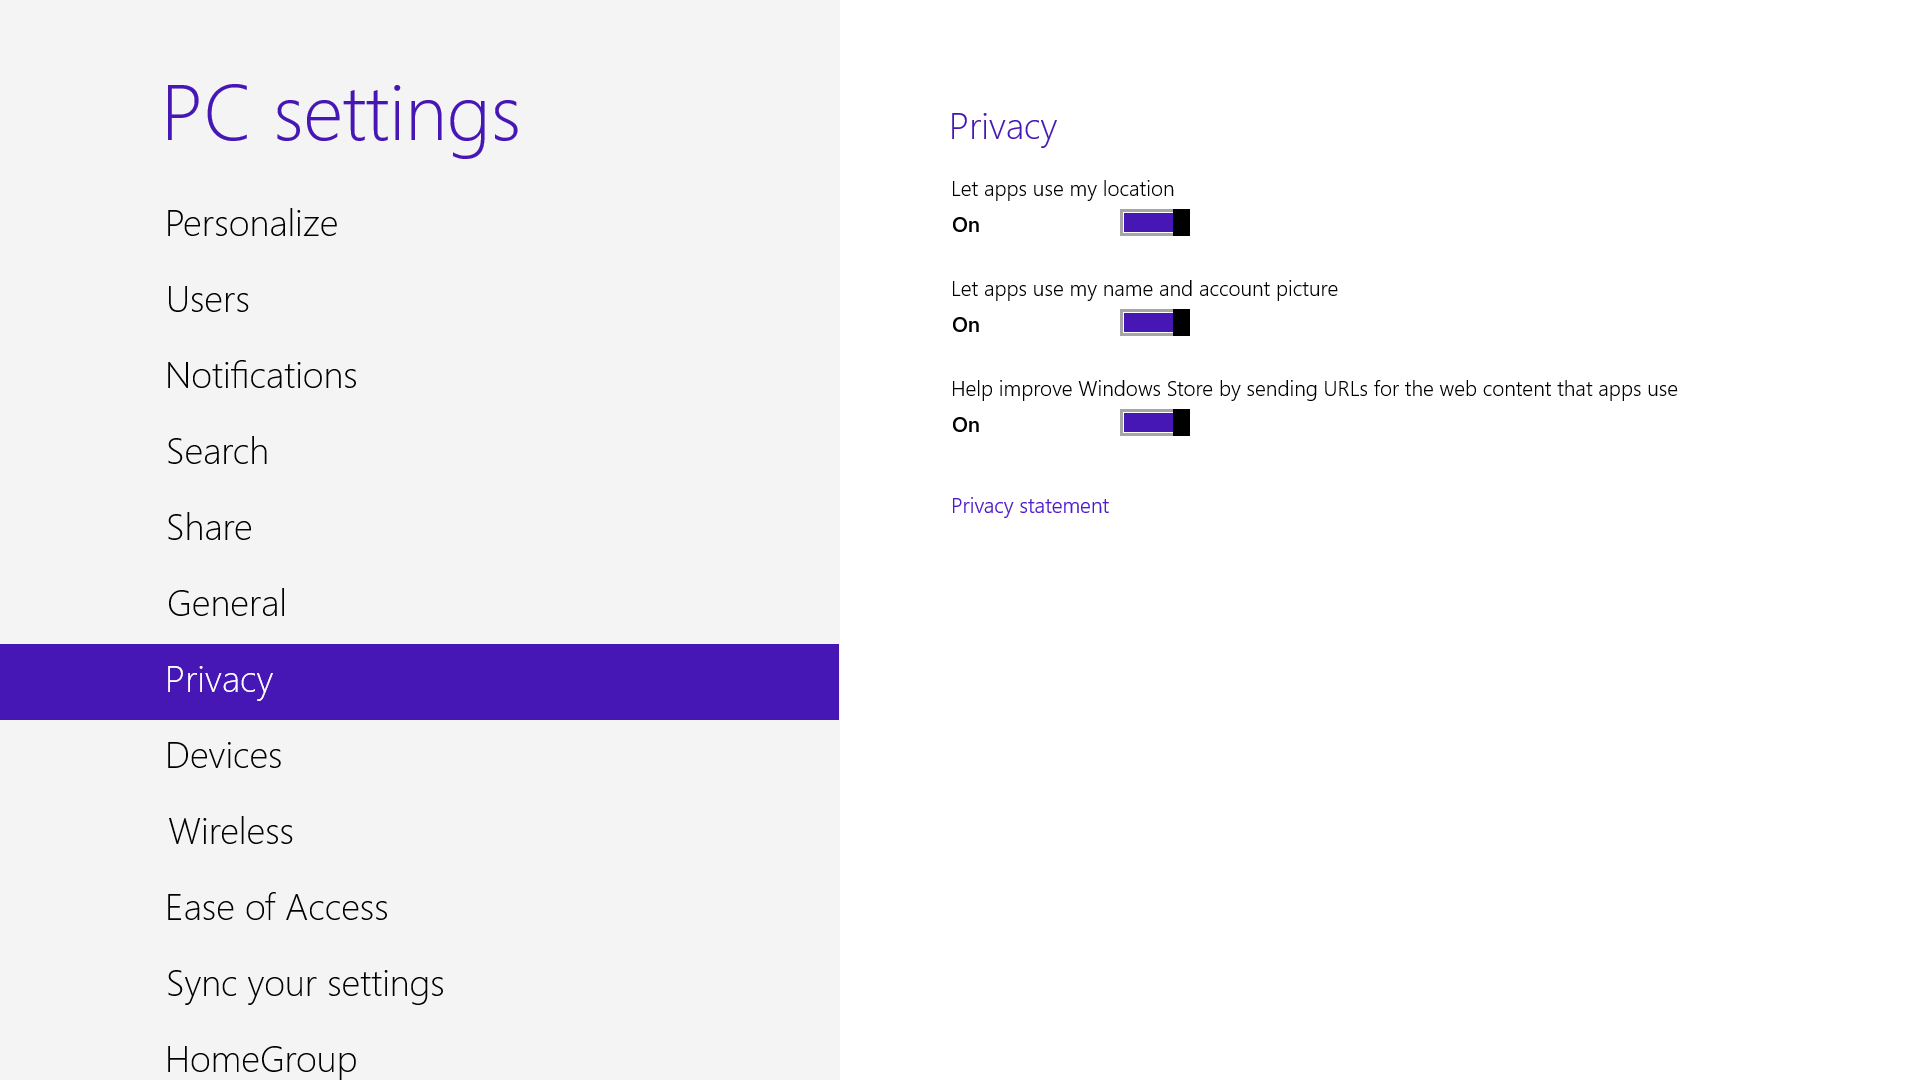
Adjust privacy settings
Customize your privacy settings to your liking.
A lot of apps tap into very personal information by default. Indeed, your pictures, location, and name are liberally woven throughout the system, and like many users you may not be comfortable trusting your machine with that much sensitive data. To adjust the settings, press the Windows key + I, and go to Change PC Settings. Select the Privacy option, and personalize the settings for your personal data there.
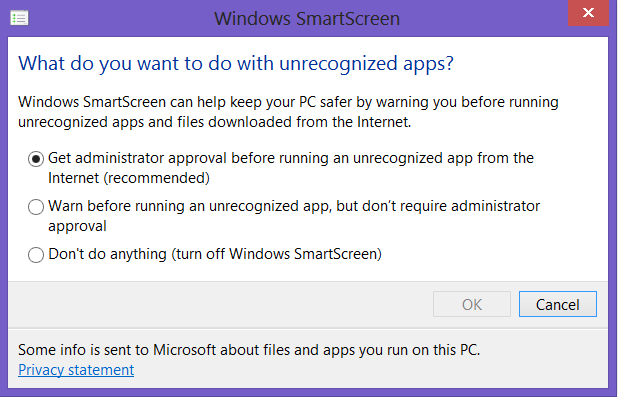
Adjust SmartScreen settings
Choose your own level of safety with SmartScreen.
SmartScreen warns you before running an unrecognized app or file from the Internet. While it’s helpful to be aware of a file’s source, constant warnings can also get a little annoying. By default, you need an administrator’s permission, but this can easily be adjusted to just a warning or no indication at all. Using the magic search function described above, type “security” at the Start screen and find the “Check security status” in the Settings tab. From this area, you can adjust various security settings, including the Windows SmartScreen.
Bring up the Quick Access Menu
The secret Start button for power users is hidden at the bottom-left.
Right-clicking on the lower left of the screen�whether you�re in the Windows 8 Start screen or in the desktop�will bring up the Quick Access Menu, which enables a direct line to many key system management chores, including Disk Management, Task Manager, Device Manager, and Control Panel.
Use Windows 8 apps and your desktop simultaneously
Because the Windows 8 experience is split between new Windows 8 Store apps and old-school desktop apps, the operating system is prone to some strange behaviors. Case in point: When running a multimonitor setup, Windows 8 apps will consume your main screen, leaving your secondary screen running the desktop. This arrangement wouldseem to allow full-screen multitasking among both types of apps�a modern app on the left side, a desktop app on the right side�but this isn�t the case. Indeed, as soon as you begin using the desktop on your secondary screen, the new-style Windows 8 app disappears, and your primary screen begins running the desktop.
But here�s a workaround. On your primary screen, use the new Windows 8 split-screen �snapping� function to run the desktop and a new Windows 8 Store app together. The desktop can take up the left-hand sliver, while the Windows 8 app consumes the majority of the screen. Now use your second display for a full desktop view. In this arrangement, you can fully multitask between new-style apps and desktop apps, and both windows will be large enough to be useful.
Go to Task Manager for Startup items
Task manager is more useful than ever.
You no longer have to run the MSConfig program to change startup items. Startup items now show up in a tab on Task Manager. Simply press Ctrl + Alt + Del and select Task Manager. Click the “More details” tab at the bottom and find the Startup tab at the top.
Share and share alike
Play with the Share charm in every app.
Windows 8 is Microsoft�s first social-media-aware PC operating system. Using the Share button located on the Charms bar, you can pick any number of elements from your Windows 8 Store apps�say, a location from your Maps app, a news story from the Finance app, or a even a contact from your People app�and then distribute that item to friends via other Windows 8 programs.
Perhaps most conveniently, you can quickly share a photo via email or Twitter, or to your own SkyDrive or Windows Phone. The Share button is contextual, and the more you use it, the more you�ll discover which apps share with each other, and which don�t. (Hint: None of your desktop apps offer sharing opportunities through the Charms menu.)
Create a picture password
A fun way to protect your system.
Using a picture password is a fun way keep your device secure while not having to remember a complex password. To enable it, press the Windows key + I to get to the settings charm. Click “Change PC settings” at the bottom right, and go to the Users tab. Under “Sign-in options” will be the “Create a picture password” button. This will give you the option to choose any picture, and then define three gestures anywhere on the image. Your gestures can be circles, swipes and clicks.
For example, to set a picture password for the image above, you could click on the highest palm tree, draw a circle around the island, and then swipe down from the lens flare in the upper right. Just beware: The direction of each gesture matters! After confirming it a couple times, your picture password will be set.
Boot to the desktop without an app
Skip the Start screen and get right to the Desktop.
One of biggest complaints about Windows 8 is that it boots straight to the Start screen�an annoyance for many committed desktop users. The Start8 utility helps you avoid this indignity (among other cool features), but you can actually boot straight to the desktop without installing anything extra.
Go to the start screen and type in “schedule” to search for Schedule Task in Settings. Click on Task Scheduler Library to the left, and select Create Task. Name your task something like “Boot to desktop.” Now select the Triggers tab, choose New, and use the drop-down box to select starting the task “At log on.” Click OK and go to the Actions tab, choose New, and enter “explorer” for the Program/Script value.
Press OK, save the task, and restart to test it out!
Log in without a username or password
To speed up the log-in process, you may want to disable the username and password log-in screen. You can do so by opening the Run window (press the Windows key + R) and typing in “netplwiz” to access the User Accounts dialog box. Uncheck the box near the top that says “Users must enter a user name and password to use this computer.” Click OK, and enter the username and password one last time to confirm your choice, and you are all set for easy access to your system.
Refresh your PC
If your system is feeling a little sluggish, it may be time for a refresh. In the past we would have to find our copy of Windows 7, back up all of our data, and perform a fresh install to enjoy that back-to-factory-fresh feeling. But now Windows 8 allows you to perform a fresh install from within Windows without losing any data.
In order to perform the refresh, go to Settings and click the Change PC Settings tab near the bottom. Select the General tab and find the “Refresh your PC without affecting your files” section near the middle (you may also select “Remove every
Start in Safe Mode
Safe Mode is a great way to get into your system when something won’t allow you to start up normally. Troubleshooting becomes a breeze when corrupted drivers and files aren’t loaded that prevents a system from functioning. It used to be as easy as pressing F8 when the system starts up, but doing so with Windows 8 will take you to Automatic Repair Mode. The trick to getting back to good old fashioned Safe Mode? Hold down the Shift key and press F8 while booting up.
This takes you to the Recovery mode. Select “advanced options,” then “troubleshoot,” then the “advanced options” again (there are a lot of advanced options). Select Windows Startup Settings and finally the Restart button. This will reboot the computer and give you the option to boot into Safe Mode.
If you need to get into Safe Mode from within Windows, open the dialog box (the Windows key + R) and type “msconfig” (no quote marks). Select the Boot tab and check the Safe boot box. The system will continually boot into Safe Mode until you go back and uncheck the box.
Turn Live Tiles on and off
thing and reinstall Windows” to get the true factory settings treatment). Select “Get started” and press “Refresh.” After a few minutes the PC will restart, and you will have a fresh copy of Windows 8.
When looking at the plethora of tiles on your Start screen, the view can get stagnant, despite all the pretty colors.This is where Live Tiles come in. They offer real-time data right on your Start screen, and you don’t need to open any apps. For example, the Weather tile will show you the current conditions, and Mail will show you the subject of the latest message you’ve received.
You can customize which apps are live and which aren’t by right-clicking on the tiles. A settings bar on the bottom will pop up with an option to turn the Live Tile on or off. Simply select the preferred option, and you’re all set. Note, however, that not all apps have a live, real-time data-streaming option.
Find the Windows games folder
Currently, the games folder used in Windows 7 isn�t present in Windows 8. Fear not; if you install any current-generation PC game that would regularly save to this folder, the folder is automatically created. For a quick way to find it, right-click on the game icon on the Start screen and choose �Open file location� at the bottom.
Activate Family Safety
Let your kids play without having to worry
Want to avoid some nasty surprises on your credit card? Create a separate, standard account on the device for your kids (Family Safety can’t be applied to an administrator account). You can activate Family Safety by going to the Control Panel, User Accounts,and Family Safety, and selecting the account you would like to apply it to. From these settings you can get reports on the account’s activity; set a level of Web filtering; set time limits; and enforce Windows Store, game, and app restrictions.
Shut down with one click
Windows 8 hides the Power button in the Settings menu, forcing a multistep process just to shut down one’s PC. But thanks to a crafty shortcut trick, you can pin a Shutdown button right onto the bottom of your desktop. Here’s how.
Create a shortcut on your desktop (right-click, go to New, then Shortcut). Enter “shutdown /s /t 0” (with no quotes, and, yes, that’s a zero not an “O”) as the location of the item, and press Next. Now name the shortcut (prefereably “Shutdown”) and press Finish.
Right-click the shortcut, and navigate to Properties. Choose Change Icon in the Shortcut tab, and then OK to leave the warning box. Choose an icon of your choice from the list. In the screenshot above, you’ll see we chose a Power button.
Right-click the shortcut again, and select Pin to Start. You can place the icon on your Start screen wherever it’s convenient. Clicking it will instantly shut down your computer
Enjoy Guys! and don’t forget to post your comments. � MyTricksTime.com
Think you know your Mac? Think again: it’s bursting with tons more awesome tricks, shortcuts and things that make you say ‘Wow!’ than you could possibly know!
Even the best of us can forget them from time to time, so check out these ten top tricks� taken from MacFormat’s ’50
awesome things you forgot your Mac could do’ issue � and discover some amazing trickshots.
The mouse is great and all, but don’t be afraid to favour keyboard shortcuts instead of a series of clicks (don’t worry, it won’t get jealous). The developers have put in tons of keyboard shortcuts that will help you save time, and here’s the best part: you can create your own custom ones too, for any of your commonly used menu options. Just go to System Preferences > Keyboard > Application Shortcuts and then pick your own selection of keys to replace the tiresome journey the cursor would have otherwise made.
Everyone’s got their own set of ‘evergreen’ apps � those that are constantly open whenever they fire up their Mac, regardless of the activity they might have planned. Wouldn’t it be great if said selection of apps automatically opened every time you switched on your computer? You can guess where this is going, can’t you? That’s right, the options await at System Preferences: select yourself from Accounts, and then visit Login Items.
3. Connect to the internet through your iPhone
Got an iPhone to accompany your Mac? Your mobile device comes with a feature that enables it to share its 3G or 4G mobile broadband connection with other devices (though this must be allowed by your network operator), making it perfect for getting your Mac online wherever you are. You can share the signal through Wi-Fi, Bluetooth and USB. First turn on the iPhone’s Personal Hotspot option in Settings. Then you can either pair them both over Bluetooth, manually connect them using a USB or select the Wi-Fi network created by the iPhone in the Mac’s Wi-Fi options and enter the password.
4. Sign here, here and here
There’s no need to feel restricted while using a Mac. Need to add a signature to an important document? Not a problem: in OS X 10.7 and later you can do exactly that using Preview. Within Preview’s Preferences, go to the Signatures tab and then click on the +. Scrawl your name in black ink on white paper, hold it up to your Mac’s webcam, line it up and click Accept. Make sure you save it so you can use it again in the future, whether it’s for writing letters or answering fanmail�
5. Record screencasts
Question: what’s the best way to record a problem you’re experiencing on screen or to make an instructional video demonstrating the use of an app? Answer: record a video of your screen � after all, that’d be the most useful if you were on the receiving end, right? You can do so through QuickTime Player. In File > New Screen Recording you can chose the audio source and even whether or not to include the mouse clicks in the recording! To neaten any rough edges, you can tweak it in iMovie, and then upload it to YouTube or AirDrop it to say, a relative’s Mac.
6. See the hidden options
It can be infuriating when trying to locate the right menu path, but not on the Mac’s watch. Holding down the Alt key on your keyboard actually lets you get to more options in the menu bar, as well as in the menus themselves. It’s a neat little time-saver; for menu options with ellipses for example, holding down Alt and then clicking them bypasses the dialogue that would have otherwise appeared and executes the command directly.
Enjoy Guys! and don’t forget to post your comments. � MyTricksTime.com
The all new HTC One will be unveiled officially on March 25th, but three weeks before that date and just around the Oscars, a drama worth an academy award unveiled. A kid named Roshan Jamkatel got his hands on the new HTC One and posted a full-on 12-minute video preview with the yet unannounced phone, thus breaking an NDA his father (an HTC employee) had signed, but also breaking a lot of the secrecy around HTC�s next big thing.
Truth be told, there wasn�t all that much secrecy left, as leaked images had already surfaced from all places, revealing the more intense metal design of the new HTC One and its one key feature – a �Duo� camera on its back, but up until now the leaks were mostly images, not a full-on video.
So what will the new HTC One look like? Read on to find out our recap of all the new features, a look at the �Duo� camera and what it could offer, as well as specs and release date.
�Duo� camera – two cameras on its back
HTC teasing the dual camera on the new One
The all new HTC One will be the first phone to feature two cameras on its back. We have actually already seen smartphones with dual rear cameras, but their goal was 3D photography, while the cameras on HTC�s new big thing are said to contribute to improving traditional 2D photography rather than 3D.
The actual process of taking a photograph actually looks pretty much identical to what you are used to – you see a single image through the viewfinder. The benefits of the dual camera become visible once you open a captured image as you can apply �Duo effects� to the picture. We�d guess HTC has bundled in effects like post-capture focusing, a depth map and the possibility to erase objects from an image, but we are yet to see. The big changes in the actual shooting process should be in faster focusing, depth of field and overall image quality. We have also seen demonstrations showing how dual cameras can be used to achieve lossless zoom, but we don�t know whether the camera in the new HTC One will support that.
The camera interface is also overhauled and now you can select from six main shooting modes. The regular camera and video modes are what most consumers will use most of the time, but there are also a �Zoe camera�, �Selfie�, �Dual capture� (recording simultaneously on your front and rear cameras), and �Pan 360� (360-degree panorama) modes.
HTC is also said to still use UltraPixel technology, but in an improved form. That’s good news, as we have found the camera on the HTC One to be sub-par to its peers.
Design: more intense metal
With so many leaked images, it seems clear that the new HTC One will feature a design very similar to the HTC One, with two front-facing speakers and an aluminum unibody, but with an even more intense metal finish, with more pronounced metallic texture.
The all new One should feature a slightly larger, 5-inch display with a resolution of 1080 x 1920 pixels. Rather than having capacitive navigation keys below the display, the new flagship will sport on-screen buttons. All in all, it looks just a bit larger (both wider and taller) than the 2013 HTC One.
Rumored specs for the new HTC One
All new interface: Sense 6.0
The new HTC One is expected to ship with the latest Android 4.4 KitKat on board and a re-imagined Sense user interface on top of that. The new Sense is expected to carry the 6.x version, but it is not a huge change over the current one.
The BlinkFeed news aggregator is still a swipe away (but it�s been improved) and now you can swipe twice to see its contents by category. The overall visuals have not changed much either – you still have a vertically scrolling app drawer and similar aesthetics. The two biggest changes are in the camera app and the settings menu. The camera app now has large, round icons that are easy to tap on, and in settings the icons have also been simplified, getting that trendy flat styling.
Specs
Under the hood, the new HTC One is expected to ship with a quad-core Snapdragon 801 system chip (likely, the MSM8974-AB version of it) with 2GB RAM. This is the same chip that powers devices like the Samsung Galaxy S5 and the Sony Xperia Z2, (the Z2 has slightly more RAM – 3GB) so it should be more or less on par with the top performers. We�re yet to see detailed benchmarks, but it is only logical to assume that it will run even the most demanding of games with ease.
The new and exciting thing under the hood is support for expandable storage. The new HTC One should come with a microSD card expansion slot (the current model does not support microSD cards), so you can expand the storage freely.
Official announcement set for March 25th, coming to all carriers
HTC has already set the date for the official unveiling of its next flagship – it�s March 25th, with events simultaneously taking place in New York City and London. The new HTC One has also cleared FCC certification recently, and we have all reasons to believe it will arrive on all four major US carriers – Verizon, AT&T, Sprint and T-Mobile – as well as internationally. Source-www.phonearena.com
Enjoy Guys! and don’t forget to post your comments. � MyTricksTime.com

+rumor+round-up.jpg)


