How to find (or erase) a lost Android device

Locked Nexus 5If you�ve ever needed to find a misplaced Android device, or if you�ve ever feared that it has fallen into the wrong hands, good news: Android has a few security features that are relatively simple to turn on and use, thanks to Google�s Android Device Manager. The only catch is that you need to enable these settings now, because you can�t do so remotely once your device has been lost or stolen. So let�s get going.

Turning on Android Device Manager
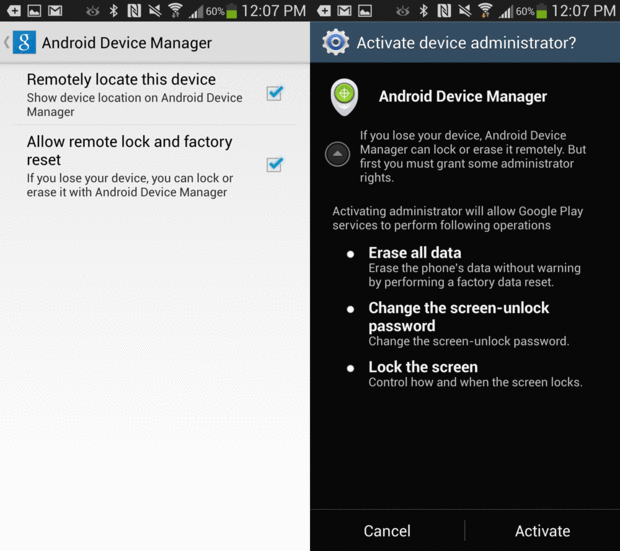
To activate Android Device Manager, you can use your mobile device or the browser-based Web interface. On your device, open the Google Settings app. Tap Android Device Manager, and on the following page check one or both of the boxes for Remotely locate this device and Allow remote lock and factory reset. When you check the lock-and-reset option, the screen prompts you to turn on the Device Manager. Tap Activate, and you�re all set.
Android Device Manager activation
If you�re having trouble finding the Google Settings app, you can instead use a Web browser and Google�s Android Device Manager page. After signing in to your Google account, you�ll see a Google Maps page with an options box in the top-left corner. All of the compatible Android devices registered to your Google account will appear in a drop-down menu within that box.
Until you enable the Android Device Manager on each device, you will not be able to use any of the features. To initiate the setup process using the Web interface, choose the device you wish to activate from the drop-down menu and then click the Setup Lock & Erase option.
This action will send a notification to your device prompting you to set up Android Device Manager. Click the notification to open the Device Manager settings, and then choose Activate. (If your device is turned off, you�ll receive the notification the next time you power it on.)
Locate, ring, lock, or erase
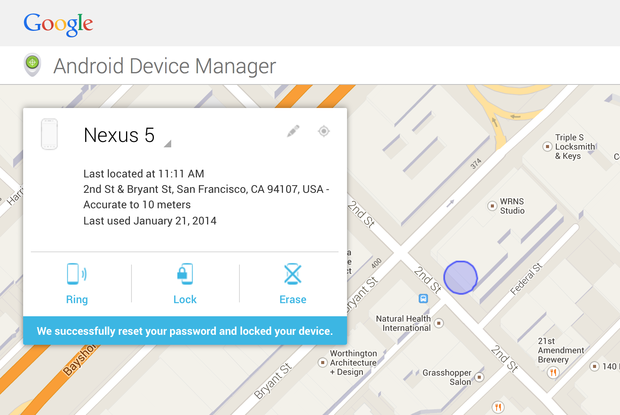
After you enable the Android Device Manager and open the Web interface, you see your device�s location within 20 or so meters on a Google Maps page. If your device�s location doesn�t appear immediately, you may have to click the location icon in the upper-right corner of the dialog box on the Maps page. (You must also enable location access for devices running Android 4.1 and higher.)
android device manager
You can also use Android Device Manager to do three things with a lost or stolen device: initiate a ring, even if the device is set to silent or vibrate; remotely lock the device and change the password; or completely erase all of your data and return the device to its factory settings.
The ring option can be particularly helpful if you misplace your device around the house. Select that option, and your device rings at full volume for five minutes or until you press the power button to silence it. (If your device is not on a network, is powered off, or has a dead battery, it will not ring.)
When you choose the lock option in Android Device Manager, you see another pop-up box with two fields, one for your new password and another to confirm it. Fill in both fields and click the Lock button, and your device is immediately locked and secure with your new password. This isn�t a one-time password: The feature changes your device password (and adds one if you didn�t have one before). To remove it, you need to launch the Settings app, tap Security, and adjust the Screen Lock setting.
Finally, you can erase and reset your device remotely using Android Device Manager. Select the Erase option in the Web interface, and you�re prompted to confirm the action and acknowledge that the procedure will erase all of the data from your device and reset it. If you confirm the erase, the device erases itself and reboots. (Android Device Manager does not work when a device is powered down, but actions you initiate while the device is turned off are performed as soon as the device connects to a wireless network again.)

10 Google Play tips and tricks every Android user should know

1 googleplaywebinterface
Google�s Play Store is your official Android portal for apps, games, movies and TV, books and magazines, and more. But Google Play isn�t just about content; it�s also a valuable tool
for managing your various Android devices, setting notifications for apps and services, enabling automatic software updates, and personalizing your Android experience.Here are ten tips and tricks for getting more practical value out of Google Play.


1      Manage your devices via the Web

     In addition to accessing the on-device app store, you can reach Google Play via your Web browser. The Web interface offers an array of options that aren�t available through the Android-based app store, including the ability to see and manage all of the Android devices associated with your Google account.To see a list of all your Android devices, visit Google Play at play.google.com. Click a content option in the vertical menu on the left side to see a Settings icon that looks like a small gear in the top-right of your display. Click that icon to view a list of your registered devices. (If you don�t see the Settings icon, try choosing another content option from the content menu.)

To change the name of a device in the list, click the Edit option, type the new name in the Nickname text field, and click Update to save your changes

2. Manage mail preferences and notifications

   The Play Settings screen also lets you update your email preferences and notification settings. Open the Web-based Play settings, using the process described above, and then scroll down to the bottom of the screen, where you�ll see two check boxes. If you want to receive news and promotions from Google Play, fill in the first box. If you want to receive email notifications from developers seeking feedback on the apps you use, check the second box.

3. Review orders, report problems, and request refunds

     To see a handy list of all of your paid transactions on Google Play, first click the Play Settings icon�but this time, instead of choosing the Settings option, click My Orders.

The orders list provides details about the specific content you�ve purchased or downloaded, including the item�s full name, price, transaction date, content type, and status (complete, cancelled, shipped, or whatever). To filter your purchases by content type, use the All Orders menu in the top left corner, above the list of purchases.

To report a problem with an app, product or service, or to request a refund, find the specific purchase in the orders list and hover your pointer over that name in the list. A set of three vertical dots will appear to the right of the name. Click the dots and choose the Report a Problem option. A popup box with a drop-down menu and a set of options specific to the content type will appear. Choose the appropriate option from the menu, and you�ll see a list of possible resolutions. If the suggestions don�t help, fill in the text field with appropriate details and submit your request. You should receive some type of email receipt after submitting a request.

4. Password-protect your orders

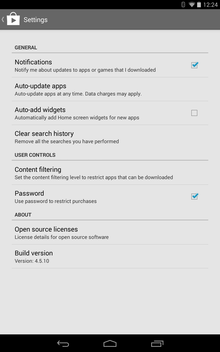
It�s a good idea to password-protect your Google Play account, to avoid unwanted or accidental purchases�especially if multiple people (including children) frequently use your device or devices.To enable Play password protection, open the Google Play app on your Android device, tap the three vertical dots in the top right corner of your display, and choose Settings. In the User Controls section, you�ll see a box next to Password. Enter a password there, and then confirm it to enable the setting.

After turning on password protection, you�ll be prompted for your password whenever you make a Play purchase. You can make additional purchases without reentering your password for up to 30 minutes after your most recent purchase.

Some devices enable password protection by default. If the Password box is checked, your account is already protected.

5. Automatically update your Google Play apps
Google Play in-app settings

Google Play�s ‘Auto-update apps’ setting lets you automatically update your apps and games so you don�t have to update them manually. Activating this option will reduce the number of (potentially annoying) update notifications you receive, too.

To enable automatic app updates, click the Menu icon (the three vertical dots) in the top right corner of your Google Play Android app and choose Settings. Under the General section, you�ll see an option for Auto-update apps. Tap that option and confirm it in the popup box.

You may still occasionally receive notifications to approve app updates if permissions change, but most of your apps will automatically update after you enable this setting.

6. Automatically add widgets for new apps

Widgets are among the best things about Android apps. They bring app features onto your Android home screen for quick viewing. And Google Play lets you automatically add a widget to your home screen for any new app you download, assuming that the app has a widget.

If you frequently download lots of apps, this setting may be a bit much, because unlimited widgets can become too much of a good thing. But it�s a good way to quickly determine which apps have widgets and whether they�re useful to you. And deleting widgets you don�t want is quite easy.

To enable the auto-widget option, open your Google Play app, tap the three-dot menu icon in the top right corner of your screen, and choose Settings. Then fill in the box next to Auto-app widgets, in the General section.

7. Filter Google Play content
Google Play content filters

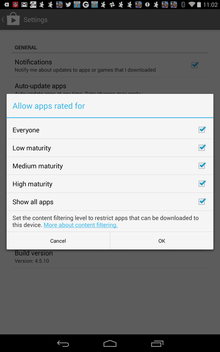
To view and modify your content settings, open the Google Play app, click the three-dot menu icon and choose Settings. Under User Controls, choose Content filtering options. You can customize those settings by checking or un checking the boxes next to the five filter options under ‘Allow apps rated for’, which include ‘Everyone’, ‘Low maturity’, ‘Medium maturity’, ‘High maturity’, and ‘Show all apps’.

8. Browse for new apps and send them to your device from the Web

Sometimes it�s easier to search for new Android apps, games or media by using your Web browserthan by using the mobile app. If you use both an Android phone and an Android tablet�or various Android devices�you can use the Play Web interface to send new apps and content to specific devices quickly and easily.

When you find an app or other download you�re interested in while using the Web interface, tap the Install or Buy button on the download page. After logging in to your Google account, you�ll see a pop-up box containing a list of the app permissions and, at the bottom of the box, a drop-down menu listing all of the Android devices linked to your account. Choose the device you want to send the app to and confirm the download. If you want to download the app to multiple devices, walk through the process again, but this time choose another device from the drop-down menu.

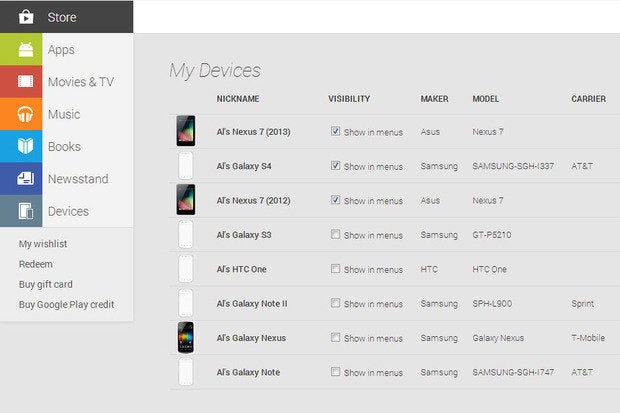
9. Remove devices from menus
All Android devices you connect to your account show up in your Google Play devices lists, but you can remove them from menus by modifying your Visibility settings. For example, if your last phone was a Samsung Galaxy S3, but you recently updated to a Galaxy S4 and no longer want the GS3 to show up when you download new apps in the Web interface, you can remove the old GS3.

Using the Web interface, open your Settings menu (as described in tip 1 above). On the My Devices page, under the Visibility column, uncheck the boxes next to the device or devices you want to remove from your menus. Then refresh the page and confirm that the boxes are still unchecked; if necessary, uncheck them again.


10. Filter tablet-optimized apps
Google Play designed for tablets
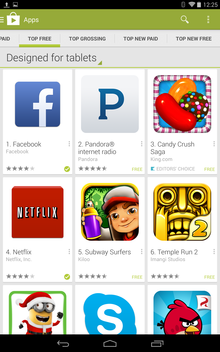
Finding apps that are designed for tablets in Google Play is simple, thanks to a newish Designed for Tablets section in Google Play. To access that section, open the Google Play app on your tablet and tap the Apps option at the top of the page. Drag a finger to the left of your screen to scroll from the homepage to one of the following pages, and choose Designed for Tablets from the drop-down menu at the top of a page.
Enjoy Guys! and don’t forget to post your comments. � MyTricksTime.com
How to secure your iPhone or iPad from unauthorized pairing using Apple Configurator

Apple was recently accused of creating �backdoor� services in iOS that make it easier for government agencies to spy on users without their knowledge, although the iPhone maker promptly denied those claims in an official response issued yesterday, and followed it up by publishing a support document that provides information about the diagnostic services. Regardless of what you choose to believe, we  prepared this step-by-step guide on how to secure your iPhone or iPad from unauthorized pairing using Apple Configurator. 

Forensic scientist and iPhone jailbreak expert Jonathan Zdziarski who had raised the concerns  recommends pair-locking your iPhone, iPad, and iPod touch using the Apple Configurator tool to prevent anyone from dumping your private data, installing malicious apps, or doing anything malicious.
Keep in mind that by following these instructions, you will be inhibiting the ability to pair your iPhone or iPad with another device and its services. If you regularly sync your iOS device with iTunes on a Mac or PC, this solution might not be ideal for you. But if you are determined to maintain your privacy and value the comfort of knowing your personal information is safe, read ahead to learn how to secure your device.

You can download Apple Configurator for free from the Mac App Store.

Disclaimer
By changing your iOS device�s profile with Apple Configurator, it might force the latest iOS version to be installed and could wipe your content or remove your jailbreak as such.
Jailbreakers:
Jailbreakers can install the PairLock jailbreak app from Cydia which was released by Zdziarski last year, when he had first raised this issue.
How to disable unauthorized pairing on iPhone or iPad
Step 1: Open Apple Configurator.
Step 2: Click on the Prepare button in the top menu.
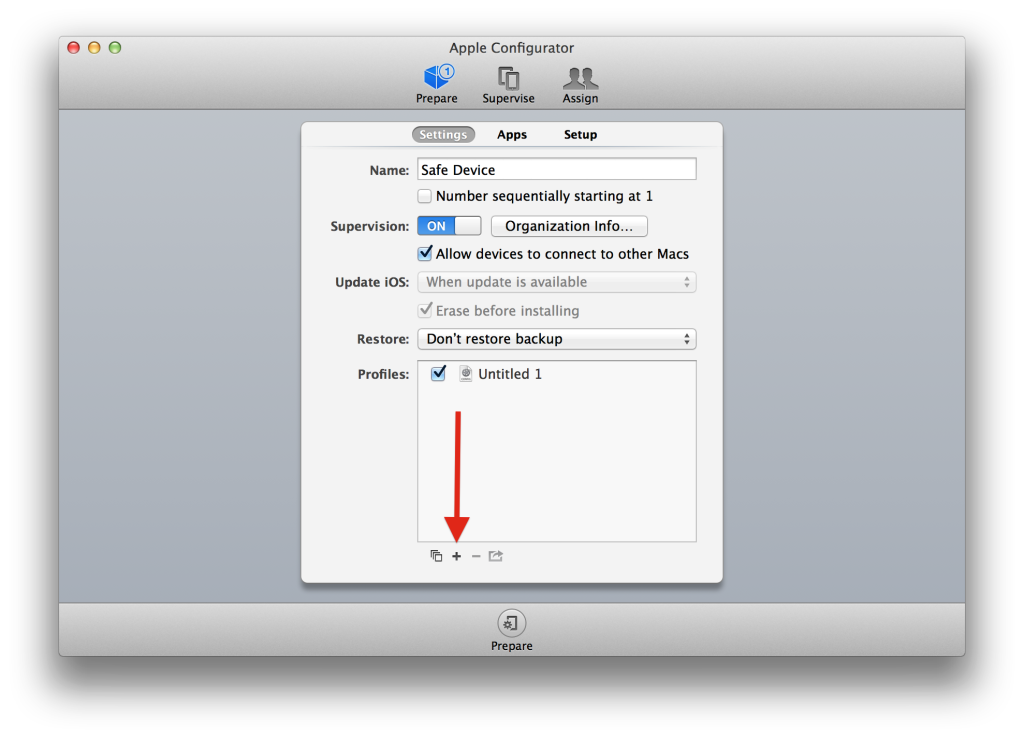
Step 3: Give the device a name � it doesn�t matter what you choose.
Step 4: Turn on the Supervision toggle switch.
Step 5: Uncheck the box for �Allow devices to connect to other Macs.�
Step 6: Click on the + sign at the bottom of the window.
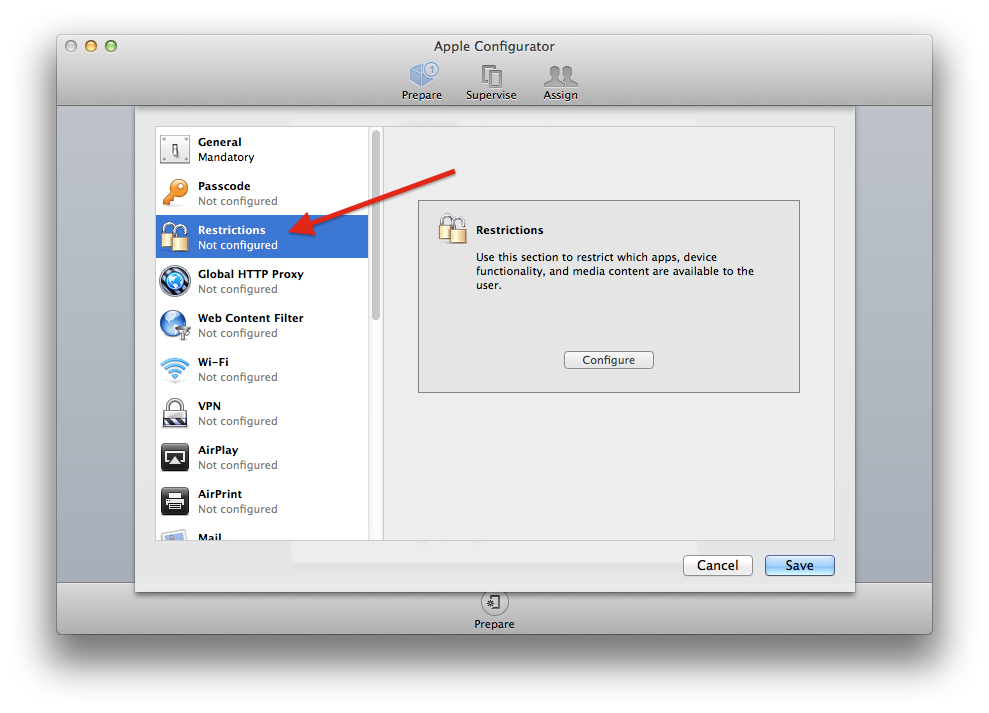
Step 7: Click on �Create New Profile��
Step 8: Click on the Restrictions menu.
Step 9: Click on the Configure button.
Step 10: Scroll down and uncheck the box next to �Allow pairing with non-Configurator hosts (supervised only)�
Step 11:  Click on the Save button.
Step 12: Check off the box next to the profile you just created. It should be called Untitled unless you named it.
Step 13: Click on the Prepare button.
Step 14: Fill in the organization information with whatever details you wish, even if they are not accurate.
Step 15: Click on the Done button.
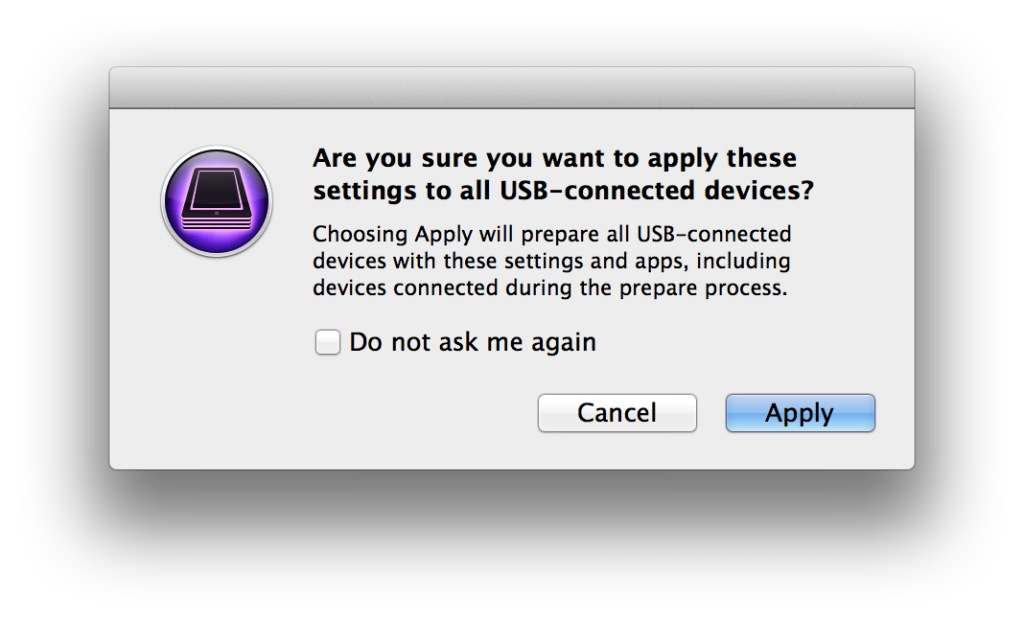
Step 16: With your iOS device plugged in to your Mac or PC via sync cable, click the Apply button.
It is also recommended that you take additional security measures to protect your iOS device against unwanted usage or data snooping, by enabling two-step authentication and setting a strong password in conjunction with a password manager like 1Password.

Enjoy Guys! and don’t forget to post your comments. � MyTricksTime.com

HOW TO BROWSE FREE WITH YOUR AIRTEL SIM CARD

Airtel Internet
For those of you guys who have Airtel sim card and it has been lying useless for several days because there’s no money for data subscription. I’ll congratulate you because there is a code to get free megabyte and of course, free browsing! This code is offered legally by the Airtel network as a bonus and it is very short and direct.
One thing you should note about this is that once you dial the code, you’ll be given 10 megabyte which you can use for just 7days, and after the 7days are over, your airtel code can not be dialed again to give you another 10 megabyte that’ll last for another 7days free.

Now the code. Just dial *141*
13*1#
and your airtel sim will be bestowed with 10 megabyte!
Three gbosa for airtel!

Enjoy Guys! and don’t forget to post your comments. � MyTricksTime.com

How to Save Google Maps for Offline Use

Modern smartphones have proven themselves to be substitutes for several handheld gadgets. They are no more just devices to make a call and send messages. They are a technological wonder that is used for browsing the net, listening to music, watching movies, playing games, capturing pictures and videos and so on. Equipped with a plethora of

sensors, they are also used as portable navigation devices.

Since smartphones and network and data oriented devices, they require a working connection to do things.Whether you are a frequent or occasional user of maps while travelling, the Google Maps is undoubtedly an indispensable tool for all. Whether you want to find the quickest route to a destination, or lost your way, the Google Maps is always there to help you, save the fact that you have a working data connection.
However, there might be situations when you are in an area with no cell connection, terrible network signal or no WiFi connection and you need the assistance of Google Maps. What would you do then? Fortunately, there is a way you can save Google Maps for offline use. Having saved certain map location or areas on you device, you can view them later when your device is offline.

Note:

However, there are certain limitations with the saved maps on your device. Google maps features like satellite, terrain, indoor maps, and 3D buildings are not available offline. The maximum size of a map area you can download in Google Maps is 50 x 50 KM.

How to Save Google Maps for Offline Use

Actually, we are not going to tell about anything new, we are just sharing the tip. The Google Maps app has this feature built-in. Now here�s how you can save Google Maps for offline use:
  1. First of all, make sure your device has a working data or WiFi connection.
  2. Then open Google Maps app.
  3. Tap the search bar (at the top of the screen), type the desired location/area name and tap the search button.
  4. When the map for that location is loaded, pull up the place info bar.
  5. Now tap the Save map to use offline option. Please note that only the area visible on the map will be saved. You can zoom in or out to select a smaller or larger area of the map. Also, if you notice The on-screen map area is too large issue while trying to save the map, try to zoom in the map to select a smaller area.
                                         
  6. Alternatively, you can also save a specific map area using this method: Search for it and when the map shows up on the screen, type ok maps in the search area. You will see options for saving the map for that area.
                                          
  7. Another Tip: Open Google Maps app, tap and hold the area.location you want to save, you will see an address or drop pin. Just tap on the address and you will see Save map to use offline option.
  8. Okay, now give a name to the map and tap the Save button. The map for the selected area will be save to your device and you can use it later.
  9. To use your saved maps later, just tap the side menu button, select Your places and tapOffline maps to see and manage saved maps. If you do not find these option by sliding the menu bar, tap the person icon on the search bar in Google Maps to access offline maps.
                             

We just hope the tips given above would help you enjoy your device better! Do you have more suggestions? Please do inform us via your valuable comments! In case you want more tips and tricks for your device or Android in general, please let us know!

Some More Apps for Offline Navigation:

Enjoy Guys! and don’t forget to post your comments. � MyTricksTime.com