How To Increase Ram In Android

Hello friends, today in this post i�m introducing a new technique and some tips How To Increase Ram In Android. This difference in hardware can greatly affect your phone, you can not use bigger size apps, and can not play heavy games or you can not run multiple application at the same time or the hanging problem and many more.
But everyone can not afford the high range phones. And majority of this problem is due to the processor and the ram size. So in this post, i�m talking about how to increase ram in android phone and you also play heavy games and use multiple applications

Note: Increasing ram does not mean that you are internally adding some hardware to your Android phone. Its not possible for a normal man to alter the hardware of Android device so as to increase its Ram. Its been risky and one need to be professional to change the hardware. And also manufacturer has some guidelines for this.  But don�t worry there is some simple way to increase ram in Android, you just need to follow the instruction. And you can easily increase your ram in maximum 10-15 minutes. Using this method or trick you can increase your ram upto 4 GB.

Requirements:

  • 1. SD card as you want but class 4 or higher SD Card will give excellent speed to your Phone.
  • 2. Rooted smartphone.
  •     Or Rooted Tablet (If you want to increase RAM and Internal Memory of it.)
  • 3. SD card reader
  • 4. Windows PC
  • 5. An internet connection for downloading a few softwares or you can get it from somewhere else also.

Partition Your SD Card:

First step you have to do is to partition your SD Card and for doing this you have to,
1. Download Mini tool Partition from Here
2. Install the application on your PC and connect your SD card to your PC with Card Reader.
3. Open Mini Tool Partition in your PC and when the wizards open click on your SD Card and select Delete option. (Note: This will format your SD Card completely mean that it will erase your data permanently, so previous to doing this backup your data at any place in PC or other Storage device.)
4. When the Formatting of your SD Card is completed then, you have whole of space of your SD Card as unallocated then Right click SD Card and select make option.
5. A popup box will open giving you options for making partition; select the partition as primary and file system as FAT if SD Card is less than 4GB or FAT32 if your SD Card is more than 4GB.
6. Leave about 512 MB or more space (your choice) for making the next partition.
7. Then select done and do right click on unallocated space of your SD Card and again click make option. Select Primary partition but change the file system to Ext2, Ext3 or Ext4.
Note: (Ext2 is not compulsory as most ROMs work fine with it).

How To Make Ram Of SD Card Android:

1. Click Apply Changes and then process goes on for the few minutes and then partition is completed.
2. Install Link2sd from Google Play or download and install the .apk format file from here to your phone.
3. On the first launch of the app, it will question for root permissions and then, it will question you the file system of the .ext partition that you had before made, choose the option as you had choose in the partitioning steps.
4. Sort the apps according to size and start linking them.

Enjoy Guys! and don’t forget to post your comments. � MyTricksTime.com

How to select all friends at once to invite friends on Facebook


Facebook invites are useful to invite your friends to view your website or to like your new Facebook page, you will see friends invite almost everywhere in Facebook.  Facebook invites are useful but a sometimes a hard job if you have large number of friends like me,
 i have 2525 friends on Facebook and thus it was very

difficult for me to invite friends one by one.When i started learning JavaScript, i came to know that we can easily select all check boxes by making a small JavaScript command line. 

But before we start, make sure you are using Google Chrome or Firefox, they are good and major browsers, so using them makes sure that it will not create any problems. I will explain it in step by step procedures.

  1. Open Google Chrome 
  2. Now open any event etc. where you can invite your friends
  3. Now scroll down until all your friends appears in the box
  4. Press CTRL+SHIFT+J (for Chrome), CTRL+SHIFT+K (for FireFox) 
  5. A window will open in bottom or top of the browser
  6. Paste this line of JavaScript code in the console
    javascript:elms=document.getElementsByName(“checkableitems[]”);for (i=0;i<elms.length;i++){if (elms[i].type=”checkbox” )elms[i].click()};


    After pasting click enter, now wait for a minute and and when all friends are selected click on send, if you have large number of friends it may take about 1 – 2 minutes for successfully sending the invites . 


    Enjoy Guys! and don’t forget to post your comments. � MyTricksTime.com

    Learn To Hide Files Behind The Images

    hide files behind images


    There are some important  files or document you want to hide from others on your computer. To do that you might be creating folder inside folder to hide such files but in todays tutorial  i will change this by teaching you a interesting trick to hide files behind images.To hide a file behind a image  means that if any one opens that image he will see the image, but to see the hidden file we need to open that image in a specific way. So lets get started .


    How To Hide File Behind Image ?

    In order to do this you should have basic understanding of command line, but if you don’t know check out  tutorial given below
    1. Select an image to be used for hiding file behind the image.
    2. Now select a file to hide behind the image and make it in .RAR format. With the help of the WinRAR.
    3. And most important is that paste both the files on desktop. You may do this anywhere instead of desktop if you have some basic understanding of command line.
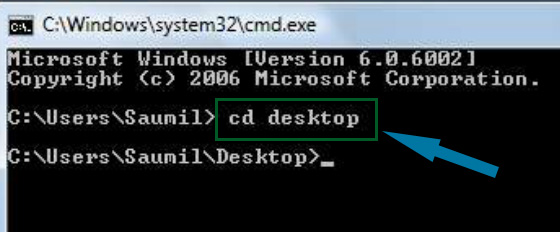
    4. Now open cmd by going to Start > Accessories Command Prompt and type following commands in it.

    cd desktop

    hide files behind images


    5. CD  stands for change directory by typing above command you change your directory to desktop. After that type command given below.

     Copy /b imagename.jpg + filename.rar finalimage.jpg

    hide files behind images
    • Replace imagename.jpg with the name of image you want your file to be hidden behind. Don’t forget to add image format (Eg: .jpg,.png,.gif)
    • Replace filename with name of your file you want to hide. It must be in .rar format.
    • Finally Replace finalimage.jpg with whatever name you want your final image with hidden files should be. This is the image where your file will be hidden.

    6. Now when you will try to open this newly created image it will open as normal image, but to open you hidden file you need follow steps given below.

    How To Access Hidden File ?

    To access your hidden file you need to open the newly created image in winrar. Just follow simple steps given below to do that.
        1. Open winrar
        2. Now locate your image and open it or simply drag your image in winrar.

        3. Extract the file  and done.

    Enjoy Guys! and don’t forget to post your comments. � MyTricksTime.com

    How To Add Facebook Like Button Below Blogger Blog Post Title

    Let your visitors like your content by adding Facebook Like Button to your post content. In this article I will teach you step by step on how to add Facebook Like Button below blogger blog post title with different button styles that suit to your content for example we have a standard, with box count, and with button count. Ok! Let�s start if you want more blogger tutorials and widgets you can visit my other blog at Trickiezone.

    For the demo, you can visit Facebook Like Button page.

    Instructions:

    1. Login to your Blogger account.
    2. Go to your blog Template section.Custom Robots Tags
    3. Then backup first your template.
    4. After that click Edit HTML.
    5. Find this

      <div class=�post-body entry-content� expr:id=�&quot;post-body-&quot; + data:post.id�>

      tag, how to do that? Just click the anywhere inside HTML editor and press Ctrl+F and input the tag and hit enter.

    6. Then copy the code below and paste it after

      <div class=�post-body entry-content� expr:id=�&quot;post-body-&quot; + data:post.id�>

      tag and save the template.

    7. View your blog content page and you�ll find the button below blog post title.

    Standard Code:

    <b:if cond='data:blog.pageType != &quot;static_page&quot;'>
    <iframe allowTransparency='true' expr:src='&quot;http://www.facebook.com/plugins/like.php?href=&quot; + data:post.url + &quot;&amp;send=false&amp;layout=standard&amp;show_faces=false&amp;width=450&amp;action=like&amp;font=arial&amp;colorscheme=light&amp;height=35&quot;' frameborder='0' scrolling='no' style='border:none; overflow:hidden; width:450px; height:35px;'/></b:if>

    With Box Count Code:

    <b:if cond='data:blog.pageType != &quot;static_page&quot;'>
    <iframe allowTransparency='true' expr:src='&quot;http://www.facebook.com/plugins/like.php?href=&quot; + data:post.url + &quot;&amp;send=false&amp;layout=box_count&amp;show_faces=false&amp;width=55&amp;action=like&amp;font=arial&amp;colorscheme=light&amp;height=65&quot;' frameborder='0' scrolling='no' style='border:none; overflow:hidden; width:55px; height:65px;'/></b:if>

    With Button Count Code:

    <b:if cond='data:blog.pageType != &quot;static_page&quot;'>
    <iframe allowTransparency='true' expr:src='&quot;http://www.facebook.com/plugins/like.php?href=&quot; + data:post.url + &quot;&amp;send=false&amp;layout=button_count&amp;show_faces=false&amp;width=90&amp;action=like&amp;font=arial&amp;colorscheme=light&amp;height=21&quot;' frameborder='0' scrolling='no' style='border:none; overflow:hidden; width:90px; height:21px;'/>
    </b:if>
    In my next I will discuss how to add this Facebook Social Plugin below blogger blog post, so stay tune for more updates.Enjoy Guys! and don’t forget to post your comments. � MyTricksTime.com

    TRICKS TO SEARCH FILES QUICKLY


    Hey Readers In Our Some Previous Post We Discussed Some Fun Tricks in the Post 10 AMAZING GOOGLE SEARCH TRICKS.Now Lets Have A Look at Some Cool Tricks To Search For APPS And Files with a Swing of Hand . These Tricks are Gonna Reduce Your Searching Hick A Lot . Have a look !!

    Write down the following code in the search bar…!!!


    To Find an EXE file …!!
    intext:  “parent directory” index:”[EXE]”
    intext:  “parent directory” index of:”[EXE]” 


    To find RAR file…!!

    intext: “parent directory” index of:”[RAR]” 

    Google will search for zip, rar , iso, bin etc….!!


    For Movies …!!!

    intext: “parent directory” intext:”[VID]”
    intext: “parent directory” index of:”[VID]”

    It will search for any video file type.

    We can also mention…

    intext:”xvid” or intext:”divx” for specific movie.

    For Music…!!

    intext: “parent directory” index:”[MP3]”
    intext: “parent directory” index of:”[MP3]”

    It will search for music files.

    For Games….!!

    intext:”parent directory” index of:”[Gamez]”

    To get the file….we can also mention the name of the file …. Eg:
    intext:”parent directory” index of:”avast” “[EXE]”
    Enjoy Guys! and don’t forget to post your comments. � MyTricksTime.com