How To Create/Design Contact Us Form For Blogger

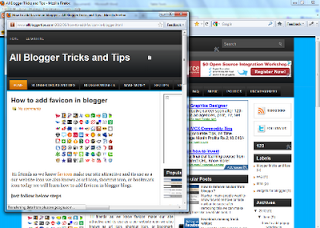
Blogger is best free CMS platform which becomes real competitor for WordPress in these days. Not doubt WordPress is too much extended  platform and easy to understand even your have technical knowledge or not. But in blogger you need some technical knowledge about basic HTML and js just because you need to setup some features manually. Blogger is not become vast and comes out with great feature within few last years. Now You can easily Design a great profession responsive blogger template and without using default boring theme. Even our safe tricks is at Blogger and but i also really don’t feel any kind of need to shift at WordPress just because i know how to use and develop every which i want at blogger.
Some major problem based by Bloggers which using and setup their blog at blogger platform is create a pages like contact us, sitemap page and while designing many other pages. I already discuss about how to design Sitemap according to label wise. So today i will explain you the method to design your contact us form. Many of users face problem while make contact us form page just because they don’t know to get fields like name, email, message and many other which will get submit just on single click. You can develop by using JavaScript and HTML but for non technique it really a great issue. So here i going to share a best way to create quick and easily contact us form with JotForm service.

How To Design Contact Us Form With JotForm ? 

  • First of Visit Official site of JotForm.
  • Then Setup Your New Account with the email address where you want to receive contact message and then login.
  • Now Click on MyForm option from the menu and click on create form.

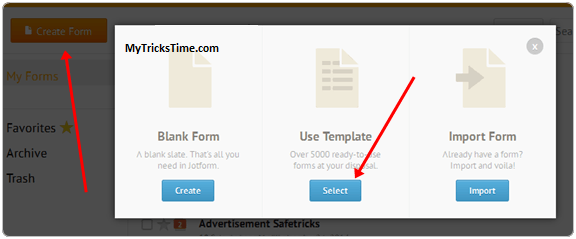
  • New Window will appear with three option just select use template option and thousand+ different style form will appear just select template you like and click on continue button.
  • Now Customize your Form and simply add and remove option available on left sidebar. Every thing is done just by doing Drag and drop.
contact us form jotform

  • After finalizing your form design just click preview button and then click Form source

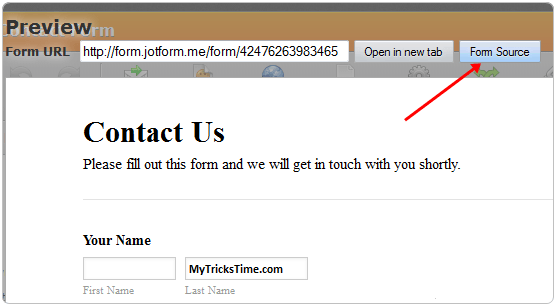
  • Now Copy Paste all the coding and save it in notepad for further usage.

Method To Setup Contact Form At Blogger

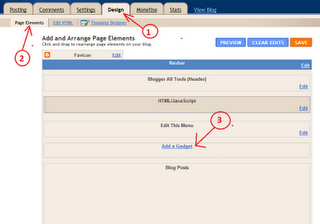
  • Open your Blogger’s blog and then go to Pages option.
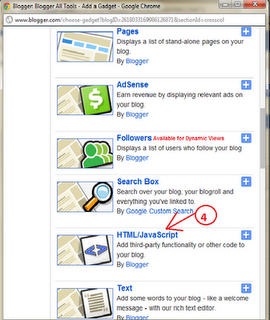
  • Create New Page option and shift to HTML Editor.
  • Now Place all the coding of form which already saved in notepad.
contact us blogger page
  • After Placing code accurately just publish your blogger page and see your contact us page working live.

Important Tips:- 

  • Jotform free account have limits on receiving month submission. Which can upgrade by completing various task available in profile.
  • Even you can buy their premium plans to increase your monthly submissions.

Enjoy Guys! and don’t forget to post your comments. � MyTricksTime.com

Add Google Translate Button In Blogger

 In this world a huge number of peoples
 and they are different from us i mean there
 culture, caste, society and the main is
 language. Here is approximately thousands
 of languages in our world and if we talk
 about our Blogging field here is also many
 people who cam to your site is from another
 country and region and they don�t know the
 specific language that we use to write our
 blog posts well as we know we also almost use English language that also known in many countries but in some country people don�t know this language so its difficult to show our knowledge to them, But Google always help Bloggers and this time also they introduce its translate button feature which help your readers to read what you exactly want to tell your readers so its a simple procedure lets have a look.

How To Add Google Translate Button In Blogger ?

   First of all go to Google Website Translator Page  now click on �Add New Website� button on the upper right side as shown below

Now in Website URL box enter your website URL and select your website language and click next as show below

Now in translation language click all languages and in second option set its mode what you want and click on get code

Now you can see two types of code the first is to verify your site and second is to show button where you want in your blog

Copy first code and Go to Blogger > Edit HTML and search for </head> tag using ctrl + f and just above it paste the first code and click on save template button.

Now copy the second code and Go to Blogger > Layout > Add a HTML / JavaScript  and paste the second code and click on save button and adjust it where you want to show this button.
Enjoy Guys! and don’t forget to post your comments. � MyTricksTime.com

how to add popup window in blogger

Popup window is an extra window it’s open in load on page or click on mouse and many other type now we will learn how to add click on mouse open popup window in blogger.

Pop up window is very use full for any important page show to viewers .


Click below Images for help with Screen short

Just follow below steps for add a popup window in your blogger

  • Log in to your Blogger account
  • Go to Design > Page Elements
  • Click Add a Gadget.
  • Select HTML/JavaScript widget
  • Copy the below code and past it in HTML/java script box.

<script type=”text/javascript”>
document.body.onclick= function(){
window.open(‘your web address‘, ‘poppage’, ‘toolbars=0, scrollbars=1, location=0, statusbars=0, menubars=0, resizable=1, width=650, height=650, left = 300, top = 50′);
}</script>


 Note 1. – 
your web address’  Replace this with your Web url (web address)

 Note 2.-   width=650, height=650  You can customize Window size.

6. Now save your Template your popup window is ready


Enjoy Guys! and don’t forget to post your comments. � MyTricksTime.com

How to Create Cracks On the Face in Photoshop CS6

The Adobe Photoshop has taken the standards of editing and photo manipulating at it�s peak. People are just crazy about it�s effect and awesome interface. Furthermore, it is easy to use photo editing software.

Now a days, Photoshop has become a mandatory tool for many individuals who want to do something creative like Photographers, ad agencies, feature films, start up companies, webs designers etc.

Here is a cool tip which can be used to edit an image in Photoshop CS6, which can generate cracked look to your image. This effect can also be achieved in any versions of Photoshop.

Since, there are many more awesome versions of Photoshop available. Furthermore, the reason of our for using CS6 is that it is most advanced and professional version of Photoshop. So now, without wasting much of your time let�s get towards the trick.

You May like Also:

The effect of creating cracks on the face in Photoshop CS6 is not such hard job to do. You need to follow the simple steps and you are all the way through it.
Additionally, believe me it is hell fun creating such cracked face images of young ones. It can give you a look that how a person is going to look when he or she�ll become old.
Step 1 : Open the raw image on Photoshop A portrait of a person preferably.
Step2 : Open Google, type �Cracks on the wall� and check the images. Download an image of a wall with the cracks on it.
Step 3 : Copy paste the downloaded cracks image right above the portrait image.
Step 4 : In the right side corner, you will find a box called Layers. There you will see both the images you have loaded on Photoshop. Be sure, that the cracks image layer is on the top and the portrait layer is in the bottom.
Step 5 : Now Select the cracks image in the layers box, and click on the drop down menu on the top of the layer box. You will get various options like Lighten, Softlight, Hard light, Linear etc. Click on �Multiply�.  That will directly give the crack effect the portrait picture.
Step 6 : Click on the history brush and erase the unnecessary cracks on the face.

Congratulations! You have successfully created crack effects on the face of your desired image.

Conclusion

This was detailed guide for the people who wanted to learn that, �How to Create Cracks on the Face in Photoshop CS6?� I am sure this would have been interesting and helpful tutorial for you guys.
Thus, if you have any confusions or questions left related to this article then do let me know. So, that we could help you to resolve your queries and questions as soon as possible.
Finally, if you have found this guide helpful then don�t forget to share it with your friends in order to help them to learn photo editing. Your shares and likes mean a lot to us.

Enjoy Guys! and don’t forget to post your comments. � MyTricksTime.com

Mr Bean on Facebook comments and status

Mr Bean on Facebook comments and status –

Hi friends,
MyTricksTime team bring a latest trick for you.
Now you can�post Mr. Bean in Facebook &� You can use these codes on Facebook comments, status &� chat also
Just copy below code and post…

[[586061134788981]]
[[586061144788980]]
[[586061158122312]]
[[586062524788842]]
[[586062561455505]]
[[586062604788834]]
[[586065874788507]]
[[586065884788506]]
[[586065894788505]]
[[586067094788385]]
[[586067104788384]]