How to Verify Your Facebook Account


Have you ever heard of Facebook? Am I kidding? Yeah… 

Now more than 800 million people including you knows Facebook. What about before 2004? At that time people didn’t know about Facebook and how it’s gonna be. Now Facebook is the most popular social media platform active on the Web. It has gained huge success since Mark Zuckerberg founded it on 2004. Facebook now integrates all over the Web including websites/blogs, web applications and more. You know all about creating Facebook account and all that. But do you know how to verify a Facebook account?
Verification of your Facebook account is vital in scenarios such as if you are planning to make use of Facebook applications on your site or elsewhere, if you wanna claim username for your profile or business page. However Facebook only allows you to verify your Facebook account via your mobile phone. It’s very simple process and you just need to have your mobile phone to verify your account. But it’s compulsory if you would like to experience some of exclusive features provided by Facebook.


Before You Go:

* If you just sign up for your Facebook account, then you gotta confirm the email sent by Facebook before you verify your account. So make sure you have confirmed your Facebook account via email.

* If you have added your mobile number to your Facebook profile or activated Facebook texts, then you don’t need to verify your profile again.


Steps:

1. Navigate to Facebook Mobile page.

2. Now click on the Sign Up for Facebook Text Messages link or button.

Note: As the page refreshes, the content may change. So sometimes you may find Sign Up for Facebook Text Messages link or else a button with same label.


3. Click Add your phone number here link on the pop up.

4. Select your country and enter you phone number in the Phone number field.

5. Click Continue button.

6. Now you will receive an text message for your phone with the confirmation code. Enter the code in the text box and click Continue button.


Notes:


* If you didn’t get your code, you can click I didn’t get my code link on the pop up box to resend your confirmation code.


* If you didn’t receive confirmation code after all, you can report it to Facebook via Mobile Account Verification form.

7. Now optionally you can select to Activate Facebook Text Messages and let my friends see your number. Select preferred options and click Submitbutton.


Enjoy Guys! and don’t forget to post your comments. � MyTricksTime.com

Can’t Undo Facebook Timeline? Know Why….

UNDO REMOVE TIMELINE
After 6th December, Facebook Timeline has completely transformed the shape of old FB profiles. Some users are finding the new layout pretty complicated and unfamiliar. Whether it may be new advanced privacy settings or the new profile design, Facebook new changes are always somewhat not unanimously accepted by the 800 Million registered users.  The new Timeline design display all your posts in hierarchal way, giving more importance to your memorable posts, photos and events.

There appears to be no option which could remove timeline or undo the new profile design change so that you could revert back to the old profile layout. No method so far seems to work, neither disabling the timeline app  is working. The Timeline App was a method by which you could set up timeline before its launch. There must be reasons behind absence of timeline Removal option. Lets analyze some facts.
Zukerberg Recently blogged about his commitment to Facebook community Saying:
I founded Facebook on the idea that people want to share and connect with people in their lives, but to do this everyone needs complete control over who they share with at all times.
This idea has been the core of Facebook since day one. When I built the first version of Facebook, almost nobody I knew wanted a public page on the internet. That seemed scary. But as long as they could make their page private, they felt safe sharing with their friends online. Control was key. With Facebook, for the first time, people had the tools they needed to do this. That’s how Facebook became the world’s biggest community online.  We made it easy for people to feel comfortable sharing things about their real lives.
We’ve added many new tools since then: sharing photos, creating groups, commenting on and liking your friends’ posts and recently even listening to music or watching videos together. With each new tool, we’ve added new privacy controls to ensure that you continue to have complete control over who sees everything you share. Because of these tools and controls, most people share many more things today than they did a few years ago.
Overall, I think we have a good history of providing transparency and control over who can see your information.
That said, I’m the first to admit that we’ve made a bunch of mistakes. In particular, I think that a small number of high profile mistakes, like Beacon four years ago and poor execution as we transitioned our privacy model two years ago, have often overshadowed much of the good work we’ve done.
The highlighted words are where Mark himself accepts some of his past mistakes. Beacon was Facebook’s advertisement system that sent data from external websites to Facebook, for the purpose of allowing targeted ads and allowing users to share their activities with their friends. The controversial part was that Facebook was publishing User activities from other websites without explicit permission from the user. This was a complete violation of user privacy. All this was done without letting you know!
The purpose of sharing the Beacon story is to tell you that Facebook have often taken decisions without keeping user feedback greatly in mind. Now when the entire Layout was going to be transformed, no proper Feedback campaign was ran which could ask users about their likes and dislikes concerned with the new timeline Design. Yes they tested a beta version of timeline and allowed users to try timeline in advance but why not User Feedback again?
Mark promised on November with his blog post that user response will be given great importance but I never get it why the same mistake is repeated again?
Now lets know the reasons that why can’t your remove, undo or delete the timeline view.

1.To Prevent Algorithm Conflict

Things look simple when they look alike. In order to prevent development ambiguity/complexity, all layouts are given same design structure so that it becomes easy to organize the data using the same technique without the need of two different methods for the display and arrangement of the same data on Facebook servers.

2. To Prevent Psychological Confusion

If the option of removing Timeline existed then it would have given rise to great confusion in interface. Facebook users are of different age and are experimented to like simplicity in design and structure. If your friend is running a timeLine and you are running Old Profile, then of course you will find it difficult to understand the updates at his profile due to different organization of data. What is placed at your left is shifted to top and right on timeline. This can discourage users from using Facebook and then can probably look for an alternative simple social media network like Google+.

3. A Challenge to Google+

Google Plus is the new social networking website which was launched just this July by Google Inc. Almost all features in Google+  match that of Facebook accept the introduction of Sparks, Circles and video conferencing. In order to tell its users that Facebook offers much different social touch a step like this was important. I must inform you that Facebook knew about the Google+ development and all its features much before it was launched. Because keeping an eye on your competitor is an important principle of i-marketing.

What do you think?

In short it is hard to believe but once again the new look has been forced upon the users without keeping the community likes and dislikes in Mind. I would love to hear about what else can you share on this latest development and do tell me if you like the new layout or not. Please give reasons why you like it. Hope to see some comfortable new changes in FB’s new design. For the time being new creative tricks are been applied to Timeline Covers. Why not Create a Hot Cover for your Profile?
Peace and blessings pals! 🙂

4G Samsung Galaxy S II X Review,Feature And Price

4G Samsung Galaxy S II X is going to be Launched Soon, It is a First 4G Smartphone by Samsung and it will going to be the Canada’s fastest Smartphone.It has announced by Telus that the Device will be Official Launched on 28th October but it seems to be that the Device is not upgraded to ICS,As we all know that Samsung Galaxy S is already in stepped in market and rocking the smartphone world and their is another smartphone which is also rolling the market side wise called Samsung Galaxy Nexus the first mobile using Operating system Android 4.0 Icecream Sandwich . but 4G Samsung Galaxy S II X is coming up with the Previous Version GingerBread aka Android 2.3.which sounds pretty uncool.

But we are not here to compare about which smartphone is using which Operating system and all to lets skip the chat on other smartphone and come to point on which total article is based …
Let we have a look on cool and awesome Features of New Phone
1.Download Apps
Downloading Apps and Streaming Videos will be faster than any other Smartphone with 4G downloading speed of upto 42Mbps(Expected average is 7-14Mbps).
2.Run Multiple Apps
Run multiple apps at the same time without any freezing or slow-downs on with the 1.5 Ghz Dual Core processor.
3.Wi-Fi
Wi-Fi web hotspot access to your laptop or tablet.
4.Touchscreen
Brilliant 4.5� super AMOLED plus touchscreen for vivid colours.
5.Adobe Flash
Adobe� Flash� 10.3 lets you access to videos and games online.
6.Video
With Cool Feature it record videos in full 1080p HD.
7.Camera
It has 8MP back facing camera with LED flash and 4X digital zoom.
8.Front Camera
With Cool Phone you can make video calls using the 2MP front facing camera.
9.Navigation
FREE Google Maps Navigation for turn-by-turn voice guidance and Google Maps in 3D
10.Android Market
It Access over 200,000 amazing free and paid apps* from the continuously growing Android Market.
Now Lets have a look on Specifications of this Awesome Smartphone
1.Screen
It has a wide Screen with dimension of 4.5? 800 x 480.
2.Weight
It is a light weighted Smartphone with weight 109g.
3.Size
This Smartphone has a size of 67.3 x 131 x 9.4mm.
4.Talk time
This 4G Phone has a Awesome Battery Backup up to 9 hours.
5.Standby time
The Phone on Standby mode will give great battery backup up to 620 hours.
6.Internal memory
The Smartphone has a big Internal memory of 16Gb.
7.Expandable memory
The external memory of this Smartphone will be expendable up to 32Gb.
8.Price of 4G Samsung Galaxy S II X
The Price of this Smartphone has not been fixed till yet and we will update the Price as soon as we will get.
Instead of these Cool Features and Specifications mentioned above it has even more awesome Features which you will come to know when you will have this superb Smartphone in your hand and I would like to Thank all mine Readers and don’t forget to share your experience with MyTricksTime.

Download Free Android 4.0 Ice Cream Sandwich Home Launcher

A day ago Google has officially launched their new android operating system called Android 4.0 Ice Cream Sandwich Flavor. But the OS will take some time to reach for your all android devices, but there is another alternative way you can enjoy this new ice cream sandwich flavor through Android 4.0 Ice Cream Sandwich Home Launcher APK App and its available for download from android market store at free of charge. This launcher will totally transform your old home screen into new android 4.0 ice cream sandwich (ICS) GUI Interface. By installing this launcher on your smartphone you will get a lot GUI features like app drawer will give vertical smooth scrolling which you can easily jump into other tasks or apps running at background, new kind of widgets that really make you crazy to add at your home screen easily.
             

This launcher was developed by Syndicate Apps based on prediction of  before Android 4.0 Ice Cream Sandwich official release. Although it was not accurate but still look like original ICS Interface and I hope that it will become another perfect home replacement launcher for your android mobile. We also hope that the developers will add more interesting features to this launcher without any bugs.


Note:

Before installing this app on your phone you need to do one thing Go to->Settings>Applications->there you need to checked Unknowns Sources this will help you to install all kind of applications on your  phone without any problems.


Click on below links to get APK App. Download Free Stable Version of Android 4.0 Ice Cream Sandwich Home Launcher App from Official Site.


Official Site or Android MarketEnjoy Guys! and don’t forget to post your comments. � MyTricksTime.com

Costom Fonts For Blogger

Hi friends as this is my first tutorial on MyTricksTime.com from a long time, as i have been giving you a lot of templates for your blog from past few months.And thanx to you all for appreciating and using my templates.But From now i would be making tutorials for you as well with templates.So tutorial for you today is about adding the custom fonts to your blogger blog, for its post titles or for post body.As before also it was possible to add custom fonts to blogger using cufon, but it was bit complicated and difficult to do so in blogger and it also increased the loading time for our blog.

So now its very easy to add custom fonts to your blogger blog and it doesn’t effect the loading time of your blog too.I will tell you two API to add custom fonts.Use the one where you like the font style to be used in your blog.

1.Google API (Best method to add fonts but as now font styles are very limited here will be more added soon by google.)

2.Kernest API (Its also an good API but with good collection of fonts.You also can use it for sure.)

Installation Steps For Custom Fonts From Google API

1. Go To Google API.You will see Fonts Written Like Below.

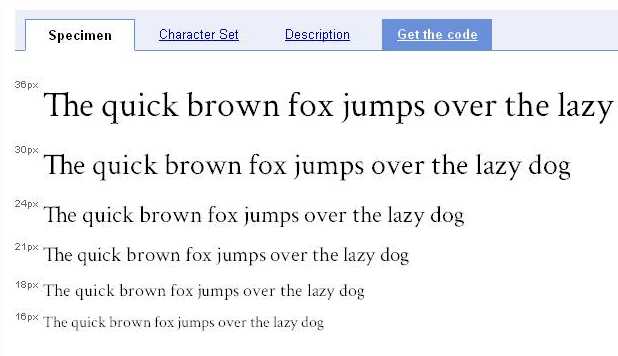
2.Just Hover your mouse over the font you like and you will see link click to embed font name.Just click the link or font only you liked.

3.Now you will be shown the get the code button and the the demo of how your font looks in different sizes.

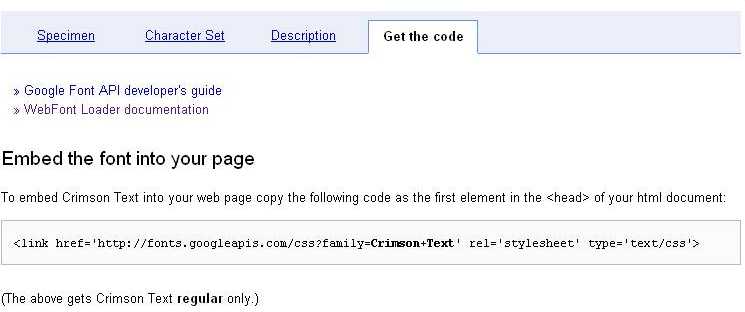
4.Now just click the get the code button and you will be given the code like below.

5.Just copy the code from there.
Codes are like below.

<link href=’http://fonts.googleapis.com/css?family=FontName‘ rel=’stylesheet’ type=’text/css’>

6.Now Just go to blogger Layout > Edit Html > Press CTRL+F and find for </head> tag.

7.Now Just place the codes you just copied from google api before this </head> tag.And now you are done to place the font codes succesfully.

Now comes the part to define font in your css to which titles or post body you want to show that font.As to define font you need to know some css codes about your templates, to know which css property defining your particular font style.

Like you want to define this font for your header title, now you need to know in which css part of your template, the font -family for your header has been defined.As now most bloggers are using custom templates, so css for each of you is different.Its difficult for me to tell for each, which css you use for header title and which for sidebar titles.So i will just tell you the basic css style you need to add in your template considering the default codes the blogger template use.

#header h1 {font-family:FontName;} */ This css style for Header Title /*

.description {font-family:FontName;} */ This css style for Header description /*

.sidebar h2 {font-family:FontName;} */ This css style for Sidebar Title /*

.post h3 {font-family:FontName;} */ This css style for post Title /*

.post {font-family:FontName;} */ This css style for post body /*

#footer h2 {font-family:FontName;} */ This css style for footer Title /*

body {font-family:FontName;} */ This css style for whole template /*

Please dont forget to change the FontName with your custom font name,you using in the script,that you placed in blogger html. 

Now just important thing to implement is :-
1.To which place in your template you want to use custom font.
2.After it,just need to find the css property defining that part in your template.
3.After finding it,just define the font-family in its css like i have shown above.

And here i complete an easy installation with custom fonts from google api.

If you want to use multiple fonts or wanna style them with bold or italic.You can go furher here to read on how to do that.Just you have to make small changes in codes you get.As you will come to know after reading.

Installation Steps For Custom Fonts From Kernest API

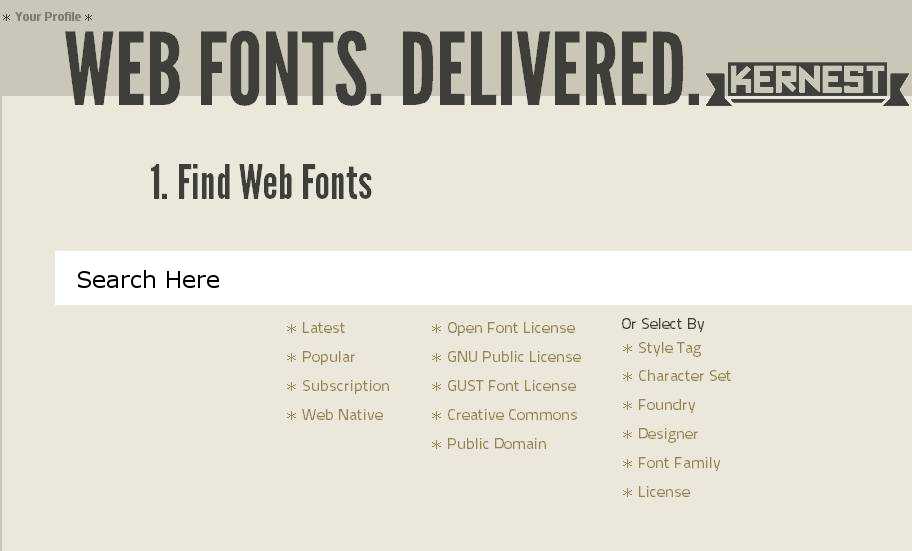
1.Just Go To Kernest.com

2.Now you will see page like below.You will get an option to search for fonts.Either you can do by writting font and hit enter or by browsing them with tags like popular fonts or latest fonts or from any designers.

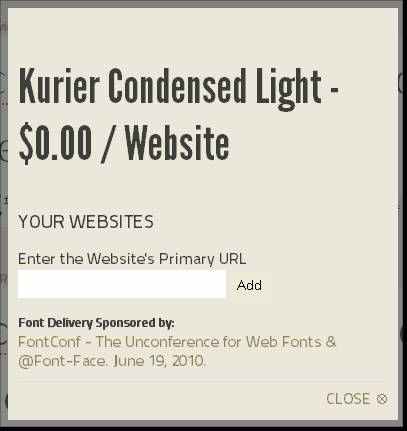
3.After selecting font you like, will see domain embed url.Just click it.

4.Pop up window will open like below and just type your blog url and hit add.

6.Now below the font you will see the codes to be placed in blogger i.e to left of domain embed url.Just copy those codes to your notepad.The codes look like below.

<link href=”http://www.kernest.com/fonts/riordon-fancy.css” media=”screen” rel=”stylesheet” type=”text/css” /><!–//
HOW TO USE THESE FONTS FROM KERNEST
1. Paste this embed code into your website

2. Add the fonts to your CSS tags. Example:
p {
font-family: ‘Riordon Fancy’;
line-height: 140%;

}

3. Add this link in your website’s footer
&lt;a href=”http://kernest.com”&gt;Fonts by Kernest&lt;/a&gt;

4. Refresh
———–

———–
//–>

You just need to took the red codes and place them before the </head> tag as you did for google api fonts.

7.Now again you need to define the font style css.Its all same way you have to do as i told above for Google API Fonts in step 7.

I hope now you would have no problem in installing custom fonts for blogger.If you still feel any problem, just leave your comment below i will see over it and will try to solve your problems.
Enjoy Guys! and don’t forget to post your comments. � MyTricksTime.com