How To: Use a laptop as a Wi-Fi repeater


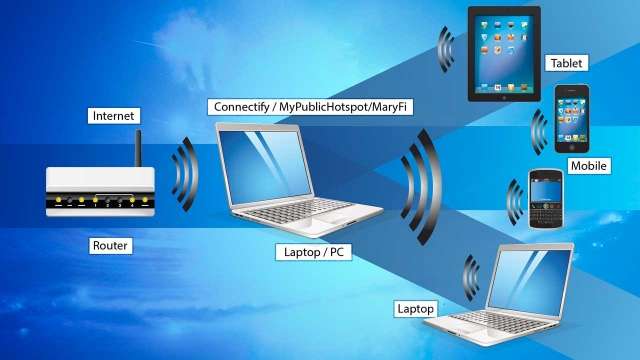
Almost all homes and offices today have an Internet connection either via a cable operator, telephone line or USB dongle. Sharing a single Internet connection with all other wireless-enabled devices at home or office requires a wireless router and these are available for as little as Rs. 1,000. But wireless routers are usually stationed at home or office and cannot be carried around because of the power requirements. There are times when you go on a holiday or travel around and need an Internet connection. USB 3G Internet dongles serve the purpose of an Internet connection whilst you are outdoors, but this connection is only available on your laptop or a tablet that has USB internet dongle compatibility. But what if you want your mobile or iPad also connected to the Internet at the same time? The Internet connectivity needs to be shared and a router is the only possibility. In this case, you will share the network connection of your laptop with the other devices and Ad-Hoc connectivity is the only option. But this method again has a limitation and only one device can connect at a single given time. We will show you how to create a temporary router using any laptop or PC within a few minutes. This will save you the cost of a new portable router.

Take another scenario where you are at home. You have your broadband connection and a router installed and configured. Your router is beaming out the Internet connection for all the devices you have. You need to chill out in your building premises with friends or monitor your children in the play area, while still using your mobile or tablet on the Internet. 
Now, you know that your home router will not be able to beam out the Internet to this distance and it will call for a relocation of the router to the balcony or the main door. But this is not practical and you will need to get yourself a wireless repeater, which will wirelessly relay the home internet to a further distance. This calls for an investment of a wireless repeater and they don�t come cheap. We will show you how to create a wireless repeater using any laptop or PC in less than Rs. 700.


In this How-To, we shall show you how simple it is to convert any regular laptop or PC into a wireless router or repeater using some freely available software. Before you begin, let�s take a look at the requirements.
  • A laptop or PC with Windows XP SP2 or higher operating system
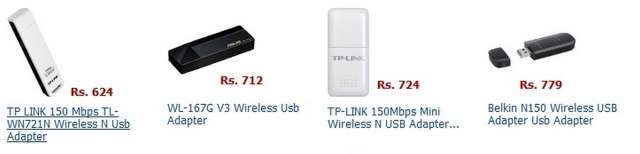
  • A wireless USB adapter
  • Any of the following software: Connectify, MyPublicWiFi or MaryFi
  • An Internet connection (USB 3G dongle, broadband or DSL)
To convert any PC or laptop into a router, you will need the computer to have an Ethernet interface, a USB port and a wireless USB adapter or Wi-Fi network card. Laptops usually have all of the above, while desktop PCs will definitely sport the USB and Ethernet interfaces. Some newer desktop PCs have motherboards with wireless networking interfaces. If your PC does not have a wireless interface, then you will have to get a wireless USB adapter; these are available for as cheap as Rs. 700. Any brand will work fine as long as you install the drivers correctly.
To convert the PC or laptop into a wireless repeater, you will need two wireless network interfaces. In this mode, one wireless interface works as a client to receive the Internet from a wireless router while the other interface relays the same Internet connection to other devices. Laptops usually have a single wireless network interface and to make a repeater, you will need to install a wireless USB adapter. PCs will have to use two of the USB adapters.
Once you are ready with the hardware requirements, it is time to download the software. 
Download any of the following software from the Internet. These software utilities have the capability of converting a regular PC with an Internet connection into a wireless hotspot as a router or repeater. The software takes the Internet connection from the PC and shares it via the wireless interface, allowing other devices to connect and use the Internet from it. The download links are given below.
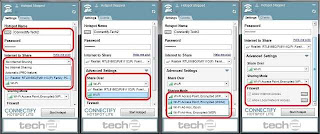
The entire procedure is very simple and will take you just a few minutes to configure and deploy. All you need is to download any of the above software, install it, restart the PC once if required and start the utility. Here is how you can configure each of the three utilities. We shall explain using Connectify as an example; you can also apply the similar methods to the other two utilities.
Router mode:

Step 1: Click the settings tab
Step 2:  Enter the SSID name or Hotspot name for your network. (free version has limited access to using the entire SSID name, while paid version users can specify any name)
Step 3:  Enter a desired 8 � digit password for securing the wireless network
Step 4:  Select the Internet line you want to share from the list in the �Internet to Share� drop-down list. This will be your Ethernet network or USB dongle / DSL dial-up connection.
Step 5:  Expand the �Advanced Settings� tab. Here, choose the wireless interface in the �Share over� drop-down list and choose the security mode for the network in the �Sharing Mode� drop- down list. Paid version users can have the option to set up the firewall and allow or disallow Internet and local network access.
Step 6:  Once done, hit the �Start Hotspot� button and your PC/laptop is now a wireless router. Connect your devices to the PC router using the SSID and password you just specified.


Step 1: Follow the same steps mentioned above, but just make a small change in the Step: 3where you will need to select the first wireless network interface in the �Internet to Share� drop-down list and the second network interface in the �Share over� drop-down list. Do make sure that your first wireless network interface is already configured to connect to the host router for an Internet connection.

Using the other two utilities is very similar and takes a few seconds to implement. There may be many more similar utilities that can do the same and if you stumble on any of them, do mention it in the comments below for the benefit of other readers. If you are using any of these or other utilities and find out any issues or tweaks to make it function better, please post your comments too.

Enjoy Guys! and don’t forget to post your comments. � MyTricksTime.com

Facebook trashes fake accounts, users, and likes,

The purge has commenced. Facebook is throwing out all fake users, accounts, and likes. That’s right, all of those thousands of questionable thumbs ups are starting to disappear.
The social network announced last month that it’d start this massive deletion process, but it was unclear when. According to TechCrunch, Facebook confirmed today that the time is now.
Over the course of the day, tens of thousands of fans were quietly dropped from
Facebook Pages. Data from Facebook metrics site PageData shows that
 

Zynga’s Texas HoldEm Poker lost 96,000 fans today, while Rihanna lost 22,198, and Michael Jackson lost 17,591. Even the Facebook like champion Eminem had fans vanish today — his count dropped by 15,420.

Facebook said last month that the reason it was sweeping its site of phony activity was to cut down on suspicious likes and make sure that users were dealing with real people and businesses.

MyTricksTime contacted Facebook for more information and we’ll update the story when we hear back. 

Despite cleaning house, the social network has said that most pages will see less than 1 percent of likes removed. As long as users go by the rules and haven’t indulged in buying likes from shady sources, the difference should be minimal.

In the end, this eradication should come as good news to most users because it means less spam and phishing on the social network.

MyTricksTime contacted Facebook for more information and we’ll update the story when we hear back.
Enjoy Guys! and don’t forget to post your comments. � MyTricksTime.com

Review of Sony Vaio E-Series – VPC-EH2N1E

The Sony Vaio E-Series – VPC-EH2N1E laptop is composed of a 500 GB hard disk and 4 GB RAM along with an Intel i5 processor that has a speed of 2.4 GHz. Microsoft Windows 7 Home Premium operating system is entitled to operate this laptop. Intel HD graphics card and a sound card add value to the output. The multi-touch track pad lets few fingers run over it and allows some special input through this track pad. The laptop uses a 15.5 inch Vaio display and also has a camera fabricated to the laptop. Ports for USB, HDMI, SVideo, digital media reader are all available on this laptop.


Sony Vaio E-Series – VPC-EH2N1E Price India
Price: Rs. 25000 – 30000


Technical Specifications of Sony Vaio E-Series – VPC-EH2N1E
Processor Make Intel
Processor Name Intel Core i5
Cache Memory(KB) 3072
Front Side Bus 1066
Processor Speed(MHz) 2400.00
Processor description Intel Core i5-2430M
System Memory Standard RAM (GB) 4
Upgradeable RAM (GB) 8.00
Hard Disk Drive (HDD) Installed Capacity (GB) 500.00
Optical Drive CD ROM Drive Yes
DVD Drive Yes
DVD Writer Drive Yes
Display Screen Size (Inches) 15.50
Maximum Display Resolution (dpi) 1920 x 1200
Screen Type VAIO Display
Video Display Card Video Display Card Intel HD Graphics 3000
Video Card Make Intel
Memory Type DDR3 SDRAM
Internet Utilities Internal Modem NA
WiFi Yes
Multimedia Info Sound Card Yes
Sound Card Make NA
Microphone Yes
Speakers Yes
Security Fingerprint Reader No
Web Cam Builtin Camera Yes
Resolution (Mega Pixel) 0.30
Ports and Cards Interfaces SVideo 1
USB Port 4
Bluetooth 1
Digital Media Reader 2
Hdmi port 1
Laptop Measurements Width (mm) 369.80
Depth (mm) 248.40
Height (mm) 31.30
Weight (Kgs) 2.70
Battery Battery (Type) Lithium ion VGP-BPS26
Battery Life (Hours) 4
Input Devices Keyboard Type Normal
Touch Screen No
Touch Pad Type Multi-Touch
Type of Mouse Normal
Miscellaneous Operating System Windows 7 Home Premium 64-Bit
OS description Genuine Windows� 7 Home Premium 64bit
Colour Options Black, White
Warranty (Years) 1

Enjoy Guys! and don’t forget to post your comments. � MyTricksTime.com

How to use your Android as a Webcam


Webcam is one of the best inventions which have bettered the online communication process. When you chat online with dear ones, you can�t do without a webcam because it helps us see each other. I have always loved it because I�ve not been lucky enough to stay with my family since I joined college. I know many of you are like me. Skype is our virtual home and the webcam is the door to the home. Imagine you are online, chatting with your old friend. And your friend wants you to video chat. One quick glance at your webcam tells you that your pet has taken the liberty of using it as a teether. Does it spell disaster? Definitely not, if you have an Android device. You can easily use your Android device as a webcam at such times. With an Android device, you can make the best of both worlds. I was in such a situation and wandered around the Android App Store in search of an app that would help me out. Alas! The search ended soon and I found two helpful apps. I�ll explain both and you can use what you find to be comfortable.
Requirements:
These are the common requirements for both apps.
  • You need to have internet connection on both your PC and phone.
  • You can also do it using USB on your phone.
App 1: IP Webcam
  1. Install IP Webcam and IP Camera Adapter on Windows. You will have to use Firefox or Chrome. It doesn�t work properly with the default Internet Explorer. (This is a free app so you will not need to spend a single penny on it.)
  2. Open the IP Webcam app and adjust the settings. You need to choose the resolution, quality, FPS limit, and orientation as per your video needs.
  3. Once you finish this, tap on the Start Server button. It will open a window where you can set your Username and Password. Setting a username is recommended as the adapter sometimes might not allow you to open it without login credentials.
  4. You will find the IP address at the bottom of your device. Ensure that the port number is also visible.
  5. The next step is to choose the video size you would like to have. I�ve tried the Browser built-in viewer.
  6. Now it�s time to open the IP Camera Adapter. Here, you will have to feed information such as your IP, username, and password.
  7. Using the Autodetect button, select the optimal resolution settings for your video. Click on Apply once you�ve adjusted all the settings.
  8. You will have to restart the applications such as Skype, Windows Live, etc., in which you want to use this makeshift webcam.
Note:  Remember:
As it doesn�t render good quality audio, you will have to use your headset for uninterrupted audio. Using it as a webcam will drain the battery charge. Therefore, plug in the device while using it as a webcam.
App 2: DroidCam
  1. Download DroidCam from Android App Store. Click here to go to the website.
  2. It works only on Windows or Linux operating systems. Therefore, choose it only if you use one of these two.
  3. Open the app and wait until you get the �Idle� message. It will appear at the top right corner of the app.
  4. Open the DroidCam program on your PC and configure the settings in the window that appears.
  5. Type the IP of your computer. You needn�t change the port number.

You can now start using your Android device as a webcam. It works for you? Good! But don�t be overwhelmed at this new use of your Android phone and ditch your webcam if it is in good shape. You will need it in the future when you want to have a perfect video quality without any interruptions. This is just a makeshift use of your Android device, it can�t surpass a proper webcam. Find something that can work as a latch to hold your device in the landscape position. Otherwise, you will have to hold the device throughout the chat session. Finding a good latch was more challenging than setting it up as a webcam, so my device kept on sliding and tilting as it didn�t get a good latch to sit on. It�s good for informal conversations with friends and family. However, don�t try to settle down with this if you are attending a virtual business meeting with your client or a higher official.
Enjoy Guys! and don’t forget to post your comments. � MyTricksTime.com

Whats New in Nintendo Wii U

Nintendo Wii U is packed with innovative features andit is all set to hit the U.S. market on Nov 18.  Nintendo�s new system plays catch-up with Sony and Microsoft and aims at tempting gamers back from the internet and mobile devices.
Whereas other contemporary video game consolesare now forthcoming to the six and seven years mark respectively since release, Nintendo has been the most popular console cycle to jump on the eighth generation of console wagon.
An Overview of the Nintendo Wii U
The new console looks sleek, small and plain in terms of design, but is empowered by an IBM multi-core processor and is compatible with 1080p HD Graphics. The new console will be marked by a little difference from its competitors if we only take into account its visuals and processing power. However, in addition to graphics, it is the controller that has literally tempted everyone to count down the few remaining days for its launch.
Wii U Controller
The innovative Gamepad, termed by the manufacturer as the �Wii U controller�, looks akin to a tablet pc. However,in addition to featuring a simpletouch screen, the Gamepad features a handsome array of controls and buttons, such as: Power buttons,XBAY buttons, Dual Analogue sticks, Triggers, Bumpers, TV, Home and Volume control. The controller comes with anattractive 6.2? touch screen having the capacity of displaying at 16:9 aspect ratio.
What is probably the most impressive feature of Nintendo Wii U is it enables you to enjoy playing your favorite games on the new controller, without having to connect it to a monitor or television screen, and even that with a range of 30 yards approximately. Just imagine you areand busy in the middle of your room beating Bowser�s head on Mario and someone demands you to bring a glass of water from the refrigerator, you can leave your place by switching your main screen from the television set to the tablet screen and keeping on with your Bowser beat down.
What is included in the Wii U Packs?
Basically, it has been unveiled that the device will come in two different packs: basic and premium.
Basic Pack will include:
  • A white colored console having 8GB built-in storage memory and a white GamePad
  • An HDMI cable
  • AC adapters for both the console and the GamePad.
The Premium Packageof the console will include:
  • A black console empowered with 32GB of internal storage memory  along with a GamePad
  • A charging cradle for the GamePad
  • A stand for the console and GamePad
  • AC adapters
  • AnHDMI cable and
  • The Nintendo Land software.
ASpecial Reward Programme
It may also be mentioned here that the premium pack comes with a special reward programme that offerspoints to its worthy clients on every digital purchase made in the Nintendo�sonline Shop. Each point is worth 10% of the regular retail price, and you can make use of this credit against future purchases as soon as it reaches 500 points minimum.
Expected Price
As far as the price is concerned, it will be available at just under $300.Sounds expensive? Rest assured you will receive a console and a standalone Gamepad tabletalong with 23 original Wii U games�all in one pack. With its exciting features, the price should not be a hindrance toward satisfying your passion for games.
Guest Post from Theresa Moyer. Theresa writes for GoToGiftBaskets.com.
source:www.goharsh.com/computer/whats-new-in-nintendo-wii-u

Enjoy Guys! and don’t forget to post your comments. � MyTricksTime.com