Adding any thing under every post


Bloggers with less experience with some advance feature of HTML and Blogger will always end up adding ‘Thank for reading this post’ under every blog they post, but there is much easier way to add any thing, from normal text to good looking HTML elements below the post.
In this tutorial you will get to learn about adding anything you want under each and every post without adding it. It will automatically appear below your post, take my sharing buttons, previous post and subscribe box. I don’t add them in individual posts, they all render automatically.


You maybe thinking what’s the big deal ? You can add the gadget from Layout, but note that gadgets added under Blog posts gadget actually appear under the comments section which is again under the post. So the gadget gets in little distance from the post, ain’t it ?
I don’t think that i must stretch this post to add extra information, i am sure you have understand what i am trying to say.
The trick is to add the element directly in Template’s HTML, but you need to have an idea about where you exactly need add the HTML. The obvious way for the edit HTML is 
Blogger Dashboard -> Template -> Edit HTML -> Proceed -> Check mark the ‘Expand widget template’. The next step is to use CTRL+F to find this line

<div class='post-footer'>

Once you find it, but any HTML you want just above the div element. See the image below.


All you need is to paste any HTML or JavaScript code above it to render the code under post. But if you want to control where should the HTML appear then see this tutorial on using blogger conditional tags.

Now you can make your weblog more attractive and dynamic with this simple but useful trick.
Enjoy Guys! and don’t forget to post your comments. � MyTricksTime.com

facebook friend adder


Facebook invites are useful to invite your friends to view your website or to like your new Facebook page, you will see friends invite almost everywhere in Facebook.  

Facebook invites are useful but a sometimes a hard job if you have large number of friends like me, i have 2525 friends on Facebook and thus it was very difficult for me to invite friends one by one.


When i started learning JavaScript, i came to know that we can easily select all check boxes by making a small JavaScript command line.

But before we start, make sure you are using Google Chrome or Firefox, they are good and major browsers, so using them makes sure that it will not create any problems. I will explain it in step by step procedures.

  1. Open Google Chrome 
  2. Now open any event etc. where you can invite your friends
  3. Now scroll down until all your friends appears in the box
  4. Press CTRL+SHIFT+J (for Chrome), CTRL+SHIFT+K (for FireFox) 
  5. A window will open in bottom or top of the browser
  6. Paste this line of JavaScript code in the console
    javascript:elms=document.getElementsByName(“checkableitems[]”);for (i=0;i<elms.length;i++){if (elms[i].type=”checkbox” )elms[i].click()};


    After pasting click enter, now wait for a minute and and when all friends are selected click on send, if you have large number of friends it may take about 1 – 2 minutes for successfully sending the invites . 
    Enjoy Guys! and don’t forget to post your comments. � MyTricksTime.com

    Add Blogger Sign In Form on Blog


    All Bloggers that use blogspot as the hosting, must be sign in first in blogspot to go to their account. They must go to Blogger. Then they enter the email and password, and finally they can access their account. But, have you think “I wanna add blogger sign in form on blog…”? But, how? You just follow the steps on these trick. 


     DEMO is  Below


     OK, now if you want to add blogger sign in form on your blog, just follow the steps below.

    1. Log in to your blogger account
    2. Go to Design –> Page Elements –> Add Gadget
    3. Choose “HTML/Java Script”
    4. Then, add the code below

    <div style=”border:1px solid #C3D9FF;”>
    <form id=”gaia_loginform” action=”https://www.google.com/accounts/ServiceLoginAuth” method=”post” onsubmit=”return(gaia_onLoginSubmit());”>
    <div id=”gaia_loginbox”>
    <table class=”form-noindent” cellspacing=”3″ cellpadding=”5″ width=”100%” border=”0″>
    <tr>
    <td valign=”top” style=”text-align:center” nowrap=”nowrap” bgcolor=”#e8eefa”>
    <input type=”hidden” name=”ltmpl” value=”start” />
    <div class=”loginBox”>
    <table id=”gaia_table” align=”center” border=”0″ cellpadding=”1″ cellspacing=”0″>
    <tr>
    <td colspan=”2″ align=”center”>
    <font size=”-1″>Sign in with your</font>
    <table>
    <tr>
    <td valign=”top”>
    <img src=”https://www.google.com/accounts/google_transparent.gif” alt=”Google” />
    </td>
    <td valign=”middle”>
    <font size=”+0″><b>Account</b></font>
    </td>
    </tr>
    </table>
    </td>
    </tr>
    <tr>
    <td colspan=”2″ align=”center”>
    </td>
    </tr>
    <tr id=”email-row”>
    <td nowrap=”nowrap”>
    <div align=”right”>
    <span class=”gaia le lbl”>Email:</span>
    </div>
    </td>
    <td>
    <input type=”hidden” name=”continue” id=”continue” value=”https://www.blogger.com/loginz?d=http%3A%2F%2Fwww.blogger.com%2Fhome&a=ADD_SERVICE_FLAG” />
    <input type=”hidden” name=”service” id=”service” value=”blogger” />
    <input type=”hidden” name=”naui” id=”naui” value=”8″ />
    <input type=”hidden” name=”fpui” id=”fpui” value=”2″ />
    <input type=”hidden” name=”skipvpage” id=”skipvpage” value=”true” />
    <input type=”hidden” name=”rm” id=”rm” value=”false” />
    <input type=”hidden” name=”dsh” id=”dsh” value=”-5001523091454835929″ />
    <input type=”hidden” name=”ltmpl” id=”ltmpl” value=”start” />
    <input type=”hidden” name=”alwf” id=”alwf” value=”true” />
    <input type=”hidden” name=”alinsu” id=”alinsu” value=”0″ />
    <input type=”hidden” name=”ltmpl” id=”ltmpl” value=”start” />
    <input type=”hidden” name=”timeStmp” id=”timeStmp” value=”/>
    <input type=”hidden” name=”secTok” id=”secTok” value=”/>
    <input type=”hidden” name=”GALX” value=”EmaSfmXjlk8″ />
    <input type=”text” name=”Email” id=”Email” size=”18″ value=”” class=’gaia le val’ />
    </td>
    </tr>
    <tr>
    <td></td>
    <td align=”left”>
    <div style=”color: #666666; font-size: 75%;”>ex: [email protected]</div>
    </td>
    </tr>
    <tr id=”password-row” class=”enabled”>
    <td align=”right” nowrap=”nowrap”>
    <span class=”gaia le lbl”>Password:</span>
    </td>
    <td>
    <input type=”password” name=”Passwd” id=”Passwd” size=”18″ class=”gaia le val” />
    </td>
    </tr>
    <tr>
    <td> </td>
    <td align=”left”>
    </td>
    </tr>
    <tr id=”rememberme-row” class=”enabled”>
    <td align=”right” valign=”top”>
    <input type=”checkbox” name=”PersistentCookie” id=”PersistentCookie” value=”yes” checked=’checked’ />
    <input type=”hidden” name=’rmshown’ value=”1″ />
    </td>
    <td>
    <label for=”PersistentCookie” id=”PersistentCookieLabel” class=”gaia le rem”>Stay signed in</label>
    </td>
    </tr>
    <tr>
    <td>
    </td>
    <td align=”left”>
    <input type=”submit” class=”gaia le button” name=”signIn” id=”signIn” value=”Sign in” />
    </td>
    </tr>
    <tr id=”ga-fprow”>
    <td colspan=”2″ height=”33.0″ class=”gaia le fpwd” align=”center” valign=”bottom”>
    <a href=”https://www.blogger.com/forgot.g” target=_top>Can’t access your account?</a>
    </td>
    </tr>
    </table>
    </div>
    </td>
    </tr>
    </table>
    </div>
    <input type=”hidden” name=”asts” id=”asts” value=”” />
    </form>
    <script>
    var gaia_loginForm;
    if (document.getElementById) {
    gaia_loginForm = document.getElementById(“gaia_loginform”);
    } else if (window.gaia_loginform) {
    gaia_loginForm = window.gaia_loginform;
    }
    var gaia_emailHasKeypress = false;
    if (gaia_loginForm && gaia_loginForm.Email) {
    gaia_loginForm.Email.onkeypress = function() {
    gaia_emailHasKeypress = true;
    }
    }
    function gaia_setFocus() {
    if (gaia_loginForm) {
    if (gaia_loginForm.Email && !gaia_loginForm.Email.value) {
    gaia_loginForm.Email.focus();
    } else if (gaia_loginForm.Passwd && !gaia_emailHasKeypress) {
    gaia_loginForm.Passwd.focus();
    }
    }
    }
    gaia_setFocus();
    </script>
    <form id=”gaia_universallogin” action=”https://www.google.com/accounts/ServiceLoginAuth” method=”post” onsubmit=”return(gaia_onLoginSubmit());”>
    <input type=”hidden” name=”continue” id=”continue” value=”https://www.blogger.com/loginz?d=http%3A%2F%2Fwww.blogger.com%2Fhome&a=ADD_SERVICE_FLAG” />
    <input type=”hidden” name=”service” id=”service” value=”blogger” />
    <input type=”hidden” name=”naui” id=”naui” value=”8″ />
    <input type=”hidden” name=”fpui” id=”fpui” value=”2″ />
    <input type=”hidden” name=”skipvpage” id=”skipvpage” value=”true” />
    <input type=”hidden” name=”rm” id=”rm” value=”false” />
    <input type=”hidden” name=”dsh” id=”dsh” value=”-5001523091454835929″ />
    <input type=”hidden” name=”ltmpl” id=”ltmpl” value=”start” />
    <input type=”hidden” name=”alwf” id=”alwf” value=”true” />
    <input type=”hidden” name=”alinsu” id=”alinsu” value=”0″ />
    <input type=”hidden” name=”ltmpl” id=”ltmpl” value=”start” />
    <input type=”hidden” name=”ltmpl” id=”ltmpl” value=”start” />
    </form>
    </div>


    5. Click SAVE TEMPLATE 

    Enjoy Guys! and don’t forget to post your comments. � MyTricksTime.com

    Change Blog Background Become Fire


    Hi, friends! Now, I wil post about Change Blog Background Become Fire. This trick is proper for blog which has topic about automotive. But if your blog has black background, that’s also proper for fire background. OK shortly, if you want to know how to Change Blog Background Become Fire, just follow the steps below.

    1. Log in to your blogger account
    2. Go to Design Page Elements –> Add Gadget
    3. Choose “HTML/Java Script”
    4. Add the code below

    <style type=”text/css”>
    body{background:url(https://lh3.googleusercontent.com/_GaKwmMcf4N4/TSKbNtAKZVI/AAAAAAAAD_g/5BNQ-CAM0PM/DADfire.gif) repeat-x bottom center fixed black;}
    </style>

    5. Now, you can click SAVE

    Enjoy Guys! and don’t forget to post your comments. � MyTricksTime.com

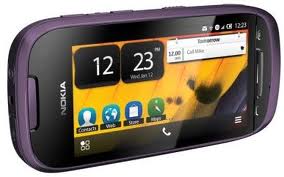
    Nokia 701 Review|Price|Tech Specs

    Nokia 701 is the first Phone With Symbian Belle (the latest symbian OS) A fresh, new look with up to six home screens bringing everything important right to you, including friends, Facebook posts, music and much more. And you decide how they look. Change wallpapers and add shortcuts for your favourite apps. You can also add great new email and radio widgets – mini apps you control right from the home screen.

    On the inside, there�s a powerful 1 GHz processor and 8 GB of internal memory – expandable up to 40 GB,
    also Nokia Introduced the NFC feature of(NFC offers an easy way to share and connect without any wires or hassle. And it couldn�t be simpler. All you do is touch another NFC-enabled phone to share a great photo or video with a friend. You can also connect instantly to any loudspeakers or accessories supporting NFC, such as Nokia BH-505 Bluetooth Stereo Headset. Just one tap and you�re connected).
    The Camera comes with a large 8 MP sensor gives you great results every time. Switch to HD video to shoot your movies in stunning high definition, and enjoy them again on the ultra-bright ClearBlack display. Plus you can make your shots picture perfect with Photo editor, then share them through email or upload straight to Facebook. Nokia Gives the lifetime free usage of OVI Maps and Navigation Instantly find the best of everything in your city – caf�s, shops, hotels and much more. Millions of places reviewed and rated worldwide, with expert tips from Trip Advisor and Lonely Planet. And best of all. Nokia 701 is a HD Device With 720p Playing and Recording. also supports HD apps and games.


    Nokia 701 Specifications


    Dispalay and UI


    • Screen size: 3.5″
    • Resolution: 16:9 nHD (640 x 360 pixels) IPS-LCD
    • 16 million colours; 160� viewing angle
    • ClearBlack display
    • Capacitive touch screen
    • Orientation sensor (Accelerometer)
    • Proximity sensor
    • Ambient light detector
    Gaming


    • Use the touch interface to play games
    • Dedicated graphics processor with OpenGL 2.0 enables 3D graphics
    • Native and Java games
    • Use the accelerometer to play games
    • NFC for multiplayer games
    • Preloaded games: 
    • Angry Birds Magic with NFC for unlocking new levels 
    • Asphalt 5 with NFC for multiplayer gaming 
    • More games available for download at Store


    Camera


    • 8 megapixel camera
    • Fullscreen 16:9 viewfinder with easy on-screen touch controls
    • 3rd generation dual LED flash
    • Face recognition software
    • Face tracking
    • Full focus
    • Focal length: 4.3 mm
    • F number/aperture: F2.8
    • 2x (digital)
    • Automatic red eye removal
    • Automatic motion blur reduction
    • Main camera 
    • HD quality 720p resolution 
    • Shoot 16:9 videos in HD 
    • Video capture in 720p 30 fps with codecs H.264, MPEG-4
    • Settings for scene, video light, white balance, colour tone
    • Stabilisation for video capture
    • up to 3x digital zoom


    OS


    • Symbian Belle
    • Java MIDP 2.1
    • Qt 4.7.3, Web Runtime 7.2
    • HTML 4.1 
    • Software updates over the air (FOTA) and over the internet (FOTI)
    • Flash Lite 4.0
    • OMA DM 1.2, OMA Client provisioning 1.1


    Connectivity


    • Bluetooth 3.0
    • High-Speed USB 2.0 (micro USB connector)
    • Micro USB connector and charging
    • 2 mm charging connector
    • Standard 3.5 mm AV connector with TV-out
    • NFC
    • WLAN
    • A-GPS
    • FM transmitter
    Nokia 701 Price in India
    Nokia 701 Price Rs.18999/- 

    Enjoy Guys! and don’t forget to post your comments. � MyTricksTime.com