Change Blog Background Become Matrix Style


Previously, I’ve posted about Change Blog Background Become Fire. Now, I will posted about Change Blog Background Become Matrix Style. Have you watch Matrix? I think you have. Because Matrix is a big movie. Even this movie can enter into Box Office and earned $742,128,461! Amazing! So, if you like Matrix, by learn this trick, you can try to change your blog background become Matrix style. Interested  Just follow the steps below.


1. Log in to your blogger account
2. Go to Design –> Page Elements –> Add Gadget
3. Choose “HTML/Java Script”
4. Add the code below

<style type=”text/css”>
<!–
body {
background-color: #000;
background-image: url(http://facebookskin.com/imgres/matrix-animated-image.gif);
}
–>
</style>


=> You can change the matrix style with other image, for example

    http://1.bp.blogspot.com/-tSfSsH65WZQ/TcJhgd58YWI/AAAAAAAAAYA/Ahbme-7fRzc/s1600/Matrixl.gif

5. Now, you can click SAVE

Enjoy Guys! and don’t forget to post your comments. � MyTricksTime.com

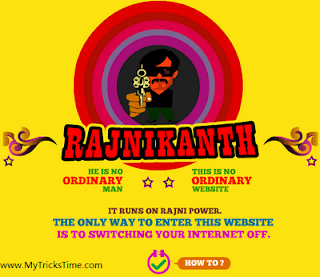
Rajnikant�s Website Runs without Internet

Dammm its serious if you do not believe than you have too because I just saw it it and enjoyed it a lot, means what ever you say Rajni-Kant properly means that there�s nothing which Rajnikant cannot do. So when I just saw this website I was just amazed than how it can run without internet but the thing is that its really running without as it will only be accessible if you will disconnect your internet.

So now if you wanna access Rajnikant�s website than visit www.allaboutrajni.com and you will see page like above so now disconnect your internet to access it further and than enjoy this funny website well I think its just on something like Biography type of website and than if you connect again to your Internet than this website will give you an error than disconnect your Internet again to access this website.
So here we go with another funny website which used Rajni�s Power to access website online, well I hope this is another creative concepts brought by South Designers for their GOD

Enjoy Guys! and don’t forget to post your comments. � MyTricksTime.com

Best CSS3 Web button With Pseudo Classes

Pseudo classes are bolted on to selectors to specify a state or relation to the selector. They take the form of selector:pseudo class { property: value; }, simply with a colon in between the selector and the pseudo class.


Many CSS proposals are not supported by all browsers, but there are four pseudo classes that can be used safely when applied to links.

                                                                       DEMO 
  • Link – This is the for the default link.
  • Visited – This Is the state you give to links which have already been visited.
  • Hover – This is the state when the mouse is over the link.
  • Active – This is the state you give when the visitor clicks on the link
 Image shows three different styles for link, hover and active.
The HTML for this button is simple, it’s just a link anchor tag with a class.

<a href=”#” class=”web_button”>CSS Button</a>

# Button Link State
This is the default setting for the button, for this we are going to use gradient colours, box shadow and border-radius.

.web_button{
background: #0.4; /* Old browsers */
background: -moz-linear-gradient(top, #b4df5b 0%, #b4df5b 100%); /* FF3.6+ */
background: -webkit-gradient(linear, left top, left bottom, color-stop(0%,#b4df5b), color-stop(100%,#b4df5b)); /* Chrome,Safari4+ */
background: -webkit-linear-gradient(top, #b4df5b 0%,#b4df5b 100%); /* Chrome10+,Safari5.1+ */
background: -o-linear-gradient(top, #b4df5b 0%,#b4df5b 100%); /* Opera 11.10+ */
background: -ms-linear-gradient(top, #b4df5b 0%,#b4df5b 100%); /* IE10+ */
background: linear-gradient(top, #b4df5b 0%,#b4df5b 100%); /* W3C */
filter: progid:DXImageTransform.Microsoft.gradient( startColorstr='#b4df5b', endColorstr='#b4df5b',GradientType=0 ); /* IE6-9 */
width:125px;
padding:20px;
display:inline-block;
color:#fff;
text-decoration:none;
font-weight:bold;
text-align: center;
border:1px solid #8dc025;
border-radius: 5px;
-moz-border-radius: 5px;
-webkit-border-radius: 5px;
-o-border-radius: 5px;
-webkit-box-shadow: 0px 2px 3px 2px rgba(50, 50, 50, 0.4);
-moz-box-shadow: 0px 2px 3px 2px rgba(50, 50, 50, 0.4);
box-shadow: 0px 2px 3px 2px rgba(50, 50, 50, 0.4);
}


# Button Hover State 
On the hover of the button we are going to change the background colour of the button.

.web_button:hover{
text-decoration:none;
background: #8dc025; /* Old browsers */
background: -moz-linear-gradient(top, #8dc025 0%, #8dc025 100%); /* FF3.6+ */
background: -webkit-gradient(linear, left top, left bottom, color-stop(0%,#8dc025), color-stop(100%,#8dc025)); /* Chrome,Safari4+ */
background: -webkit-linear-gradient(top, #8dc025 0%,#8dc025 100%); /* Chrome10+,Safari5.1+ */
background: -o-linear-gradient(top, #8dc025 0%,#8dc025 100%); /* Opera 11.10+ */
background: -ms-linear-gradient(top, #8dc025 0%,#8dc025 100%); /* IE10+ */
background: linear-gradient(top, #8dc025 0%,#8dc025 100%); /* W3C */
filter: progid:DXImageTransform.Microsoft.gradient( startColorstr='#8dc025', endColorstr='#8dc025',GradientType=0 ); /* IE6-9 */
}


# Button Active State 
For the active state we are changing the box shadow to be inverted by using the inset on the box-shadow property. 

.web_button:active{
-webkit-box-shadow: inset 0px 1px 3px 2px rgba(0, 0, 0, 0.4);
-moz-box-shadow: inset 0px 1px 3px 2px rgba(0, 0, 0, 0.4);
box-shadow: inset 0px 1px 3px 2px rgba(0, 0, 0, 0.4);
cursor: pointer;
}


Original Article >>

Enjoy Guys! and don’t forget to post your comments. � MyTricksTime.com

NOKIA LUMIA 800 features. or Nokia Lumia 800 price in india

Also known as Nokia Sea Ray
Expected Price:Rs.29000 

Place : Chennai Delhi Kolkata Mumbai
Expected Price: $644.44 approx
 
GENERAL 2G Network GSM 850 / 900 / 1800 / 1900
3G Network HSDPA 850 / 900 / 1900 / 2100
Announced 2011, October
Status Available. Released 2011, November
SIZE Dimensions 116.5 x 61.2 x 12.1 mm, 76.1 cc
Weight 142 g
DISPLAY Type AMOLED capacitive touchscreen, 16M colors
Size 480 x 800 pixels, 3.7 inches (~252 ppi pixel density)
Multitouch Yes
Protection Corning Gorilla Glass
– Nokia ClearBlack display
– Touch-sensitive controls
SOUND Alert types Vibration; MP3, WAV ringtons
Loudspeaker Yes
3.5mm jack Yes
MEMORY Card slot No
Internal 16 GB storage, 512 MB RAM
DATA GPRS Class 33
EDGE Class 33
Speed HSDPA 14.4 Mbps, HSUPA 5.76 Mbps
WLAN Wi-Fi 802.11 b/g/n
Bluetooth Yes, v2.1 with A2DP, EDR
USB Yes, microUSB v2.0
CAMERA Primary 8 MP, 3264×2448 pixels, Carl Zeiss optics, autofocus, dual-LED flash,
Features Geo-tagging
Video Yes, 720p@30fps, 
Secondary No
FEATURES OS Microsoft windows Phone 7.5 Mango
Chipset Qualcomm MSM8255 Snapdragon
CPU 1.4 GHz Scorpion
GPU Adreno 205
Sensors Accelerometer, proximity, compass
Messaging SMS (threaded view), MMS, Email, Push Email, IM
Browser WAP 2.0/xHTML, HTML5, RSS feeds
Radio Stereo FM radio with RDS
GPS Yes, with A-GPS support
Java No
Colors Black, Cyan, Magenta
– MicroSIM card support only
– SNS integration
– Active noise cancellation with dedicated mic
– MP3/WAV/eAAC+/WMA player
– MP4/H.264/H.263/WMV player
– Document viewer/editor
– Video/photo editor
– Voice memo/command/dial
– Predictive text input
BATTERY Standard battery, Li-Ion 1450 mAh (BV-5JW)
Stand-by Up to 265 h (2G) / Up to 335 h (3G)
Talk time Up to 13 h (2G) / Up to 9 h 30 min (3G)
Music play Up to 55 h

Enjoy Guys! and don’t forget to post your comments. � MyTricksTime.com

How To Add a Sitemap to Your Blog


A Sitemap is a beautiful and special effect for the blog. It is a   easy way for navigating the labels of your blog with a “New” feature. It shows the new posts and shows the “New” at the end of the post. 

Now your are going to see how to create a beautiful Sitemap in an easy way using JavaScript

  1. How to add a Sitemap to the blog?
  2. Go to Dashboard
  3. Click on Pages>>Create a New page.
  4. Name it or may not also.
  5. Copy the code shown below.
  6. </script><script src=”/feeds/posts/summary?alt=json-in-script&amp; max-results=500&amp;callback=loadtoc” type=”text/javascript”></script>
  7. Click on Html section of the page and paste the code in it.
  8. Preview the page and then save the page.

U R Done…!!!


Note:U can change the no. of the results in the script.

Enjoy Guys! and don’t forget to post your comments. � MyTricksTime.com