CSS3 Thread Out Social Sharing Widget for Blogger

When it comes to attracting attention to yourself on the internet, nothing does a better job than share buttons.
Whether its twitter or google plus, social media probably has a huge impact on your traffic. I set out to create an attention grabbing way to display buttons, and came up with this: a circle that expands revealing a bunch of Social Sharing Widget on hover.
This widget is created using Pure CSS3 and ShareThis social sharing plugin. This widget have 4 buttons: Facebook Like

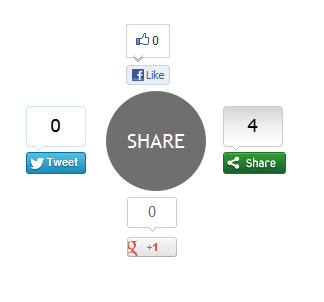
button, Google +1 button, Tweet button and main ShareThis button for more social sharing links.

Note: This Blogger Social Sharing widget animated zoom out feature will only work on latest Browsers and won�t work with Internet Explorer ( not tested with IE 10 ).

Live Demo

Add CSS3 Thread Out Social Sharing Widget In Blogger

1. Login to Blogger Dashboard > Design tab > Edit Html
2. Click on Expand Template widgets check box
3. Search for <div class=�post-footer-line post-footer-line-1?> HTML tag
4. And Put Below Code immediately after it
<b:if cond='data:blog.pageType == &quot;item&quot;'>
<style type="text/css">
.ringMenu {
width: 100px;
margin: 150px auto;
}
.ringMenu ul {
list-style: none;
position: relative;
width: 100px;
color: white;
}
.ringMenu ul a {
color: white;
}
.ringMenu ul li {
-webkit-transition: all 0.3s ease-in-out;
-moz-transition: all 0.3s ease-in-out;
-o-transition: all 0.3s ease-in-out;
-ms-transition: all 0.3s ease-in-out;
transition: all 0.3s ease-in-out;
}
.ringMenu ul li a {
display: block;
width: 100px;
height: 100px;
background: rgba(50,50,50,0.7);
text-align: center;
line-height: 100px;
-webkit-border-radius: 50px;
border-radius: 50px;
font-size: 20px;
}
.ringMenu ul li a:hover {
background: rgba(230,150,20,0.7);
text-decoration: none;
}

.ringMenu ul li:not(.main) {
-webkit-transform: rotate(-180deg) scale(0);
-moz-transform: rotate(-180deg) scale(0);
-o-transform: rotate(-180deg) scale(0);
transform: rotate(-180deg) scale(0);
opacity: 0;
}
.ringMenu:hover ul li {
-webkit-transform: rotate(0) scale(1);
-moz-transform: rotate(0) scale(1);
-o-transform: rotate(0) scale(1);
transform: rotate(0) scale(1);
opacity: 1;
}
.ringMenu ul li.top {
-webkit-transform-origin: 50% 152px;
-moz-transform-origin: 50% 152px;
-o-transform-origin: 50% 152px;
transform-origin: 50% 152px;
position: absolute;
top: -70px;
left: 50px;
}
.ringMenu ul li.bottom {
-webkit-transform-origin: 50% -52px;
-moz-transform-origin: 50% -52px;
-o-transform-origin: 50% -52px;
transform-origin: 50% -52px;
position: absolute;
bottom: -70px;
left: 50px;
}
.ringMenu ul li.right {
-webkit-transform-origin: -52px 50%;
-moz-transform-origin: -52px 50%;
-o-transform-origin: -52px 50%;
transform-origin: -52px 50%;
position: absolute;
top: 10px;
right: -50px;
}
.ringMenu ul li.left {
-webkit-transform-origin: 152px 50%;
-moz-transform-origin: 152px 50%;
-o-transform-origin: 152px 50%;
transform-origin: 152px 50%;
position: absolute;
top: 10px;
left: -50px;
}
</style>
<div class="ringMenu">
<script type="text/javascript">var switchTo5x=false;</script>
<script type="text/javascript" src="http://w.sharethis.com/button/buttons.js"></script>
<script type="text/javascript">stLight.options({publisher: "ur-e9856caa-8f3b-40a6-82af-461e390fe167"});</script>
<ul>
<li class="main"><a href="#main">SHARE</a></li>
<li class="top"><span class='st_fblike_vcount' displayText='Like'></span></li>
<li class="right"><span class='st_sharethis_vcount' displayText='Share'></span></li>
<li class="bottom"><span class='st_plusone_vcount' displayText='+1'></span></li>
<li class="left"><span class='st_twitter_vcount' displayText='Tweet'></span></li>
</ul>
</div>
</b:if>
4. Save your Template and Done!
Related Widget  : No 1. A Colorful jquery digital clock

Customization

The demo and post codes are same. You have to adjust this widget with your blog design ( how do I know your blog design look like.  No more customization needed for this CSS3 Thread Out Social Sharing Widget CSS3 Thread Out Social Sharing Widget for Blogger for Blogger, but if you want you can replace Share This script with your registered Share This account script.
Once you�ve done that, save everything and check it out! Thanks for reading, and if you liked this little tutorial and socal sharing widget don�t forget to share. It really helps. Click here for more stylish widgets

Enjoy Guys! and don’t forget to post your comments. � MyTricksTime.com

How to Add FaceBook Page Like Box to your Blog

Having a Facebook Page for our blog is a great way to promote it. Facebook Pages give you a more dynamic relationship with the public figures and organizations you are interested in. In simple words, it helps us to share blog updates to the interested facebook users who become a �fan� of our blog.
This post gives you a simple tutorial on how to add a Facebook Like Box widget to your blogs. If you haven�t created a facebook page yet, you can do it from here.

How to Add FaceBook Like Box to self-hosted WordPress:

You can do this simply by installing Facebook Like Box Widget to your wordpress. It allows you to enable Facebook Page Like Box through a widget. Refer the Installationand Screenshots sections for more help.

How to Add FaceBook Like Box to Blogger (blogspot):

  1. Go to FaceBook Plugins page HERE.
  2. Fill your Facebook Page URL or ID and customize the widget properties according to your requirements.
  3. After customizing the widget, click Get Code. Then copy the iframe widget code as shown below:

  4. Go to Blogger Dashboard � Layout/Design � Add a Gadget �HTML/Javascript � then paste that widget iframe code and Save.

Hope it worked fine. Don�t forget to Like MyTricksTime on facebook! 

Enjoy Guys!and don’t forget to post your comments. � MyTricksTime.com

Increase blog traffic using powerful meta tags

This is a very useful article for all bloggers,every blogger had a dream that their blog got higher rank in Google or other search engines.Adding meta tags to your blogger blog help you to increase blog traffic.The meta tag helps the search engine to find appropriate results,This is a powerful Search Engine optimization(SEO) method used by popular websites and blogs.

Within a few steps you can add powerful meta tags by following the below steps


  • Sign In to your Blogger Account
  • Take Design tab in your blog dashboard
  • Select Edit HTML
  • Add the following code inside <head> section

<b:if cond=’data:blog.url == data:blog.homepageUrl’>
<meta content=’Place blogger description here‘ NAME=’description’/>
<meta content=’Place your blog’s keywords here(seperated by commas)
NAME=’keywords’/>
</b:if>

Replace the Red text by your blog’s description and keywords and place it inside <head> section.Now your blogger blog meta tags are placed.The Blogger description you placed in meta tag description will display as the description of your blog in Google search results(as shown in the figure).

Now day by day there are so many blogs are arriving on internet.This powerful meta tag technique will help you to go your blog success.

Enjoy Guys! and don’t forget to post your comments. � MyTricksTime.com

Kill a Process in Command Prompt in Windows 7/XP

Q. How to kill/stop a Process a process in windows using Command Prompt ?


Killing or terminating a process without a task manager is possible using “taskkill” commands in Windows operating systems like Windows 7, 8, XP, 2003, 2008 servers. Taskkill is a powerful  command to kill or terminating (forcefully) any running process.


Windows Kill a Process by Process Name


Windows Kill a process by pid (Process ID)
Click Here to learn How to find Process ID in Windows
C:>taskkill /PID 1372

Enjoy Guys! and don’t forget to post your comments. � MyTricksTime.com

How to Improve Graphic 3D performance in Samsung Galaxy phones

3D graphics performance on Android devices has increased dramatically in the last year or so. Some newer phones have very impressive bench mark scores, and many don�t even break a sweat while playing high quality games or emulators for consoles like Playstation and Nintento 64. Some older devices such as the Samsung Galaxy Ace don�t have that kind of power, though, and require some help.

have ported a method that will help increase 3D graphics performance. The modification process is a relatively, and involves deleting the libGLES_android.so file from the phone, flashing the modified Adreno Lib files, and giving the build.prop a few tweaks to get everything running.

The end result is a GPU that renders 3D faster than it did previously. As always, make a complete backup before attempting anything, just in case something bad happens. For now, the tweak has only been tested on a couple of ROMs, but should work for any Gingerbread based ROM.

# Instruction 
Step 1Dowload this files

Step 2 : Place this files in your SD card.
Step 3 : now press and hold +volume key, Home Key and Shutdown side Key
Step 4 : Phone will restart automatically and start with recovery mode
Step 5 : select update firmware [second option] 
Step 6 :  It will show file browser, browse and select files which you have download
Step 7 : It will Start updating your phone
Step 8 : After successfully updation you can run your HVGA games easily in your phone

# Warning : 
using this method you are rooting your mobile phone, MyTricksTime.com is not responsible for that 

Enjoy Guys! and don’t forget to post your comments. � MyTricksTime.com