
- Download the necessary files below. Those are the firmwares and the software to be used in flashing which is Odin.
- Download the following.
- DDLE1
DDLC3
DDLC2
DXLC1
DDLA2
DDLA1
DXKL2 - ODIN3 v1.84
Step 2
- Extract all downloaded files in a location you prefer but I recommend extract it to your Desktop for easy access.
Step 3
- Open Odin ( for Vista/Win7 users run it as administrator )
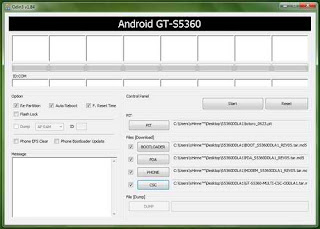

Just fill up the PIT and Files[Download] by clicking those 5 buttons then browsing the necessary files indicated below.
PIT : totoro_0623.pit
BOOTLOADER : BOOT_S5360DDLA1_REV05.tar.md5
PDA : PDA_S5360DDLA1_REV05.tar.md5
PHONE : MODEM_S5360DDLA1_REV05.tar.md5
CSC : GT-S5360-MULTI-CSC-ODDLA1.tar.md5
About Re-partition, it is Optional. You check or uncheck it. If you uncheck, it will do a normal flash, on the otherhand, it will Flash repair your SGY if you bricked it .
Step 4
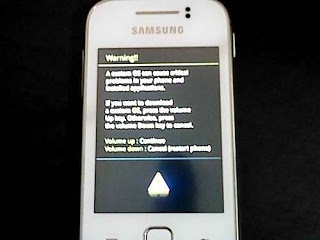
- Odin is now ready. Now, turn off your phone and be sure that it has no sim or mmc to avoid deletion of files. Make sure also that you have installed already SGY Drive on your computer or have Samsung Kies installed also. If none, download it here. After all those stuffs press POWER BUTTON + VOLUME DOWN + HOME BUTTON simultaneously. The image on the right should be seen on your SGY.

- You still have the option to back out.hehe.Press Volume Up to continue and Volume Down to cancel. Of course I assume that you pressed Volume Up, then it will show something like this>>>>>>
- Now, connect SGY to your PC while in Download Mode where we have set the Odin3 v1.4. There should be coloured yellow box under ID:COM and at the bottom part of the software in the Message Box the word “Added” should be seen. This means your SGY is connected via Odin. See screenshot.

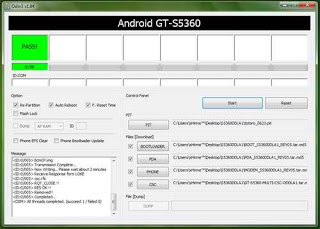
- Before clicking the Start button, double check the files Download. Then if all is on their right position, Click the Start Button. Wait until the it is finished. See screenshots on the right to see how it looks when you flash your SGY successfully.
Step 8
- Don’t remove yet your SGY from the computer because it is still configuring some phone settings. Wait until it automatically reboot. Wait until you see the boot screen.
Step 9
- After the successful flashing of your SGY, do a hard reset by typing *2767*3855# . Wait until it is finish. It will reboot again automatically. This process is just for making your SGY a very fresh phone.
Goodluck and Happy Flashing!
Warning : Make sure that your battery is more than 50% to avoid interruption which may lead to serious phone damage. Do the following procedure at your own risk.
Enjoy Guys! and don’t forget to post your comments. � MyTricksTime.com