How to Find Process ID (PID) in Windows


Each process must have a unique process ID in all windows operating systems like Windows 7, 8, XP, 2003, 2008 servers. You can find that PID from Task Manager’s process tab or by executing a command in command prompt.


Finding the Process Id (PID) of a windows process. Using task list command you can list all the running process in the system. And you can get the PID of each process from the command output.
C:>tasklist


Find the Process Identifieer (PID) from Task Manager
Steps: Open the task manager and select the “Process” tab.
Now select “View” from menu (on top) and select “Select Columns…”
Now tick “PID (Process Identifier)” and click “OK”


Enjoy Guys! and don’t forget to post your comments. � MyTricksTime.com

Whats new in windows 8

Despite certain criticism, Windows OS is the world market leader over the last dozen years. Microsoft�s creative ideas, constant improvements and innovations let Windows users be in touch with the newest tendencies in software technology. Having impressed the world with their Windows 7, Microsoft has continued developing brand new multi-platform desktop environment.
This fall (October, 26) new Windows 8 is finally ready to go. From the revolutionary �Metro� interface to the new level of security and privacy, Windows 8 is a solid example of innovative and all-embracing product. Although, the new OS features require deeper research, we�ll try to review most outstanding Windows 8 capabilities and improvements in brief.
Windows 8 targets both PC�s and ARM devices
This is in fact the first OS edition compatible with both traditional x64/x86 PC�s and mobile devices based on ARM architecture. Unlike desktop and laptop computers, tablet device sales have increased over 2011-12. That is why Microsoft takes a chance to boost their market share in a growing niche. With sensor and touchscreen options, new Windows 8 will hit mobile device market in November, 2012.
Windows 8 �Metro� Interface
This time, Windows interface became radically different � tiles are colorful and eye-catching. As mentioned above, Windows has been completely remodeled in the attempt to step away from everlasting desktop mode. Such mobile-oriented implementation gives the opportunity to experience new system with both touchscreen and mouse/ keyboard controllers. As to the Windows 7-style programs, they will start in traditional �desktop mode�. It means that you can easily switch to a traditional interface if needed.
New Start Screen
A new user experience begins with a �Start Screen� replacing �Start Menu�. You can reach it by pointing your mouse cursor to the bottom left corner (alternatively to �Start� button) and launch any of the installed applications. No more trivial icons � you will navigate through the mosaic of tiles that contain brief application info. Therefore, you don�t need to launch application just to learn more about it � very convenient.
�Charms� bar
Windows 8 Charms bar gives you a quick access to the following frequently used features like Search, Share, Start Screen, Devices and Settings. It�s available when pointing your mouse to the top or bottom right corner or you may alternative use Win+C hotkey to activate it. Charms bar is accessible system-wide no matter where the user is currently located in the OS. The Search feature allows you search online directly from the Charms bar � no need to start the browser. Another great feature is Sharing � your E-mail, Twitter and Facebook accounts has never been closer to you.
Windows Store
This is a place where users can officially acquire free or paid software from third parties. Currently, the Store is opened for developers who are encouraged to submit their Windows 8 applications for approval. Microsoft is focused on building the greatest application store online. The developers will be rewarded withup to 80% sales commission.
User Login features � new lock screen
Windows 8 offers a new creative way of user authorization on PC�s and mobile devices known as a picturepassword. In order to login, the user will have to �draw� certain gestures or shapes on a device screen. You will have 5 attempts to login this way, otherwise the system will require a password.
As you can see Windows 8 is full of brand new features to discover. If you�re a Windows 7 user, there is a two ways to upgrade � click here to visit the official upgrade resource.
This article is brought to you by a tech-savvy D. Blackthorn � a software enthusiast, digital audio and video specialist who is currently interested in iTunes conversion software.source:www.goharsh.com/computer/whats-new-in-windows-8/

Enjoy Guys! and don’t forget to post your comments. � MyTricksTime.com

How to create a folder without any name

Hello Dear Friends now i am again here with a new Trick for you, to day yo will know aboutHow to create a folder without any name:
At first select a folder or create a new folder. Now remove the name by rename option. Or Simply click F2 and then press backspace to remove the name. (Hold on that position and look if your Numlock in On. If it is off make it on because you have to type a code only by Numpad. In many laptop
 there is no numpad, the numpad is mixed with the
keyboard so e careful about it. )


Now in that position press ALT button and type a code 0160 by the help of your number pad and press Enter. you will see there is no name on it.


Important thing to notice: You should type the code 0160 by holding the Alt button. You must Hold down the ALT button. You must type the code by using the number pads. In some laptops the number pads are hidden and difficult to use. First turn on the number lock by using Fn+Nmlk and then type the code from the right hand side pad of your laptop. Do not use the horizontal number keys.

Here is a Video we have uploaded for clear instruction:


Hope you will love it 😀

Enjoy Guys! and don’t forget to post your comments. � MyTricksTime.com

How to Remove Watermark from Windows 8 Consumer Preview Desktop

We all know that,Windows 8 Consumer Preview has been launched and is being downloaded by many of us.If you are using Windows 8 then,you will find a Watermark showing Windows build information on your Desktop.


The Watermark is not being liked by many of us.As it looks like odd,when you are showing your Computer to your friends.There are many method for removing this Watermark from your desktop.
Below is a quick and easy method to Remove Windows 8 Watermark from Desktop.


How to Remove or Hide Watermark in Windows 8

  • First of all Select your favorite Image and set it as your Desktop background.
  • Now,Press “Win+R” to open Run Dialog Box


  • Copy and Paste below text in the Run Dialog Box
  • %appdata%MicrosoftWindowsThemes

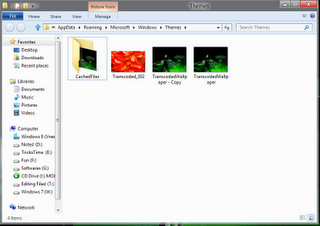
  • Now Windows Explorer will open the Theme folder.Here you will see a “CachedFiles” folder,which contains the cache file of your Desktop Background wallpaper and “TranscodedWallpaper.jpg” file which is your desktop background.
  • Now,there only make a copy of  “TranscodedWallpaper.jpg” file.Just click on the image file and press “Ctrl+C” and then press “Ctrl+V” key in the same folder to make a copy of image.


  • Now open the “CachedFiles” folder
  • Click on the image and press “F2” to rename it and copy it’s name


  • Now go back to the previous folder and then Rename the  “TranscodedWallpaper-Copy.jpg” with the name which you copied from CachedFiles folder in above step.
  • Now Cut this image file and paste it in “CachedFiles” folder.It will ask you to replace the file,simply click on “Replace the File in Destination Folder
  • Now go and refresh your desktop and see the magic

Enjoy Guys! and don’t forget to post your comments. � MyTricksTime.com

Password Protect Your Word Documents

We all use Microsoft Word to create documents.
and some times we dont want other people to access our documents
specially when you are on a shared computer in your company and you may have your certain secret data stored in your word document that should not be accessed by your boss or other employee�s.

To deal with such a situation Microsoft word 2007 integrated a security feature in Microsoft word so that you can password protect your files.


just follow these simple steps to make your document protected

  • Click on the Microsoft Office Button present on the top left corner of the window.
  • Now Click on the Save As option
  • Now a new window will pop up.
  • Click on Tools option at the bottom of the window.
  • Now you will have two options.
  • You can select either one or both options
  • One is Password To Open it will ask for the password every time the document is opened.
  • So to view the document you have to enter the password first.
  • Second is Password To Modify it will ask for the password every time somebody tries to modify the document.

Enjoy Guys! and don’t forget to post your comments. � MyTricksTime.com