How to use pendrive as ram memory in windows 7 & 8

Hi friends, Do you know Windows 7 / 8 and Windows vista comes with a ready boost option.
Q-What is ready boost
Ans- ReadyBoost is a disk cache component of Microsoft Windows, first introduced with Microsoft’s Windows Vista in 2006 and bundled with Windows 7 in 2009. It works by using flash memory, a USB flash drive,SD card, Compact  Flash, external hard drive or any kind of portable flash mass storage

system as a cache. ReadyBoost is also used to facilitate SuperFetch, which allows it to perform analysis of boot-time disk usage patterns and creates a cache which is used in subsequent system boots.” Source
If you are using a high configuration PC, It doesn’t show any effect on speed because if you are a normal user I think only a few times you use your full ram memory but if you are using an old pc with low ram memory(Like 512 MB or IGB) and harddisk & using vista or 7. It speed up your PC and you will see the result, reduced application data loading time, reduced shutdown and restart time and many more you can’t imagine without High ram memory.

How to use this feature

  • Plug in your pendrive
  • Format with NTFS or FAT32
  • Now go to properties
  • Select ReadyBoost
  • Check Use this device
  • Choose maximum space to reserve system speed
  • Click on Apply and OK. 

Your readyboost PenDrive is ready Now to Use.

Here is an personal suggestion HP and Sandisk is the Best for this work so what are you waiting for.

Enjoy Guys! and don’t forget to post your comments. � MyTricksTime.com

How to Restore your Computer from a System Image

Recently we had taught you,how to make a System Image Disc in Windows 7,Now it’s time to see if it is working or not.First of all make sure that your system is set up to boot from disc drive,because we will boot the PC with System Repair Disc,which we had created.
restore windows 7

Steps to Restore Computer From System Image

  • Insert your Repair Disc into Disk Drive and restart your Computer
  • Now you will see a black screen asking “Press any key to boot from disc“.Just follow the instruction given by your computer and wait until Windows loads up all the required files
  • Now,Select a Keyboard input method: US and click on the “Next” button
  • You will see different-different options.Just you have to select “Restore your computer using a system image that your created earlier” and click on Next button.
  • Now windows will look for the drive for system image.
  • Click on Next button.
  • Now click on Finish to restart the restoring process.

Enjoy Guys! and don’t forget to post your comments. � MyTricksTime.com

How to increase your RAM and make your computer system faster


These tips will help you to increase your Desktop or Laptops speed and make your system quick

It includes to main steps . from these you will learn How to increase your RAM and make your computer system faster 


1.Increase virtual Ram (Paging)       2.Check for errors, Analyze and defragment. 3. Deleting %temp% and temp

1.   Increase virtual Ram (Paging) It will increase the virtual Ram .just follow the steps

    •  Hold down the ‘Windows’ Key and Press the ‘Pause/Break’ button at the top right of your keyboard.

Another way is Right-Clicking ‘My Computer’ and then Select ‘Properties’.

    • Click on the ‘Advanced’ tab.


    • Under ‘Performance’, click ‘Settings’.


    • Then click the ‘Advanced’ tab on the button that pops up.


    • Under ‘Virtual Memory’ at the bottom, click ‘Change’.


    • Click the ‘Custom Size’ button.


    •  For the initial size (depending on your HD space), type in anywhere from 1000-1500 (although I use 4000), and for the Maximum size type in anywhere from 2000-2500 (although I use 6000).


    •  Click ‘Set’, and then exit out of all of the windows.


    •  Finally, Restart your computer.


    •  You now have a faster computer and 1-2GB of Virtual RAM..!


2.Check for errors, Analyze and defragment.

    • go to my computer


    •  right click on c drive, click properties


    • click on tools tab


    • Click check now and start disk check. It will scan the system for errors.sometimes it show , disk check will take place when you restart computer, if it show such message then click yes and it will automatically check when you restart.


    • follow step 1-4 for all drives.


    • if no message is shown then manually check for errors and then click analyze and after analyzing click defragment.


    • On your next restart you will see the changes in speed.


3. Deleting %temp% and temp


    • go to run 
    • type:-  %temp%
    • and press enter
    • select all by using ctrl+a delete all files. This are temparary files taking the disk space. Deleting files would not affect the system.some files may not be deleted so just ignore them.

Follow all this steps every week or every month for better performance from your system.
Enjoy Guys! and don’t forget to post your comments. � MyTricksTime.com

Get Windows 8 Metro Start Menu On Windows 7 Using Newgen

Windows 8 logo for website
Windows 8 Logo

As our readers will know, Windows 8 Developer Preview was released yesterday. This version of Windows 8, as suggested by the name, is meant for developers who wish to develop Windows 8 apps in the future. It is not the complete version of the OS that will be released sometime in 2012.

While we�ve already written an easy to follow guide on how to install Windows 8 in VirtualBox, but there are plenty of people who want to, but would rather not try out an incomplete OS. Such people can get a slice of the Windows 8 action with Newgen: a Metro style launcher for
Windows Vista and Windows 7. Previously however, you could simply use Mosaic or Eight, which were great alternative for Newgen but they weren�t that good in terms of looks back then.
Developed by speaker60 and 1000MrCasper and released on the open source project community CodePlex, Newgen aims to bring the ultra-Metrofied Start menu to current desktop PCs running Windows Vista or 7.
From CodePlex:

Newgen is an application that brings the new Metro UI to your desktop. It is a set of live widgets that shows some content from the web and some from your PC.
Newgen supports WPF, HTML5, and HTML widgets. 

Read Also : Easy step by step How to use pen drive as RAM in windows 8

Features :

  • Support for HTML widgets
  • Launch your favourite apps and webs in one click
  • Customize as you want
  • Switch to your opened apps, in just few clicks
  • Get Windows 8 Metro UI to your desk
  • Play your videos and music, view your pictures without opening them
  • Get your tweets, mails and weather reports in front of your eye, just sitting
  • Provides easy-to-use API for Widget developers
  • Get updates from us without navigating our site
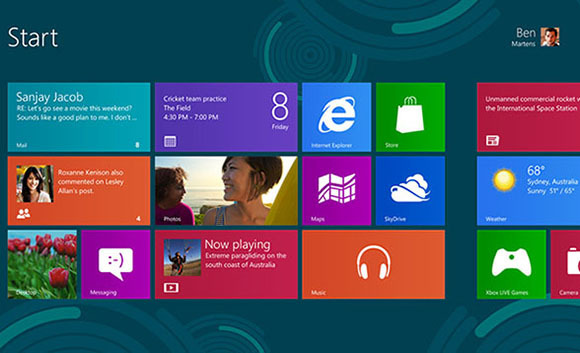
  

We�ve personally tested the application and can confirm that it mostly works as claimed. It takes some tedious work setting up exactly as you want, but since it is a new app, it is to be expected.
After you�ve got the app installed, you launch it from the Start menu on your PC. On launching, you are treated to a very good-looking Metro style Start menu where you can add tiles, widgets and direct links to websites of your choice. They can be added by calling up the Start Menu (left-click on the right edge of the screen) and then right-clicking, which will show up options for you to add said items.
The transitions and overall UX is similar to what Microsoft offers with Windows 8�s launcher though, obviously, Newgen isn�t as full-featured as the real thing. However, there are plenty of settings you can tinker around with in order to customize your experience.

If you�re interested, you can give Newgen a try by downloading it from the link embedded below.
Download Newgen for Windows Vista, 7 [CodePlex Link]
You can follow us on Twitter or join our Facebook Funpage to keep yourself updated on all the latest from Microsoft, Google, Apple and the web.

Enjoy Guys! and don’t forget to post your comments. � MyTricksTime.com

Kill a Process in Command Prompt in Windows 7/XP

Q. How to kill/stop a Process a process in windows using Command Prompt ?


Killing or terminating a process without a task manager is possible using “taskkill” commands in Windows operating systems like Windows 7, 8, XP, 2003, 2008 servers. Taskkill is a powerful  command to kill or terminating (forcefully) any running process.


Windows Kill a Process by Process Name


Windows Kill a process by pid (Process ID)
Click Here to learn How to find Process ID in Windows
C:>taskkill /PID 1372

Enjoy Guys! and don’t forget to post your comments. � MyTricksTime.com