PHOTOSHOP – How to Design Windows 10 Logo Full Tutorial Photoshop CS6

PHOTOSHOP - How to Design Windows 10 Logo Full Tutorial Photoshop CS6
PHOTOSHOP – How to Design Windows 10 Logo Full Tutorial Photoshop CS6

Hello Readers, MyTricksTime team again come with a Photoshop tutorial. We post on Photoshop after a long time, earlier we post about How to Create Cracks On the Face in Photoshop CS6, Now we are teaching you how you can easily create windows 10 logo. here is step by step full tutorial where you will learn this from your self.

How to Create Cracks On the Face in Photoshop CS6

The Adobe Photoshop has taken the standards of editing and photo manipulating at it�s peak. People are just crazy about it�s effect and awesome interface. Furthermore, it is easy to use photo editing software.

Now a days, Photoshop has become a mandatory tool for many individuals who want to do something creative like Photographers, ad agencies, feature films, start up companies, webs designers etc.

Here is a cool tip which can be used to edit an image in Photoshop CS6, which can generate cracked look to your image. This effect can also be achieved in any versions of Photoshop.

Since, there are many more awesome versions of Photoshop available. Furthermore, the reason of our for using CS6 is that it is most advanced and professional version of Photoshop. So now, without wasting much of your time let�s get towards the trick.

You May like Also:

The effect of creating cracks on the face in Photoshop CS6 is not such hard job to do. You need to follow the simple steps and you are all the way through it.
Additionally, believe me it is hell fun creating such cracked face images of young ones. It can give you a look that how a person is going to look when he or she�ll become old.
Step 1 : Open the raw image on Photoshop A portrait of a person preferably.
Step2 : Open Google, type �Cracks on the wall� and check the images. Download an image of a wall with the cracks on it.
Step 3 : Copy paste the downloaded cracks image right above the portrait image.
Step 4 : In the right side corner, you will find a box called Layers. There you will see both the images you have loaded on Photoshop. Be sure, that the cracks image layer is on the top and the portrait layer is in the bottom.
Step 5 : Now Select the cracks image in the layers box, and click on the drop down menu on the top of the layer box. You will get various options like Lighten, Softlight, Hard light, Linear etc. Click on �Multiply�.  That will directly give the crack effect the portrait picture.
Step 6 : Click on the history brush and erase the unnecessary cracks on the face.

Congratulations! You have successfully created crack effects on the face of your desired image.

Conclusion

This was detailed guide for the people who wanted to learn that, �How to Create Cracks on the Face in Photoshop CS6?� I am sure this would have been interesting and helpful tutorial for you guys.
Thus, if you have any confusions or questions left related to this article then do let me know. So, that we could help you to resolve your queries and questions as soon as possible.
Finally, if you have found this guide helpful then don�t forget to share it with your friends in order to help them to learn photo editing. Your shares and likes mean a lot to us.

Enjoy Guys! and don’t forget to post your comments. � MyTricksTime.com
Photoshop Tutorial – How To Paint A Car

Photoshop Tutorial - How To Paint A Car step by step learn
Photoshop Tutorial – How To Paint A Car

Changing the color of your favorite car (in a photo) is extremely easy. Here�s a simple tutorial that will guide you through changing them on the fly. Complete tutorial after jump.

Photoshop Tutorial - How To Paint A Car trick step by step - step 1
Photoshop Tutorial – How To Paint A Car  – step 1

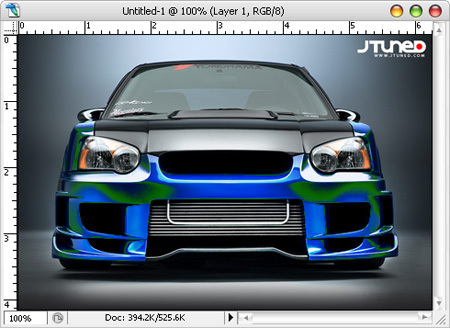
The blue color Subaru WRX above may not appeal to all tastes. I kindda like it but I�m sure other colors will be nice too so let�s try changing them or proposed it to Subaru. Choose Image/Adjust/Replace Color to get started.

Photoshop Tutorial - How To Paint A Car step by step - step 2
Photoshop Tutorial – How To Paint A Car  – step 2

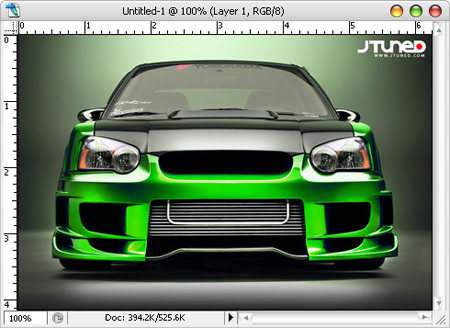
By default, the Replace Color dialog shows a monochrome view of what�s being selected (White�s active, Black�s not). Now click on the body of the Subaru and you will noticed that the region of that color becomes selected. Try changing the Hue, the images changes to reflect that, as seen in the image below (greenish)

Photoshop Tutorial - How To Paint A Car step by step - step 3
Photoshop Tutorial – How To Paint A Car  – step 3

Now here�s the result of our initial change. It really doesn�t matter if it is a ugly green Subaru at this stage. Go for something bright, the aim here is to see it�s change/affect.

Photoshop Tutorial - How To Paint A Car step by step - step 4
Photoshop Tutorial – How To Paint A Car  – step 4

To add more colors. hold on the SHIFT key and click on the unchanged area (all the blue color on the Subaru), or
drag to select a range of colors. That range will be added to the selection and the color will change the image. To remove a selection added accidentally, hold ALT while clicking to select the color.

Photoshop Tutorial - How To Paint A Car step by step - step 5
Photoshop Tutorial – How To Paint A Car  – step 5

Keep on adding the color until you have the entire blue Subaru changed to green color. One way to increase the range of colors changed is to raise the Fuzziness value; but this will draw unwanted colors in the surrounding area.

Keep on adding the color until you have the entire blue Subaru changed to green color. One way to increase the range of colors changed is to raise the Fuzziness value; but this will draw unwanted colors in the surrounding area.

Photoshop Tutorial – How To Paint A Car  – step 6

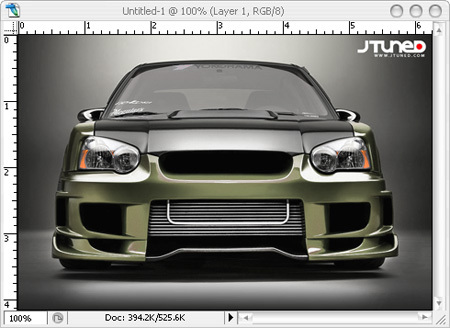
Now when you are sure the whole body is selected, change the Hue, drag and move it around until you get the color you want. Toggle the Fuzziness as well if you want. I end up with a gold color Subaru WRX.
Enjoy Guys! and don’t forget to post your comments. � MyTricksTime.com

How To Create Custom Patterns In Photoshop

Most of the time, default Adobe Photoshop�s patterns just could not satisfied designers needs. Minutes later you will be creating your own custom pattern for buttons, interfaces, photo scan-lines, etc.

Download this sample

1. Create A Pattern Image

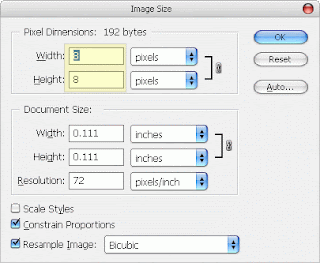
Fire up a new canvas. It should be small (in terms of height x width). Image you are creating here will duplicate itself to form your pattern in the later stage. For this example, I�ll be using 8�8 pixel canvas, zoomed them up and create a small pattern like this.Enjoy Guys! and don’t forget to post your comments. � MyTricksTime.com


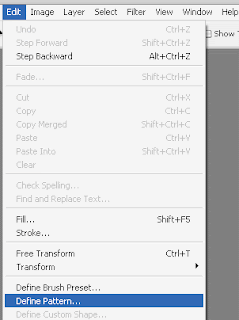
Let�s define it as pattern so it can be used at anytime. Select Edit ->Define Pattern
Rename it to something you can remember (especially useful when you have a lot of custom patterns in future). I�ll call it Stripe5x because it will give me a stripe effect and 5px is how thick each stripes are. Click OK and you�ve just have your custom pattern defined.

3. Using Custom Pattern

Create a new canvas to try out the custom pattern. With your new canvas selected, Select Edit -> Fill.


In the Fill dialog box, select Pattern from the dropdown, find the pattern you�ve just created in Custom Pattern and click OK.


The canvas will now be filled with pattern you�ve just created. Tweak the colors and it should look fine.

Misc: Alternative Way To Call Custom Pattern

Another way to call up the custom pattern. (Right Click) layer name -> Blending Options


Check Pattern Overlay, select your pattern


Misc � Delete Custom Pattern

Anywhere in the pattern selection box, (Right Click), choose Delete.