This example shows how to record sound and save it to SD card it.
Algorithm:
1.) Create a new project by
File->
New ->
Android Project name it SoundRecorder.
2.) Write following into main.xml:
<?xml version=“1.0” encoding=“utf-8”?>
<LinearLayout xmlns:android=“http://schemas.android.com/apk/res/android”
android:layout_width=“fill_parent”
android:layout_height=“fill_parent”
android:orientation=“horizontal” > <Button
android:id=“@+id/start”
android:layout_width=“wrap_content”
android:layout_height=“wrap_content”
android:text=“Start Recording”
android:onClick=“startRecording” />
<Button
android:id=“@+id/stop”
android:layout_width=“wrap_content”
android:layout_height=“wrap_content”
android:text=“Stop Recording”
android:enabled=“false”
android:onClick=“stopRecording”
/>
</LinearLayout>
3.) Write following into manifest file:
<manifest xmlns:android=“http://schemas.android.com/apk/res/android”
package=“com.example.soundrecorder”
android:versionCode=“1”
android:versionName=“1.0” > <uses–sdk
android:minSdkVersion=“8”
android:targetSdkVersion=“15” />
<uses–permission android:name=“android.permission.WRITE_EXTERNAL_STORAGE”/>
<uses–permission android:name=“android.permission.RECORD_AUDIO” />
<application
android:icon=“@drawable/ic_launcher”
android:label=“@string/app_name”
android:theme=“@style/AppTheme” >
<activity
android:name=“.SoundRecorder”
android:label=“@string/title_activity_sound_recorder” >
<intent–filter>
<action android:name=“android.intent.action.MAIN” />
<category android:name=“android.intent.category.LAUNCHER” />
</intent–filter>
</activity>
</application>
</manifest>
4.) Run for output.
Steps:
1.) Create a project named SoundRecorder and set the information as stated in the image.
Build Target: Android 4.0
Application Name: SoundRecorder
Package Name: com. example. SoundRecorder
Activity Name: SoundRecorder
Min SDK Version: 8

2.) Open SoundRecorder.java file and write following code there:
package com.example.soundrecorder; import java.io.File;
import java.io.IOException;
import android.app.Activity;
import android.content.ContentResolver;
import android.content.ContentValues;
import android.content.Intent;
import android.media.MediaRecorder;
import android.net.Uri;
import android.os.Bundle;
import android.os.Environment;
import android.provider.MediaStore;
import android.util.Log;
import android.view.View;
import android.widget.Toast;
public class SoundRecorder extends Activity {
MediaRecorder recorder;
File audiofile = null;
private static final String TAG =“SoundRecordingActivity”;
private View startButton;
private View stopButton;
@Override
public void onCreate(Bundle savedInstanceState) {
super.onCreate(savedInstanceState);
setContentView(R.layout.main);
startButton = findViewById(R.id.start);
stopButton = findViewById(R.id.stop);
}
public void startRecording(View view) throwsIOException {
startButton.setEnabled(false);
stopButton.setEnabled(true);
File sampleDir =Environment.getExternalStorageDirectory();
try {
audiofile =File.createTempFile(“sound”, “.3gp”, sampleDir);
} catch (IOException e) {
Log.e(TAG, “sdcard access error”);
return;
}
recorder = new MediaRecorder();
recorder.setAudioSource(MediaRecorder.AudioSource.MIC);
recorder.setOutputFormat(MediaRecorder.OutputFormat.THREE_GPP);
recorder.setAudioEncoder(MediaRecorder.AudioEncoder.AMR_NB);
recorder.setOutputFile(audiofile.getAbsolutePath());
recorder.prepare();
recorder.start();
}
public void stopRecording(View view) {
startButton.setEnabled(true);
stopButton.setEnabled(false);
recorder.stop();
recorder.release();
addRecordingToMediaLibrary();
}
protected void addRecordingToMediaLibrary() {
ContentValues values = new ContentValues(4);
long current = System.currentTimeMillis();
values.put(MediaStore.Audio.Media.TITLE,“audio” + audiofile.getName());
values.put(MediaStore.Audio.Media.DATE_ADDED, (int) (current/ 1000));
values.put(MediaStore.Audio.Media.MIME_TYPE,“audio/3gpp”);
values.put(MediaStore.Audio.Media.DATA, audiofile.getAbsolutePath());
ContentResolver contentResolver =getContentResolver();
Uri base =MediaStore.Audio.Media.EXTERNAL_CONTENT_URI;
Uri newUri = contentResolver.insert(base, values);
sendBroadcast(newIntent(Intent.ACTION_MEDIA_SCANNER_SCAN_FILE, newUri));
Toast.makeText(this, “Added File “ + newUri, Toast.LENGTH_LONG).show();
}
}
3.) Compile and build the project.
Output


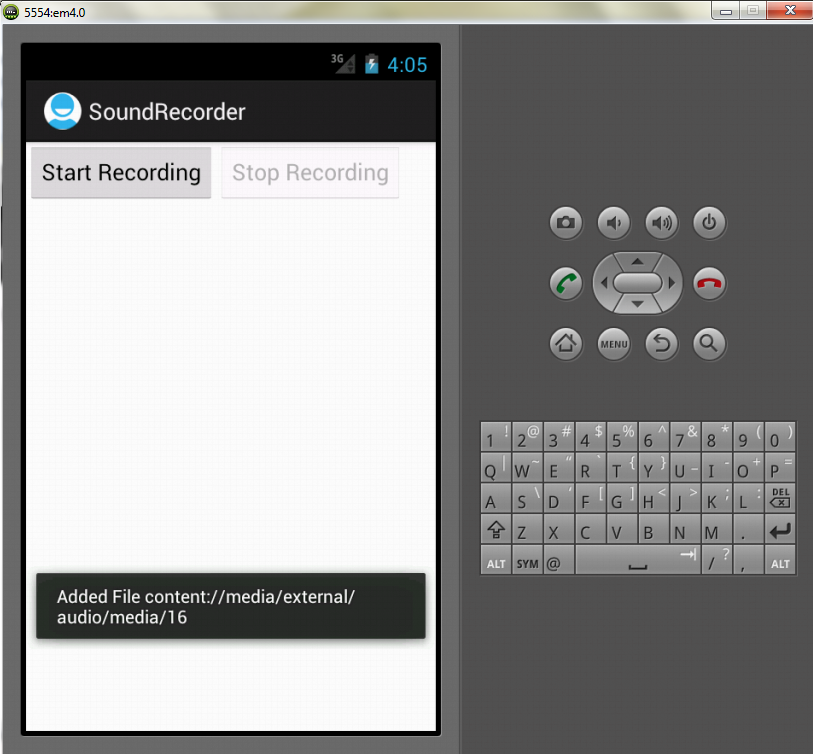
Enjoy Guys! and don’t forget to post your comments. � MyTricksTime.com
.jpg)