How to add Recommended Post Slide Out Widget For Blogger

Recommended Post Widget

You know those popup messages that slide out from the bottom right corner once you�ve almost reached the bottom of the page? Well, they used to be available only on WordPress but not anymore; now Blogger users can enjoy it too! The Recommended Post slide Out Widget is an invitation to the reader to read any other post once he has read one of your blog entries. It’s both useful for you (can improve your Click Through Rate (CTR) ) and for your blog visitors too.


Demo
Scroll down to the bottom of the post and you should see the Recommended Slide Out Widget appearing in the right corner of blog’s page.


How to add the Recommended Post Slide out Widget
1. Log in into your Blogger account, then go to Design (or Layout) > Page Elements
2. Click on Add a Gadget Link
3. Choose “HTML/JavaScript” option
4. Paste this code inside the empty box:

<div id=”hlslidein” style=”display:none;”> <div class=”help”>?</div><div class=”expand”>+</div> <div class=”close”>X</div> <p>Recommended for you</p> <div id=”hlslidein_image”></div> <div  id=”hlslidein_title”>Loading..</div> </div> <script> if(document.location.href.split(“/”).length==6&&document.location.href.indexOf(“.html”)!=-1){if(typeof hl_onload_queue==’undefined’)var hl_onload_queue=[];if(typeof hl_dom_loaded==’boolean’)hl_dom_loaded=false;else var hl_dom_loaded=false;if(typeof hl_async_loader!=’function’){function hl_async_loader(src,callback,id){var script=document.createElement(‘script’);script.type=”text/javascript”;script.async=true;script.src=src;script.id=id;var previous_script=document.getElementById(id);if(previous_script)if(previous_script.readyState==”loaded”||previous_script.readyState==”complete”){callback();return}else{script=previous_script}if(script.onload!=null)previous_callback=script.onload;script.onload=script.onreadystatechange=function(){var newcallback;if(previous_script&&previous_callback)newcallback=function(){previous_callback();callback()};else newcallback=callback;if(hl_dom_loaded){newcallback()}else hl_onload_queue.push(newcallback);script.onload=null;script.onreadystatechange=null};var head=document.getElementsByTagName(‘head’)[0];if(!previous_script)head.appendChild(script)}}if(typeof hl_domLoaded!=’function’)function hl_domLoaded(callback){hl_dom_loaded=true;var len=hl_onload_queue.length;for(var i=0;i<len;i++){hl_onload_queue[i]()}}hl_domLoaded();hl_async_loader(“http://ajax.googleapis.com/ajax/libs/jquery/1.7.1/jquery.min.js”,function(){hl_async_loader(“http://helplogger.googlecode.com/svn/trunk/Recommended Post Slide Out For Blogger Blogspot.js”,function(){},”hl-out-slide”)},”jQueryjs”)} </script> <a href=”http://helplogger.blogspot.ro/2012/06/recommended-post-slide-out-widget-for.html” target=”_blank”></a>


5. Save The Widget.
6. Go to Edit HTML > Check the “Expand Widget Template” box
7. Search (CTRL + F) for the following code :

<div class=’post-footer-line post-footer-line-1′>


OR

<p class=’post-footer-line post-footer-line-1′>


OR

<data:post.body/>


Immediately below any of these lines, add the following snippet

<b:if cond=’data:blog.pageType == “item”‘>
<div style=’display:none’ id=’bpslidein_place_holder’></div>
</b:if>


Now when the reader scrolls down to this div, the slide will open up.

8. Save your template. And that’s it!

Enjoy Guys! and don’t forget to post your comments. � MyTricksTime.com

Add Facemoods Emoticons To Your Blogger Comments

Want to add Facemoods emoticons in your Blogger comments? Then follow the next steps:Step 1.

If you are using the old Blogger interface:

  • Go to Dashboard – Design – Edit HTML – Expand Widget Template (make a backup)

If you are using the new Blogger interface:

  • Go to Dashboard – Template – Edit HTML – Proceed – Expand Widget Template (make a backup)


Step 2. Search (CTRL + F) for this code:


Read Also : Add �Email Subscription Form� To Blogger Blogspot

  • For previous commenting system: 

<h4 id=’comment-post-message’><data:postCommentMsg/></h4>

  • For threaded comments:

<div class=’post-footer-line post-footer-line-3′>

Step 3. Add the below code just above it
(for threaded comments, add the code after):

<b:if cond=’data:blog.pageType == “item”‘>
<div style=’ width: 450px; text-align: left; border: 1px dashed #0084ce; background: transparent; padding: 10px; color:#000000; font-weight:bold; ‘>
<img border=’0′ src=’http://1.bp.blogspot.com/-zY65UBxSl6w/T67AajI_U6I/AAAAAAAACIc/fCV19C1627Q/s1600/helplogger.blogspot.com(1).gif’/> :a
&#160;
<img border=’0′ src=’http://4.bp.blogspot.com/-M8aBZtLjGqY/T67Ai2d8eAI/AAAAAAAACIk/PrDerObloAw/s1600/helplogger.blogspot.com+(2).gif’/> :b
&#160;
<img border=’0′ src=’http://3.bp.blogspot.com/-HfIjCWOuxwo/T67Ar7HZiHI/AAAAAAAACIs/RgwvdPP4JSc/s1600/helplogger.blogspot.com(3).gif’/> :c
&#160;
<img border=’0′ src=’http://4.bp.blogspot.com/-98YuuiC8MIc/T67AzJ3Xf0I/AAAAAAAACI0/UtaFpgTb_PM/s1600/helplogger.blogspot.com(4).gif’/> :d
&#160;
<img border=’0′ src=’http://3.bp.blogspot.com/-ikCFMFesIrE/T67BAtTQGhI/AAAAAAAACI8/AisqU7R–Yc/s1600/helplogger.blogspot.com(5).gif’/> :e
&#160;
<img border=’0′ src=’http://2.bp.blogspot.com/-VSY5nbsSEIs/T67BK3G-B6I/AAAAAAAACJE/n_fhk-2Ihqc/s1600/helplogger.blogspot.com(6).gif’/> :f
&#160;
<img border=’0′ src=’http://3.bp.blogspot.com/-e9hytPNLXeY/T67BSj27JJI/AAAAAAAACJM/Rwonrid9oiQ/s1600/helplogger.blogspot.com(7).gif’/> :g
&#160;
<img border=’0′ src=’http://4.bp.blogspot.com/-mT-nqGFvXec/T67BZDPxvxI/AAAAAAAACJU/fgTPtQNxMK8/s1600/helplogger.blogspot.com(8).gif’/> :h
&#160;
<img border=’0′ src=’http://3.bp.blogspot.com/-xcMDAiCizIE/T67BfnBeWSI/AAAAAAAACJc/_OqmXLGhjLg/s1600/helplogger.blogspot.com(9).gif’/> :i
&#160;
<img border=’0′ src=’http://3.bp.blogspot.com/-XJUn74vJTwo/T67BrafHO3I/AAAAAAAACJk/B40nJjxUxNE/s1600/helplogger.blogspot.com(10).gif’/> :j
&#160;
<img border=’0′ src=’http://3.bp.blogspot.com/-JgARtAx7IHo/T67B2Db6LjI/AAAAAAAACJs/U1EWgczqOYY/s1600/helplogger.blogspot.com(11).gif’/> :k
&#160;
<img border=’0′ src=’http://2.bp.blogspot.com/–K1Z6RvN57w/T67CCzlaGcI/AAAAAAAACJ0/iF2-osmFALE/s1600/helplogger.blogspot.com(12).gif’/> :l
&#160;
<img border=’0′ src=’http://4.bp.blogspot.com/-c0DJDg4M2n4/T67CTf-xShI/AAAAAAAACJ8/BqUmJYoDBLI/s1600/helplogger.blogspot.com(13).gif’/> :m
&#160;
<img border=’0′ src=’http://1.bp.blogspot.com/-zrvYy6caFXM/T67CZi7etnI/AAAAAAAACKE/iPJsX_duWjE/s1600/helplogger.blogspot.com(15).gif’/> :n
&#160;
<img border=’0′ src=’http://3.bp.blogspot.com/-F2LUTd1hG_o/T67CfNLnIlI/AAAAAAAACKM/UHuPyigCX24/s1600/helplogger.blogspot.com(16).gif’/> 😮
&#160;
<img border=’0′ src=’http://3.bp.blogspot.com/-Vd6U_2eq_Gk/T67CosaWm8I/AAAAAAAACKU/JgnYMS4AJOc/s1600/helplogger.blogspot.com(14).gif’/> :p
&#160;
<img border=’0′ src=’http://1.bp.blogspot.com/-faDYi6E_d6E/T67CybEuj1I/AAAAAAAACKc/nHxSH7KMSwY/s1600/helplogger.blogspot.com(17).gif’/> :q
&#160;
<img border=’0′ src=’http://2.bp.blogspot.com/-2QiwXpJ7gxk/T67C41ItlCI/AAAAAAAACKk/8sba1I9fZOY/s1600/helplogger.blogspot.com(18).gif’/> :r
&#160;
<img border=’0′ src=’http://2.bp.blogspot.com/-KUlSaDVWqW8/T67C_4ITH-I/AAAAAAAACKs/e6N7K2jJvl8/s1600/helplogger.blogspot.com(19).gif’/> :s
&#160;
<img border=’0′ src=’http://2.bp.blogspot.com/-UC_5gE8LgaQ/T67DGU12FBI/AAAAAAAACK0/oHA628PaDhk/s1600/helplogger.blogspot.com(20).gif’/> :t   <a href=’http://helplogger.blogspot.com/2012/05/add-facemoods-emoticons-to-your-blogger.html’ style=’color: rgb(30, 122, 183); font-size: x-small;’>Add smileys to Blogger + </a>
</div></b:if>

Step 4. Now search for this piece of code:

</body>


Step 5. And add the following code immediately above it:

  • For previous commenting system:

<script type=’text/javascript’ src=”http://helplogger.googlecode.com/svn/trunk/facemood emoticons.js”/>

  • For threaded comments: 

<script type=’text/javascript’ src=”http://helplogger.googlecode.com/svn/trunk/facemood emoticons threaded.js”/>

Step 6. Save the Template. And enjoy your comments 🙂Enjoy Guys! and don’t forget to post your comments. � MyTricksTime.com

How To Add �Email Subscription Form� To Blogger Blogspot

If you are providing useful information in your blog, then every visitor will want to get latest updates from your blog. For that purpose you need a Email Subscription Form in your blog, so that interested visitors can easily get latest updates. And to add email or feed Subscription Form to your blogger blog (blogspot) it’s a very easy thing to do. So let’s begin:

1. Log in to Blogger, then go to Design > Page Elements > click on “Add a Gadget” link. 
2. From the pop-up window, click on the “HTML/JavaScript” gadget. 
3. Paste the following code inside the empty box:

<style>
.hl-email{
background:url(http://4.bp.blogspot.com/-u3UaeUufpmI/T8lFuelsg8I/AAAAAAAACQY/tOWbHsgTYKc/s1600/mail.png) no-repeat 0px 12px ;
width:300px;
padding:10px 0 0 55px;
float:left;
font-size:1.4em;
font-weight:bold;
margin:0 0 10px 0;
color:#686B6C;
}
.hl-emailsubmit{
background:#9B9895;
cursor:pointer;
color:#fff;
border:none;
padding:3px;
text-shadow:0 -1px 1px rgba(0,0,0,0.25);
-moz-border-radius:6px;
-webkit-border-radius:6px;
border-radius:6px;
font:12px sans-serif;
}
.hl-emailsubmit:hover{
background:#E98313;
}
.textarea{
padding:2px;
margin:6px 2px 6px 2px;
background:#f9f9f9;
border:1px solid #ccc;
resize:none;
box-shadow:inset 1px 1px 1px rgba(0,0,0,0.1);
-moz-box-shadow:inset 1px 1px 1px rgba(0,0,0,0.1);
-webkit-box-shadow:inset 1px 1px 1px rgba(0,0,0,0.1); font-size:13px;
width:130px;
color:#666;}
</style>
<div class=”hl-email”>
Subscribe via Email <form action=”http://feedburner.google.com/fb/a/mailverify” id=”feedform” method=”post” target=”popupwindow” onsubmit=”window.open(‘http://feedburner.google.com/fb/a/mailverify?uri=mytrickstime‘, ‘popupwindow’, ‘scrollbars=yes,width=550,height=520’);return true”>
<input gtbfieldid=”3″ class=”textarea” name=”email” onblur=”if (this.value == &quot;&quot;) {this.value = &quot;Enter email address here&quot;;}” onfocus=”if (this.value == &quot;Enter email address here&quot;) {this.value = &quot;&quot;;}” value=”Enter email address here” type=”text” />
<input type=”hidden” value=”mytrickstime” name=”uri”/><input type=”hidden” name=”loc” value=”en_US”/>
<input class=”hl-emailsubmit” value=”Submit” type=”submit” />
</form>
</div>

Read Also :Speed up our blog by hosting CSS files externally

Settings 

  • Replace the url address in green if you want to change the email icon
  • Increase/Decrease the 130 width value for a wider text area
  • Replace http://feedburner.google.com/fb/a/mailverify?uri=mytrickstime with your Feedburner Email Feed link. You can get it by visiting your feedburner account then navigate to Publicize and then to Email Subscriptions.
  • Replace mytrickstime with your feed title. It appear at the end of your feed link. In my case it is http://feedburner.google.com/fb/a/mailverify?uri=mytrickstime

4. Save your widget and check your blog.Enjoy Guys! and don’t forget to post your comments. � MyTricksTime.com

How To Set Default Video Player In Mac OS X?

How can I set the default player for video is to VLC player? In my Mac OS X, Quicktime is the default media player.
Each and every video I need to manually set VLC as default player.
Are you facing the above mentioned problem?
If so, here is the solution to fix this problem.


Setting Default Media Player in Mac

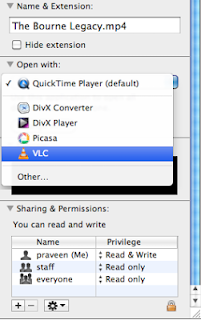
  • Right click on the file you wish to always open in VLC.
  • Click �Get Info�.
  • In the �Open With� section, select VLC from the drop down menu. In the below screenshot �The Bourne Legacy� movie with *.mp4 file format�s default media player is changed.

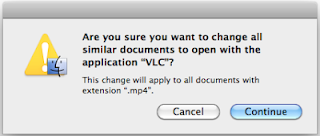
  • To apply this change to all files of this type, click the �Change All� button.

Enjoy Guys! and don’t forget to post your comments. � MyTricksTime.com

Photoshop Tutorial – How To Paint A Car

Photoshop Tutorial - How To Paint A Car step by step learn
Photoshop Tutorial – How To Paint A Car

Changing the color of your favorite car (in a photo) is extremely easy. Here�s a simple tutorial that will guide you through changing them on the fly. Complete tutorial after jump.

Photoshop Tutorial - How To Paint A Car trick step by step - step 1
Photoshop Tutorial – How To Paint A Car  – step 1

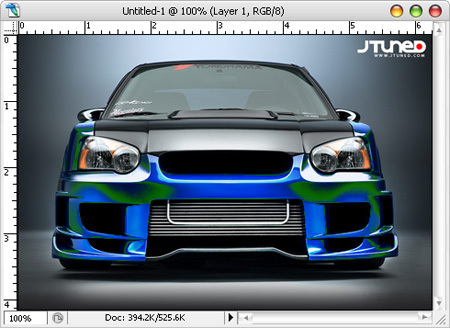
The blue color Subaru WRX above may not appeal to all tastes. I kindda like it but I�m sure other colors will be nice too so let�s try changing them or proposed it to Subaru. Choose Image/Adjust/Replace Color to get started.

Photoshop Tutorial - How To Paint A Car step by step - step 2
Photoshop Tutorial – How To Paint A Car  – step 2

By default, the Replace Color dialog shows a monochrome view of what�s being selected (White�s active, Black�s not). Now click on the body of the Subaru and you will noticed that the region of that color becomes selected. Try changing the Hue, the images changes to reflect that, as seen in the image below (greenish)

Photoshop Tutorial - How To Paint A Car step by step - step 3
Photoshop Tutorial – How To Paint A Car  – step 3

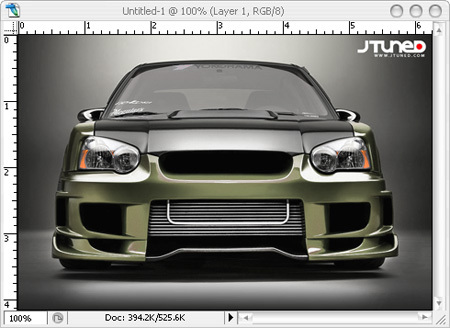
Now here�s the result of our initial change. It really doesn�t matter if it is a ugly green Subaru at this stage. Go for something bright, the aim here is to see it�s change/affect.

Photoshop Tutorial - How To Paint A Car step by step - step 4
Photoshop Tutorial – How To Paint A Car  – step 4

To add more colors. hold on the SHIFT key and click on the unchanged area (all the blue color on the Subaru), or
drag to select a range of colors. That range will be added to the selection and the color will change the image. To remove a selection added accidentally, hold ALT while clicking to select the color.

Photoshop Tutorial - How To Paint A Car step by step - step 5
Photoshop Tutorial – How To Paint A Car  – step 5

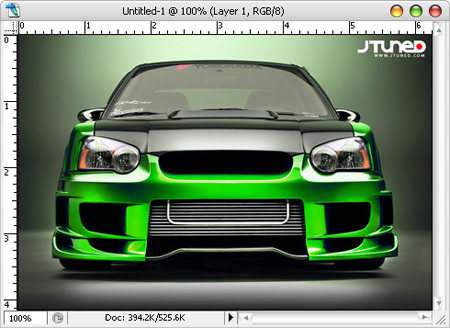
Keep on adding the color until you have the entire blue Subaru changed to green color. One way to increase the range of colors changed is to raise the Fuzziness value; but this will draw unwanted colors in the surrounding area.

Keep on adding the color until you have the entire blue Subaru changed to green color. One way to increase the range of colors changed is to raise the Fuzziness value; but this will draw unwanted colors in the surrounding area.

Photoshop Tutorial – How To Paint A Car  – step 6

Now when you are sure the whole body is selected, change the Hue, drag and move it around until you get the color you want. Toggle the Fuzziness as well if you want. I end up with a gold color Subaru WRX.
Enjoy Guys! and don’t forget to post your comments. � MyTricksTime.com