How to Change the ICON of an EXECUTABLE file


Some times it becomes necessary to change the icon of an executable (.exe) file so that the file get�s a new appearance. Many of the tools such as TuneUP Winstyler does this job by adjusting the Windows to display a custom icon to the user. But, in reality if the file is carried to a different computer, then it shows it�s original icon itself.

This means that in order to permanently change the icon, it is necessary to modify the executable file and embed the icon inside the file itself. When this is done the executable file�s icon is changed permanently, so that even if you take file to a different computer it show�s a new icon.
For this purpose I have found a nice tool which will modidify the executable file and embed the icon of your choice into the file itself. ie: The tool changes the icon of the executable file permanently.
I will give you a step-by-step instruction on how to use this tool to change the icon:
  1. Go to www.shelllabs.com and download the trial version of IconChanger and install it (Works on XP, Vista and Win 7).
  2. Run the IconChanger program from Start -> All Programs and you should see an interface as shown below:


  1. Now you will see a window stating that �Choose an object whose icon you want to change�. Click on the �OK� button.
  2. Now select the executable file for which you wish to change the icon.
  3. Icon changer will automatically search for all the icons on your �C: drive� so that you can select any one of those. If your desired icon is not shown in the window, you may paste the path of your icon file in the field which says �Search icons in� so that your desired icon gets displayed.
  4. Select the ICON of your choice and click on Set button.
  5. Now a popup window will appear and ask you to select from either of these two options.
    • Change embeded icon.
    • Adjust Windows to display custom icon.
  6. Select the first option (Change embedded icon). You are done. The icon get�s changed.
I hope you like this post. Pass your comments in case if you have any queries or clarifications.

Enjoy Guys! and don’t forget to post your comments. � MyTricksTime.com

How to Compile C Programs

In many of my previous posts especially in the VIRUS CREATION section, I have used C as the programming language for writing the programs. If you�re new to C programming and find it difficult to compile the C source codes then this post is for you.
Here is a step-by-step procedure to install Borland C++ compiler 5.5 on your PC and compile the C programs.

How to Install Borland C++ compiler?

Follow the below steps to install Borland C++ compiler 5.5 on your PC:
  1. Download Borland C++ compiler 5.5 (for Windows platform) from the following link:
  2. After you download, run the file C++5.51.exe. The default installation path would be:
    C:BorlandBCC55

How to configure Borland C++ compiler?

Here is a step-by-step instruction on how to configure the compiler:
  1. After you install Borland C++ compier, create two new Text Documents.
  2. Open the first New Text Document.txt file and add the following two lines into it:
    -I�c:BorlandBcc55include�
    -L�c:BorlandBcc55lib�
    Save changes and close the file. Now rename the file from New Text Document.txt to bcc32.cfg.
  3. Open the second New Text Document (2).txt file and add the following line into it:
    -L�c:BorlandBcc55lib�
    Save changes and close the file. Rename the file from New Text Document (2).txt to ilink32.cfg.
  4. Now copy the two files bcc32.cfg and ilink32.cfg, navigate to C:BorlandBCC55Bin and paste them.

    Read Also :  Basic trick to become a hacker !!!

How to Compile the C Source Code (.C files)?

Here is a detailed instruction on how to compile C source codes:
  1. You need to place the .C (example.c) file to be compiled in the following location:
  2. C:BorlandBCC55Bin
  3. Now go to the command prompt (Start->Run->type cmd->Enter)
  4. Make the following path as the present working directory (use the CD command):
  5. C:BorlandBCC55Bin
  6. To compile the file (example.c) use the following command:
  7. bcc32 example.c
  8. Now if there exists no error in the source code, you�ll get a compiled executable module (example.exe) in the same location (C:BorlandBCC55Bin).
  9. Now you have successfully compiled the source code into an executable file(.exe file).
NOTE: The above tutorial assumes that you�ve installed the compiler onto the C: drive (by default).

Enjoy Guys! and don’t forget to post your comments. � MyTricksTime.com

HOW TO SCAN CHANNELS OF AIRTEL DIGITAL TV

Scan airtel digital tvHi Guys ! Today we will know how we can scan all channels available on Airtel digital Tv using ADTV Set top box. Using this method we can know , Which new channels are on testing mode .
You don’t need any FTA set top box to scan transponders, you can scan all channels by using your own ADTV STB(Set Top Box) . Just follow these simple steps ..
Open menu
Settings
System setup
Free to air channels
Find channels
  
Satellite: Choose any(Insat 4A ,4B or other)
Search mode: FTA+CAS
Transponder: USER
Modulation type: DVB-S2-QPSK 
Frequency:11480
Polarization : VERTICAL
Symbol rate:28800
FEC: 2/3(or any)
Fill these details and press blue button for search the channels , you will see list on all channels available on this transponder.

You can follow same steps to scan  all other transponders of airtel digital tv.

Follow the same procedure , only change the given detail ,other fills will remain same.
frequency: 11561
polarization : horizontal and vertical (check both)
symbol rate: 28800

frequency: 11483 
polarization : horizontal
symbol rate: 25600

frequency: 11521
 
polarization :horizontal and vertical(check both)
symbol rate: 28800
frequency: 11680 
polarization : vertical 
symbol rate: 28800
frequency: 11600 
polarization : horizontal and vertical (check both)
symbol rate: 28800


Every time select User as a transponder and FTA+CAS as a search mode. Save all channels and you can view these channel after channel no. 700 .If it is working for you don’t forget to comment.

Enjoy Guys! and don’t forget to post your comments. � MyTricksTime.com

Show Blogger Image Only In Homepage And Hide It In Post Page


Want to know how to hide specific images from blogger posts pages and to appear only in homepage? In this tutorial we’ll learn how we can do this! So let’s start hiding our images from posts pages:


Step 1. 


If you are using the old Blogger interface:

  • Go to Dashboard – Design – Edit HTML – Expand Widget Template (make a backup)

If you are using the new Blogger interface:

  • Go to Dashboard – Template – Edit HTML – Proceed – Expand Widget Template (make a backup)

Step 2. Find (CTRL + F) this code in your template:

    }]]></b:skin>

Step 3. Copy and paste the following code just below it

<b:if cond=’data:blog.pageType != &quot;index&quot;’>
<style>
.hidepic{
display: none;
}
</style>
</b:if>

Step 4. Save the Template.
Now everytime you create a post, firstly add the pic you want to hide and then switch to Edit HTML tab where you’ll see the HTML code of the image you have added that will look something like this:

<div class=”separator” style=”clear: both; text-align: center;”>
<a href=”http://2.bp.blogspot.com/-shsd_c51zRA/T6UeoPgcbII/AAAAAAAACCc/sYI6WB22CaM/s1600/fire_bird_by_fhrankee-d32af8v.png” imageanchor=”1″ style=”margin-left: 1em; margin-right: 1em;”><img border=”0″ height=”320″ src=”http://2.bp.blogspot.com/-shsd_c51zRA/T6UeoPgcbII/AAAAAAAACCc/sYI6WB22CaM/s320/fire_bird_by_fhrankee-d32af8v.png” width=”320″ /></a></div>

Note: it should be at the exact location where your image has been added (if the image is at the middle of the text, then the code should be located also at the middle)
All you have to do is to replace “separator” with “hidepic” as you can see in this screenshot below:
That’s it!

Enjoy Guys! and don’t forget to post your comments. � MyTricksTime.com

How To Create Drop Caps (Big First Letters) In Blogger/Blogspot

Here’s another way you can customize your Blog. In this case, your Posts and Comment’s first letter. The effect is a large first letter stretching down three or four lines with the text wrapped around. The drop cap letter can also use a different font and can be a different color to the rest of the text. You often see this style in newspapers, literature, magazines. In this tutorial i will show you how to apply automatically Magazine text style in Blogger Posts and Comments. So let’s start adding it!

Read Also : A Simple Related Posts Widget For Blogger

Big First Letter for your Blogger / Blogspot Posts


DEMO BELOW


Step 1.

  •  If you are using the old Blogger interface:

Go to Dashboard – Design – Edit HTML – Expand Widget Template (make a backup)

  • If you are using the new Blogger interface:

Go to Dashboard – Template – Edit HTML – Proceed – Expand Widget Template (make a backup)

Step 2. Search (CTRL + F) for this piece of code:

]]></b:skin>


Step 3. Just above it, add the following:

.capital:first-letter {
float: left;
display: block;
font-family: Times, serif, Georgia;
font-size: 40px;
color: #000000;
margin:0px 5px 0 0;
padding:0 0 0 10px;
}


Customize:

Color – change the color highlighted in blue with the value of your desired color
Size – to change the letter size, increase/decrease the value highlighted in pink.

Step 4. Now search for this code:

<data:post.body/>


Step 5. Then immediately before and after add the red fragments you see in the example below:

 <div class=’capital’><data:post.body/></div>


Step 6. Save your template.

Important! If the above code is not working, add one of following codes from this example:


<p class=”capital”><data:post.body/></p>


Or

<span class=”capital”><data:post.body/></span>


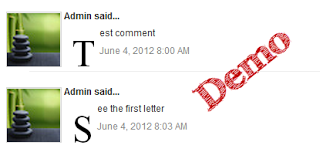
Big First Letter For Blogger/Blogspot Comments


                                        DEMO BELOW


Step 1. Log in to your Blogger account, then go to Design (Layout) >> Edit HTML >> check the “Expand Widget Templates” box

Step 2. Search (CTRL + F) for this piece of code (if you have already added this code, skip step 2 & 3):

]]></b:skin>


Step 3. Add the following code just above ]]></b:skin>:

.capital:first-letter {
float: left;
display: block;
font-family: Times, serif, Georgia;
font-size: 40px;
color: #000000;
margin:0px 5px 0 0;
padding:0 0 0 10px;
}


Customize:

Color – change the color highlighted in blue with the value of your desired color
Size – to change the letter size, increase/decrease the value highlighted in pink.

Step 4. Then Search for this piece of code:

<data:comment.body/>


Step 5. Add the red codes before and after <data:comment.body/> as you can see in my example below:

<p class=”capital”><data:comment.body/></p>


Step 6. Save your Template.

That’s it! Now you have a cool drop cap first letter on your blog.
Enjoy Guys! and don’t forget to post your comments. � MyTricksTime.com