What is USB Type C?

1
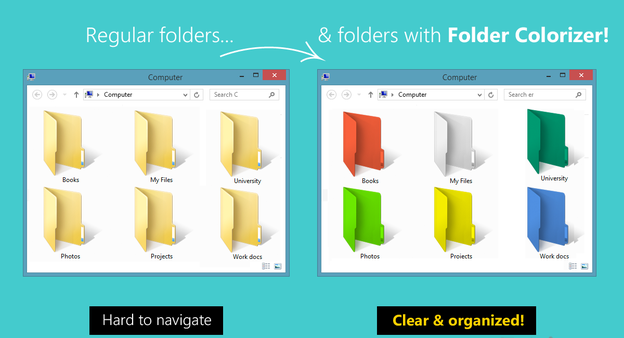
Take a look around your room and you will find many devices plugged with Universal Serial Bus or popularly known as USB Cables. USB Cables are used everywhere. From connecting a phone to PC and from connecting printer to the PC, USBs can be easily found. They are one of the most successful type of peripheral connection. However, there are some issues with these USBs. Most of the time the confusion remains that which one is the front side and which one is the back side. Sometimes the question comes that whether the cable should be connected upside down or in the other way. So to overcome all these shortcomings, USB Type C is coming. Now before going into the details let us understand what Type C is.

What is USB Type C or USB 3.1?

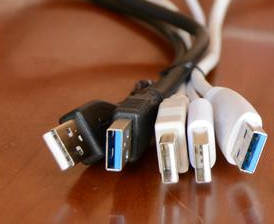
There are four main categories of USB:

USB Type A: Is the very first, and the original USB which comes in a flat rectangular shape used by USB Keys and external drives. Versions of USB like USB 1.1, USB 2.0, and USB 3.0 shares the same USB Type-A design. This indicates that USB Type A is always compatible with a Type-A port even if the device and host are using different versions of USB.
USB Type BThese are the much upgraded version of Type A which comes in the shape of the little used square form factor most commonly seen on the back of printers.
Capture
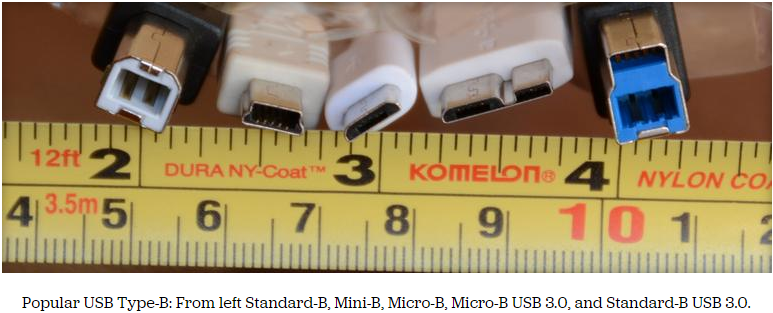
Micro USB: It is the successor of Type B which are very tiny in the shape and are used by smartphones and tablets.
Mini USB: It is the predecessor of Micro USB which was used at the device like GPS units and some external hard drives. However, they are not used so much now.
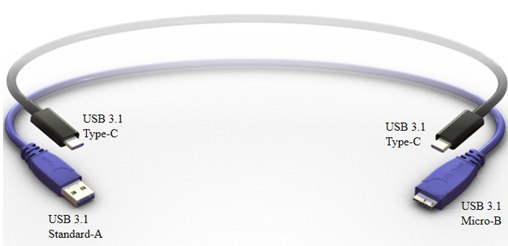
USB Type C: The most advanced and the latest is the Type C, which combines the small size of Micro USB and speed of USB Type A.
usb-type-c-plugs-508-100391081-orig

What�s new in USB Type C?

  • It has completely new design and it can be used backwards which means it has backward compatibility. A user can use any side of the cable.
  • It is smaller in size. Even smaller than USB 2.0.
  • One of the most interesting feature is the reversible plug orientation. It can be used either upside down or the other way.

Advantages:

Speed: Everyone wants to be faster. USB Type C will be able to provide the speed performance of up to 10 Gbps as compared to present speed of 5 Gbps. 10 Gbps means 1250 MB of data in a second.
Power: USB 2.0 can support current of up to 500 mA for up to 2.5W of power and USB 3.0 can support up to 900mA for up to 4.5W of power. But USB Type 3 is much more powerful and can support up to 5 amps (5000mA) for 100W of power. This implies that devices can be charged at a faster rate by using USB Type C.
2
Reversible: There is no doubt that this is one of the most important advantage of USB Type C. In a Type-C USB cable both ends will be the same thus allowing for reversible plug orientation. A user also don�t need to worry about plugging it in upside down.

Disadvantages:

Need of new adapters: The main problem is that there are millions and millions of existing USB devices and cables that will need adapters and new cables to work with new Type-C devices. So making a universal port for all the devices would be a challenge for sure.

When it will be launched?

It will launch at the end of 2014 and the mass adoption will start in early 2015.

What will it cost?

There are no news on how much will a USB Type C cost. Better to wait for the official announcement.
Finally the day is not far when we all will have a same tiny cable for all the devices.
Enjoy Guys! and don’t forget to post your comments. � MyTricksTime.com

Customize folders with different colors in Windows

There are many softwares available today over the internet which can Customize your Computer in an efficient manner that it looks so attractive as well as it becomes very easy to use. We always want our computer to be clean and well organized so that whenever we need to access something or need to search a particular file/folder in our computer we could find it easily.

As similar to that, here I am going to share a software through which you can easily assign your favorite colors to your desired folders in order to differentiate them easily and to ease of access.

Read also :
Make Invisible Folder In Windows
How to Create Windows 8 Bootable USB – Pen Drive
Trick To Reset Password For Samsung Mobile Phone 
Trick to Post Empty Status on Facebook

How do i Customize folders with different colors ?

Just follow the two simple steps given below to customize your folder :

Step 1 :

First of all Download and install the software FolderColorizer. It is tested and 100% virus free. You can download it from here : DOWNLOAD FOLDERCOLORIZER

Step 2 :

Now after installing the software, simply right click on any folder which you wish to customize. Here when you right click on folder, you will see a new option in the context menu i.e. Colorize !. Now simply go to that option and one submenu will appear. Now choose any color you want to assign to this folder.

Although it is a free software for everyone to use it but while you will use this software for the very first time , it will just ask your email id for activation of this software. But no need to worry because you wont need to confirm the activation by logging in to your e mail account. Even if you don�t wish to share your e mail id with developers of this software you can do it because product will be activated automatically once you enter any email id. So you can also enter any fake id if you want.

For your convenience I am providing you a screenshot of above mentioned procedure for changing folder color :

In this way you will be able to easily organize folders in any of your drive weather C: , D: or any other drive. You can also assign different colors to several folders in the same drive to give it more attractive and cool looks.

 Enjoy Guys! and don’t forget to post your comments. � MyTricksTime.com

LIST OF TALLY SHORTCUT KEYS

Here is the list of some of the shortcuts keys which can be used while working on the tally… software 

1. ALT + 2 �      To duplicate a voucher

2. ALT + A �     To add a voucher

3. ALT + D �     To delete a voucher

4. ALT + E �     To export the report in ASCII, SDF, HTML or in XML format

5. ALT + I �      To insert a voucher

6. ALT + O �    To upload the report at your website

7. ALT + M �    To Email the report

8. ALT + P �     To print the report

9. ALT + R �     To remove a line in a report

10. ALT + S �    To bring back a line which was removed using alt + r

11. CTRL + U � To select the Units

12. Ctrl + V � To select the Voucher Types

13. CTRL + B � To select the Budget

14. CTRL+ E � To select the Currencies

15. CTRL + L � To select the Ledger

Enjoy Guys! and don’t forget to post your comments. � MyTricksTime.com

HOW TO SHARE PC INTERNET ON ANDROID DEVICE USING USB DATA CABLE

Friends, I think you all know about Tethering in your android phone. Tethering is the technique to share internet from your android phone to your PC or laptop. Tethering can be done by two methods. First one is by USB and second one is by Wi-Fi. But friends, sometimes a situation comes when you have internet access on your pc but not on your android device and you don�t have Wi-Fi hotspot also. Then what will you do if you want to access same internet on your android phone ? 

Read also : Secret Hack Codes for Android Mobile Phones

No problem friends, I have already faced this problem so I am writing this post to help you to overcome from this situation. But one and only limitation of this trick is that you should have rooted android phone and if you have rooted phone then keep reading this post. I will try to help you step by step.
Do you know this technique of using PC internet on android phone is known as Reverse Tethering. So lets start reverse tether your android phone.
STEP 1.

First of all Download Android Reverse Tethering.rar [4.55 MB] On your pc.
Now Extract The folder 
using password � way2hacking

STEP 2.
When you will extract the folder you�ll see some files in that folder but you have to open AndroidTool.exe as shown in below screenshot.

STEP 3.
Now just enable DEBUGGING MODE in your android device and connect it with your pc using your data cable.
STEP 4.
Now refresh the device list in the AndroidTool.exe as shown in below screenshot and you will see your device there. After getting your device in list just click on that and then click on connect. Wait for some seconds and done. Enjoy your pc internet on your android device. If you still have any problem then feel free to ask below in comment section.

Enjoy Guys! and don’t forget to post your comments. � MyTricksTime.com

HOW TO RECOVER PERMANENTLY DELETED FILE ON COMPUTER

Most times, when you delete files from your computer system, you can recover them by simply opening your recycle bin and then restore back using the restore option. Reverse is the case when you delete files permanently, you can never find them in your computer again because you can’t undo the action. A good example is when you use the SHIFT+DELETE command to get rid of a file, your computer gives a warning, “Are you sure you want to permanently delete this file?” once you hit the enter key, your file gets lost for life, and the funny thing is that you cannot recover it from the recycle bin. Sometimes, the action may not be intentional and you start to blame yourself or regret your actions.
Well, I want to assure you that there is still hope at this point if the space where the deleted file was has not been re-occupied, what I mean is if you have not stored a new file in that location. There is a software that can help you recover your file, the name of the software is “kissass Undelete” and I’ll suggest you download it at http://www.sourceforge.net/projects/kickassundelete and keep in your system or install it as soon as you finish your download. TO RECOVER YOUR PERMANENTLY DELETED FILE(s) using Kickass Un delete, follow the steps below: 

1. Install the kickass software after download 


2. Launch the software open 


3. Select the drive from which the file was deleted from the left panel of the windows and click the scan button. The scan can take as long as 10 seconds or more.

 
4. When the file search has been completed, the search results will be displayed with the name, type, size and the last modified date of the searched file

 
5. You can now select the file to be recovered. Note that the kickass undelete software is an open source application and is available for all windows operating system. (Windows XP, vista and windows 7) Now 

you can recover your permanently deleted files because I decided to share this info with you, it’ll be ideal for you to share it with someone too. Who knows, they might be in need of it too. To share this information, just use any of the sharing tools below. I�ll be posting many more info, tips and tricks, so, ensure you constantly check back. If you have questions or comments, use the comment box below. Widget on

Enjoy Guys! and don’t forget to post your comments. � MyTricksTime.com