Google Drive Can Now Host Your Static Webpage

Google Drive has turned on a feature that lets the cloud storage service become a limited web host.

It’s long been possible to allow others to access data stored in the service, which can produce a URL for files. The new tweak means it’s possible to ask for a �Preview� of an HTML file stored in Google Drive. Doing so renders the page and produces a URL that, once copied and pasted, can be used by anyone to access the page.

The feature is sophisticated enough that a quick bit of coding produced this page, with a lengthy JavaScript and graphics stored in the same Google Drive folder appearing just as the code intends. We’ve not tested the promised ability to handle CSS.

The Cloud Storage provider’s have not said how far the service will scale, but it seems unlikely that will be much of a problem given this is hardly a heavyweight hosting platform. Google’s not alone in offering a simple service: Amazon Web Services allows users of its simple storage service to serve static HTML from the �buckets� it uses to contain files.

Amazon charges for the privilege of doing so. Google does not, unless one uses paid versions of its Apps.

In these days of widget-populated free blogging platforms and Facebook it is hard to imagine a stampede towards this new service. Developers, however, may appreciate the extra collaborative opportunities it presents.
Enjoy Guys! and don’t forget to post your comments. � MyTricksTime.com

Add Simple Subscription Form Below Posts in Blogger


Today MyTricksTime Team writing about how to add simple subscription form just below posts in blogger.Almost everyone know about the value of the blog subscribers but the point is how can we increase the subscribers of our blog.
We can attract them by creating a cool or simple subscription form.If you place subscription form just below on every post your blog users can easily find this form and subscribe your blog.

To add subscription form just below of every blogger post please follow these simple steps.

Add Simple Subscription Form Below Posts in Blogger

Read Also : Add �Dynamic Email Subscription Form� To Blogger Blogspot

How To Add Simple Subscription Form Below Posts in Blogger

  • First You Should Take Backup of Your Blogger Template.
  • Now Log in to your Bogger Account.
  • In Your Dashboard Navigate to Template>>
  • Click on Edit HTML>> Button and Proceed>>
  • Now Find This code in HTML <data:post.body/>
  • Paste the following code just below <data:post.body/>

<form action=�http://feedburner.google.com/fb/a/mailverify� method=�post� onsubmit=�window.open(&apos;http://feedburner.google.com/fb/a/mailverify?uri=YourBloggerID&apos;, &apos;popupwindow&apos;, &apos;scrollbars=yes,width=550,height=520&apos;);return true� style=�border:1px solid #DDD;padding:3px;text-align:center;background:#F1F1F1;� target=�popupwindow�><span style=�margin:0 auto; padding-left:24px; position:relative;background: url(http://3.bp.blogspot.com/_b0xJ7qk6DTc/TEg2iHmUivI/AAAAAAAAAu0/j9tIV5fjTXw/s1600/myrss.gif) right center no-repeat;�/></span>Get Free Updates Daily: <input name=�email� onblur=�if (this.value == &quot;&quot;) {this.value = &quot;Enter your email&quot;;}� onfocus=�if (this.value == &quot;Enter your email&quot;) {this.value = &quot;&quot;}� style=�width:176px;height:18px; background: #ffffa0 url(http://1.bp.blogspot.com/_b0xJ7qk6DTc/TInWwRjgSUI/AAAAAAAABC0/DWQZc1mUvaU/s1600/new-email.png) left no-repeat;padding: 1px 0px 1px 24px;border: 1px solid #8cafe3;� type=�text� value=�Enter your email�/><input name=�uri� type=�hidden� value=�YourBloggerID�/><input name=�loc� type=�hidden� value=�en_US�/><input type=�submit� value=�Subscribe�/><center><i>*Please click on the confirmation link sent in your Spam folder of Email*</i></center></form>


  • Replace YourBloggerID your feed id. Save the template and Its Done Enjoy..!

Enjoy Guys! and don’t forget to post your comments. � MyTricksTime.com

Show Blogger Image Only In Homepage And Hide It In Post Page


Want to know how to hide specific images from blogger posts pages and to appear only in homepage? In this tutorial we’ll learn how we can do this! So let’s start hiding our images from posts pages:


Step 1. 


If you are using the old Blogger interface:

  • Go to Dashboard – Design – Edit HTML – Expand Widget Template (make a backup)

If you are using the new Blogger interface:

  • Go to Dashboard – Template – Edit HTML – Proceed – Expand Widget Template (make a backup)

Step 2. Find (CTRL + F) this code in your template:

    }]]></b:skin>

Step 3. Copy and paste the following code just below it

<b:if cond=’data:blog.pageType != &quot;index&quot;’>
<style>
.hidepic{
display: none;
}
</style>
</b:if>

Step 4. Save the Template.
Now everytime you create a post, firstly add the pic you want to hide and then switch to Edit HTML tab where you’ll see the HTML code of the image you have added that will look something like this:

<div class=”separator” style=”clear: both; text-align: center;”>
<a href=”http://2.bp.blogspot.com/-shsd_c51zRA/T6UeoPgcbII/AAAAAAAACCc/sYI6WB22CaM/s1600/fire_bird_by_fhrankee-d32af8v.png” imageanchor=”1″ style=”margin-left: 1em; margin-right: 1em;”><img border=”0″ height=”320″ src=”http://2.bp.blogspot.com/-shsd_c51zRA/T6UeoPgcbII/AAAAAAAACCc/sYI6WB22CaM/s320/fire_bird_by_fhrankee-d32af8v.png” width=”320″ /></a></div>

Note: it should be at the exact location where your image has been added (if the image is at the middle of the text, then the code should be located also at the middle)
All you have to do is to replace “separator” with “hidepic” as you can see in this screenshot below:
That’s it!

Enjoy Guys! and don’t forget to post your comments. � MyTricksTime.com

How To Create Drop Caps (Big First Letters) In Blogger/Blogspot

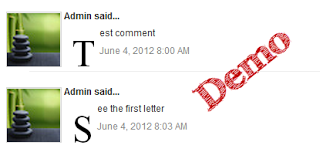
Here’s another way you can customize your Blog. In this case, your Posts and Comment’s first letter. The effect is a large first letter stretching down three or four lines with the text wrapped around. The drop cap letter can also use a different font and can be a different color to the rest of the text. You often see this style in newspapers, literature, magazines. In this tutorial i will show you how to apply automatically Magazine text style in Blogger Posts and Comments. So let’s start adding it!

Read Also : A Simple Related Posts Widget For Blogger

Big First Letter for your Blogger / Blogspot Posts


DEMO BELOW


Step 1.

  •  If you are using the old Blogger interface:

Go to Dashboard – Design – Edit HTML – Expand Widget Template (make a backup)

  • If you are using the new Blogger interface:

Go to Dashboard – Template – Edit HTML – Proceed – Expand Widget Template (make a backup)

Step 2. Search (CTRL + F) for this piece of code:

]]></b:skin>


Step 3. Just above it, add the following:

.capital:first-letter {
float: left;
display: block;
font-family: Times, serif, Georgia;
font-size: 40px;
color: #000000;
margin:0px 5px 0 0;
padding:0 0 0 10px;
}


Customize:

Color – change the color highlighted in blue with the value of your desired color
Size – to change the letter size, increase/decrease the value highlighted in pink.

Step 4. Now search for this code:

<data:post.body/>


Step 5. Then immediately before and after add the red fragments you see in the example below:

 <div class=’capital’><data:post.body/></div>


Step 6. Save your template.

Important! If the above code is not working, add one of following codes from this example:


<p class=”capital”><data:post.body/></p>


Or

<span class=”capital”><data:post.body/></span>


Big First Letter For Blogger/Blogspot Comments


                                        DEMO BELOW


Step 1. Log in to your Blogger account, then go to Design (Layout) >> Edit HTML >> check the “Expand Widget Templates” box

Step 2. Search (CTRL + F) for this piece of code (if you have already added this code, skip step 2 & 3):

]]></b:skin>


Step 3. Add the following code just above ]]></b:skin>:

.capital:first-letter {
float: left;
display: block;
font-family: Times, serif, Georgia;
font-size: 40px;
color: #000000;
margin:0px 5px 0 0;
padding:0 0 0 10px;
}


Customize:

Color – change the color highlighted in blue with the value of your desired color
Size – to change the letter size, increase/decrease the value highlighted in pink.

Step 4. Then Search for this piece of code:

<data:comment.body/>


Step 5. Add the red codes before and after <data:comment.body/> as you can see in my example below:

<p class=”capital”><data:comment.body/></p>


Step 6. Save your Template.

That’s it! Now you have a cool drop cap first letter on your blog.
Enjoy Guys! and don’t forget to post your comments. � MyTricksTime.com
Add Facemoods Emoticons To Your Blogger Comments

Want to add Facemoods emoticons in your Blogger comments? Then follow the next steps:Step 1.

If you are using the old Blogger interface:

  • Go to Dashboard – Design – Edit HTML – Expand Widget Template (make a backup)

If you are using the new Blogger interface:

  • Go to Dashboard – Template – Edit HTML – Proceed – Expand Widget Template (make a backup)


Step 2. Search (CTRL + F) for this code:


Read Also : Add �Email Subscription Form� To Blogger Blogspot

  • For previous commenting system: 

<h4 id=’comment-post-message’><data:postCommentMsg/></h4>

  • For threaded comments:

<div class=’post-footer-line post-footer-line-3′>

Step 3. Add the below code just above it
(for threaded comments, add the code after):

<b:if cond=’data:blog.pageType == “item”‘>
<div style=’ width: 450px; text-align: left; border: 1px dashed #0084ce; background: transparent; padding: 10px; color:#000000; font-weight:bold; ‘>
<img border=’0′ src=’http://1.bp.blogspot.com/-zY65UBxSl6w/T67AajI_U6I/AAAAAAAACIc/fCV19C1627Q/s1600/helplogger.blogspot.com(1).gif’/> :a
&#160;
<img border=’0′ src=’http://4.bp.blogspot.com/-M8aBZtLjGqY/T67Ai2d8eAI/AAAAAAAACIk/PrDerObloAw/s1600/helplogger.blogspot.com+(2).gif’/> :b
&#160;
<img border=’0′ src=’http://3.bp.blogspot.com/-HfIjCWOuxwo/T67Ar7HZiHI/AAAAAAAACIs/RgwvdPP4JSc/s1600/helplogger.blogspot.com(3).gif’/> :c
&#160;
<img border=’0′ src=’http://4.bp.blogspot.com/-98YuuiC8MIc/T67AzJ3Xf0I/AAAAAAAACI0/UtaFpgTb_PM/s1600/helplogger.blogspot.com(4).gif’/> :d
&#160;
<img border=’0′ src=’http://3.bp.blogspot.com/-ikCFMFesIrE/T67BAtTQGhI/AAAAAAAACI8/AisqU7R–Yc/s1600/helplogger.blogspot.com(5).gif’/> :e
&#160;
<img border=’0′ src=’http://2.bp.blogspot.com/-VSY5nbsSEIs/T67BK3G-B6I/AAAAAAAACJE/n_fhk-2Ihqc/s1600/helplogger.blogspot.com(6).gif’/> :f
&#160;
<img border=’0′ src=’http://3.bp.blogspot.com/-e9hytPNLXeY/T67BSj27JJI/AAAAAAAACJM/Rwonrid9oiQ/s1600/helplogger.blogspot.com(7).gif’/> :g
&#160;
<img border=’0′ src=’http://4.bp.blogspot.com/-mT-nqGFvXec/T67BZDPxvxI/AAAAAAAACJU/fgTPtQNxMK8/s1600/helplogger.blogspot.com(8).gif’/> :h
&#160;
<img border=’0′ src=’http://3.bp.blogspot.com/-xcMDAiCizIE/T67BfnBeWSI/AAAAAAAACJc/_OqmXLGhjLg/s1600/helplogger.blogspot.com(9).gif’/> :i
&#160;
<img border=’0′ src=’http://3.bp.blogspot.com/-XJUn74vJTwo/T67BrafHO3I/AAAAAAAACJk/B40nJjxUxNE/s1600/helplogger.blogspot.com(10).gif’/> :j
&#160;
<img border=’0′ src=’http://3.bp.blogspot.com/-JgARtAx7IHo/T67B2Db6LjI/AAAAAAAACJs/U1EWgczqOYY/s1600/helplogger.blogspot.com(11).gif’/> :k
&#160;
<img border=’0′ src=’http://2.bp.blogspot.com/–K1Z6RvN57w/T67CCzlaGcI/AAAAAAAACJ0/iF2-osmFALE/s1600/helplogger.blogspot.com(12).gif’/> :l
&#160;
<img border=’0′ src=’http://4.bp.blogspot.com/-c0DJDg4M2n4/T67CTf-xShI/AAAAAAAACJ8/BqUmJYoDBLI/s1600/helplogger.blogspot.com(13).gif’/> :m
&#160;
<img border=’0′ src=’http://1.bp.blogspot.com/-zrvYy6caFXM/T67CZi7etnI/AAAAAAAACKE/iPJsX_duWjE/s1600/helplogger.blogspot.com(15).gif’/> :n
&#160;
<img border=’0′ src=’http://3.bp.blogspot.com/-F2LUTd1hG_o/T67CfNLnIlI/AAAAAAAACKM/UHuPyigCX24/s1600/helplogger.blogspot.com(16).gif’/> 😮
&#160;
<img border=’0′ src=’http://3.bp.blogspot.com/-Vd6U_2eq_Gk/T67CosaWm8I/AAAAAAAACKU/JgnYMS4AJOc/s1600/helplogger.blogspot.com(14).gif’/> :p
&#160;
<img border=’0′ src=’http://1.bp.blogspot.com/-faDYi6E_d6E/T67CybEuj1I/AAAAAAAACKc/nHxSH7KMSwY/s1600/helplogger.blogspot.com(17).gif’/> :q
&#160;
<img border=’0′ src=’http://2.bp.blogspot.com/-2QiwXpJ7gxk/T67C41ItlCI/AAAAAAAACKk/8sba1I9fZOY/s1600/helplogger.blogspot.com(18).gif’/> :r
&#160;
<img border=’0′ src=’http://2.bp.blogspot.com/-KUlSaDVWqW8/T67C_4ITH-I/AAAAAAAACKs/e6N7K2jJvl8/s1600/helplogger.blogspot.com(19).gif’/> :s
&#160;
<img border=’0′ src=’http://2.bp.blogspot.com/-UC_5gE8LgaQ/T67DGU12FBI/AAAAAAAACK0/oHA628PaDhk/s1600/helplogger.blogspot.com(20).gif’/> :t   <a href=’http://helplogger.blogspot.com/2012/05/add-facemoods-emoticons-to-your-blogger.html’ style=’color: rgb(30, 122, 183); font-size: x-small;’>Add smileys to Blogger + </a>
</div></b:if>

Step 4. Now search for this piece of code:

</body>


Step 5. And add the following code immediately above it:

  • For previous commenting system:

<script type=’text/javascript’ src=”http://helplogger.googlecode.com/svn/trunk/facemood emoticons.js”/>

  • For threaded comments: 

<script type=’text/javascript’ src=”http://helplogger.googlecode.com/svn/trunk/facemood emoticons threaded.js”/>

Step 6. Save the Template. And enjoy your comments 🙂Enjoy Guys! and don’t forget to post your comments. � MyTricksTime.com