ADD TRANSPARENT NOTIFICATON BAR TO BLOG


Many Popular blogs use a notification bar to show a News feed and latest content because it attracts your visitors attention.

You can add a link to a featured post, your Rss feed, social profile or an affiliate offer. So here I will show you how to add an awesome notification bar with close button. Its very simple and looks very cool.You can use it on a blogger blog and wordpress blog or even in your websites.
Add The Transparent Notification Bar To Blogger

Remember Always Back Up Your Template Before You Make Changes – How To Back Up A Blogger Template 

Step 1. In Your Blogger Dashboard Click Design > Edit Html 

Step 2. Find the following piece of code in your blogs Html : (Click Ctrl and F for a search bar to help find the code – How To Find Code In Blogger Template Template) 

</body>


Step 3. Copy and Paste the following code Directly Above / Before </body>

<!– Notification code start –>
<style type=’text/css’>
#ut-sticky
{
background:url(&#39;http://3.bp.blogspot.com/-7oGSlq30cTw/Tv33CS4WGgI/AAAAAAAAA0w/HxId_tRUae8/s1600/ut-bg.png&#39;) repeat; 

color:#fff;

text-align: center;
margin:0 auto; 

border-top: 1px solid #fff;

height:28px;
font-size:13px;
position:fixed;
bottom:0;
z-index:999;
width:95%;
border-top-left-radius:15px;
border-top-right-radius:15px;
display:block;
font-weight: bold;
font-family: arial,&quot;Helvetica&quot;;

font-color:#fff;

}
#ut-sticky:hover
{background:#333;}
#ut-sticky p{line-height:5px; font-size:13px; text-align:center; width:95%; float:left;}
#ut-sticky p a{ text-decoration:underline; color:#FFFF33;}
.ut-cross{display:block; position:relative; right:15px; float:right;}
.ut-cross a{font-size:18px; font-weight:bold; font-family:&quot;Arial&quot;; color:#FF0000; line-height:30px;}
</style>
<div id=’ut-sticky’>
<p>Add This Transparent Notification Bar To Your Blog <a href=’http://www.pctricksarena.blogspot.com.com’ target=’_blank’>Transparent Notification Bar</a></p>
<div class=’ut-cross’><a href=’javascript:hide_cross();’>X</a></div>
</div>
<script language=’JavaScript’>
function hide_cross() {
crosstbox = document.getElementById(&quot;ut-sticky&quot;);
crosstbox.style.visibility = &#39;hidden&#39;;
}
</script>
<!– End of Notification code, info – http://www.pctricksarena.blogspot.com –>

How to change color and Notification Message.

In this code i have chosen such a color combination so that its looks transparent and whenever you take your mouse on this bar it become more visible.

Change Message – The message and link are highlighted in red above, change as required.
The colors used for the bar are highlighted Enjoy Guys! and don’t forget to post your comments. � MyTricksTime.com

Speed up our blog by hosting CSS files externally

Nowadays, blogs and websites are ranked on basis of various factors and page load speed is also one of the factor on which your search rank depends.
If you are on Blogger then the reason you don’t get good search results if compared to similar WordPress blogs is because WordPress sites load faster and that’s because the CSS for the website is hosted externally.

In blogger templates the CSS styles are always internal and those CSS lines are 100s in number. The simple template in Blogger have more than 20kb of CSS styles inside the document.You maybe thinking how 20kb of CSS can slow down your page, 20kb can be downloaded easily with speed or even slow internet connection but here it’s not about your internet connection speed, it is about your page’s speed. Every single bytes can decide your rankings on search pages.

The first thing you must check is your current page speed marks, the highest score you can get is 100.
[Click here to check your Page Speed]

If you get less than 90 then you should now host the CSS externally and speed up your site.

Get your CSS codes into a stylesheet file

Note: The first step to out the CSS styles in your template on an external stylesheet file. To do that you have to make changes into your template, so i suggest you to keep a backup of your template for future.

You are now ready to remove the CSS from your template and put it into a CSS file. Follow the instruction below.

Create a CSS file

Before you take out the CSS codes from the template you have to make a stylesheet file. You don’t need any special tool to create a .css file. You just need a plain text editor (notepad).

  1. Open Notepad, don’t type anything 
  2. Click on the file menu and click on Save As
  3. Locate where you want to Save the file
  4. Now name your file with .css at end, in Save As type place select ‘All Files’ and in Encoding select ‘UTF8’ that is it. See what it should look like this

  5. Save the file and it will be in a .css format if you did it right

Continue the next section to learn how to take out all the CSS in your blogger template and then put it into the stylesheet file

Move style code from template to stylesheet

Now you have to open up your template code, you can do it by going to Blogger Dashboard -> Template -> Edit HTML ->  and Proceed.

Now copy all the CSS codes you have in your template and paste it into the stylesheet file we just created and delete the codes from template as you have now pasted it already into the file.


Note: You can not normally use the Blogger’s default CSS code which has dollar sign into it’s values for example font: $(body.font); as the value of a property is fetched from database, so you can’t use it into a normal stylesheet file. If you want to speed up your blog page more efficiently than you can ask me to make the blogger’s CSS code compatible with a stylesheet for as low as $8 as a donation amount. Contact me on my email i[email protected] or [email protected] or both

Host the file

Now when you have made the stylesheet file ready with the codes you can now upload it to your hosting service [Click here to know how to use free DropBox as CDN]. When the file is uploaded, get the hotlink (direct link) to it.

Attach it to your template

This is the last step, you now have to link the hosted CSS file to your template so it fetches the styles from the stylesheet. To do that go to your Blogger Dashboard -> Template -> Edit HTML -> Proceed -> Use CTRL+F5 to find </head> and paste this code above </head> 
1
<link rel='stylesheet' type='text/css' href='http://host.com/files/stylesheet.css'/>
You obviously have to have the link in the href value, replace this link in above HTML

http://host.com/files/stylesheet.css

With the link to CSS file hosted by you.

Enjoy Guys! and don’t forget to post your comments. � MyTricksTime.com

Add Attractive Animated CSS Buttons For Blogger

Today i m  gonna  explain how to add css3 stylish animated  buttons  for your blogger. you can  use  this buttons as  download   buttons, demo buttons, redirect to other page and etc.I m  using  CSS  and HTML for this. you can use this button code in to your blogger post too.Check my  earlier post about  Button
codes here.


1.
 Log in to blogger account and Click drop down. 

2. Now select “Template” Like Below.

3. Now you can see Live on blog, Click EDIT HTML Button”

4. Now click Proceed button.
    
5. Find this tag by using Ctrl+F    ]]></b:skin>

6. Paste below code Before ]]></b:skin> tag

.button{
font:15px Calibri, Arial, sans-serif;
text-shadow:1px 1px 0 rgba(255,255,255,0.4);
text-decoration:none !important;
white-space:nowrap;
display:inline-block;
vertical-align:baseline;
position:relative;
cursor:pointer;
padding:10px 20px;
background-repeat:no-repeat;
background-position:bottom left;
background-image:url('https://lh6.googleusercontent.com/-4cWMlF-uqh4/TltCfL8C4DI/AAAAAAAABhE/qNaNueMVpCU/s144/button_bg.png');
background-position:bottom left, top right, 0 0, 0 0;
background-clip:border-box;
-moz-border-radius:8px;
-webkit-border-radius:8px;
border-radius:8px;
-moz-box-shadow:0 0 1px #fff inset;
-webkit-box-shadow:0 0 1px #fff inset;
box-shadow:0 0 1px #fff inset;
-webkit-transition:background-position 1s;
-moz-transition:background-position 1s;
transition:background-position 1s;
}
.button:hover{
background-position:top left;
background-position:top left, bottom right, 0 0, 0 0;
}
.button:active{
bottom:-1px;
}
/* The three buttons sizes */
.button.big { font-size:30px;}
.button.medium { font-size:18px;}
.button.small { font-size:13px;}
/* BlueButton */
.blue.button{
color:#0f4b6d !important;
border:1px solid #84acc3 !important;
background-color: #48b5f2;
background-image: url('https://lh6.googleusercontent.com/-4cWMlF-uqh4/TltCfL8C4DI/AAAAAAAABhE/qNaNueMVpCU/s144/button_bg.png'), url('https://lh6.googleusercontent.com/-4cWMlF-uqh4/TltCfL8C4DI/AAAAAAAABhE/qNaNueMVpCU/s144/button_bg.png'),
-moz-radial-gradient( center bottom, circle,
rgba(89,208,244,1) 0,rgba(89,208,244,0) 100px),
-moz-linear-gradient(#4fbbf7, #3faeeb);
background-image: url('https://lh6.googleusercontent.com/-4cWMlF-uqh4/TltCfL8C4DI/AAAAAAAABhE/qNaNueMVpCU/s144/button_bg.png'), url('https://lh6.googleusercontent.com/-4cWMlF-uqh4/TltCfL8C4DI/AAAAAAAABhE/qNaNueMVpCU/s144/button_bg.png'),
-webkit-gradient( radial, 50% 100%, 0, 50% 100%, 100,
from(rgba(89,208,244,1)), to(rgba(89,208,244,0))),
-webkit-gradient(linear, 0% 0%, 0% 100%, from(#4fbbf7), to(#3faeeb));
}
.blue.button:hover{
background-color:#63c7fe;
background-image: url('https://lh6.googleusercontent.com/-4cWMlF-uqh4/TltCfL8C4DI/AAAAAAAABhE/qNaNueMVpCU/s144/button_bg.png'), url('https://lh6.googleusercontent.com/-4cWMlF-uqh4/TltCfL8C4DI/AAAAAAAABhE/qNaNueMVpCU/s144/button_bg.png'),
-moz-radial-gradient( center bottom, circle,
rgba(109,217,250,1) 0,rgba(109,217,250,0) 100px),
-moz-linear-gradient(#63c7fe, #58bef7);
background-image: url('https://lh6.googleusercontent.com/-4cWMlF-uqh4/TltCfL8C4DI/AAAAAAAABhE/qNaNueMVpCU/s144/button_bg.png'), url('https://lh6.googleusercontent.com/-4cWMlF-uqh4/TltCfL8C4DI/AAAAAAAABhE/qNaNueMVpCU/s144/button_bg.png'),
-webkit-gradient( radial, 50% 100%, 0, 50% 100%, 100,
from(rgba(109,217,250,1)), to(rgba(109,217,250,0))),
-webkit-gradient(linear, 0% 0%, 0% 100%, from(#63c7fe), to(#58bef7));
}
/* Green Button */
.green.button{
color:#345903 !important;
border:1px solid #96a37b !important;
background-color: #79be1e;
background-image:url('https://lh6.googleusercontent.com/-4cWMlF-uqh4/TltCfL8C4DI/AAAAAAAABhE/qNaNueMVpCU/s144/button_bg.png'), url('https://lh6.googleusercontent.com/-4cWMlF-uqh4/TltCfL8C4DI/AAAAAAAABhE/qNaNueMVpCU/s144/button_bg.png'), -moz-radial-gradient(center bottom, circle, rgba(162,211,30,1) 0,rgba(162,211,30,0) 100px),-moz-linear-gradient(#82cc27, #74b317);
background-image:url('https://lh6.googleusercontent.com/-4cWMlF-uqh4/TltCfL8C4DI/AAAAAAAABhE/qNaNueMVpCU/s144/button_bg.png'), url('https://lh6.googleusercontent.com/-4cWMlF-uqh4/TltCfL8C4DI/AAAAAAAABhE/qNaNueMVpCU/s144/button_bg.png'), -webkit-gradient(radial, 50% 100%, 0, 50% 100%, 100, from(rgba(162,211,30,1)), to(rgba(162,211,30,0))),-webkit-gradient(linear, 0% 0%, 0% 100%, from(#82cc27), to(#74b317));
}
.green.button:hover{
background-color:#89d228;
background-image:url('https://lh6.googleusercontent.com/-4cWMlF-uqh4/TltCfL8C4DI/AAAAAAAABhE/qNaNueMVpCU/s144/button_bg.png'), url('https://lh6.googleusercontent.com/-4cWMlF-uqh4/TltCfL8C4DI/AAAAAAAABhE/qNaNueMVpCU/s144/button_bg.png'), -moz-radial-gradient(center bottom, circle, rgba(183,229,45,1) 0,rgba(183,229,45,0) 100px),-moz-linear-gradient(#90de31, #7fc01e);
background-image:url('https://lh6.googleusercontent.com/-4cWMlF-uqh4/TltCfL8C4DI/AAAAAAAABhE/qNaNueMVpCU/s144/button_bg.png'), url('https://lh6.googleusercontent.com/-4cWMlF-uqh4/TltCfL8C4DI/AAAAAAAABhE/qNaNueMVpCU/s144/button_bg.png'), -webkit-gradient(radial, 50% 100%, 0, 50% 100%, 100, from(rgba(183,229,45,1)), to(rgba(183,229,45,0))),-webkit-gradient(linear, 0% 0%, 0% 100%, from(#90de31), to(#7fc01e));
}
/* Orange Button */
.orange.button{
color:#693e0a !important;
border:1px solid #bea280 !important;
background-color: #e38d27;
background-image:url('https://lh6.googleusercontent.com/-4cWMlF-uqh4/TltCfL8C4DI/AAAAAAAABhE/qNaNueMVpCU/s144/button_bg.png'), url('https://lh6.googleusercontent.com/-4cWMlF-uqh4/TltCfL8C4DI/AAAAAAAABhE/qNaNueMVpCU/s144/button_bg.png'), -moz-radial-gradient(center bottom, circle, rgba(232,189,45,1) 0,rgba(232,189,45,0) 100px),-moz-linear-gradient(#f1982f, #d4821f);
background-image:url('https://lh6.googleusercontent.com/-4cWMlF-uqh4/TltCfL8C4DI/AAAAAAAABhE/qNaNueMVpCU/s144/button_bg.png'), url('https://lh6.googleusercontent.com/-4cWMlF-uqh4/TltCfL8C4DI/AAAAAAAABhE/qNaNueMVpCU/s144/button_bg.png'), -webkit-gradient(radial, 50% 100%, 0, 50% 100%, 100, from(rgba(232,189,45,1)), to(rgba(232,189,45,0))),-webkit-gradient(linear, 0% 0%, 0% 100%, from(#f1982f), to(#d4821f));
}
.orange.button:hover{
background-color:#ec9732;
background-image:url('https://lh6.googleusercontent.com/-4cWMlF-uqh4/TltCfL8C4DI/AAAAAAAABhE/qNaNueMVpCU/s144/button_bg.png'), url('https://lh6.googleusercontent.com/-4cWMlF-uqh4/TltCfL8C4DI/AAAAAAAABhE/qNaNueMVpCU/s144/button_bg.png'), -moz-radial-gradient(center bottom, circle, rgba(241,192,52,1) 0,rgba(241,192,52,0) 100px),-moz-linear-gradient(#f9a746, #e18f2b);
background-image:url('https://lh6.googleusercontent.com/-4cWMlF-uqh4/TltCfL8C4DI/AAAAAAAABhE/qNaNueMVpCU/s144/button_bg.png'), url('https://lh6.googleusercontent.com/-4cWMlF-uqh4/TltCfL8C4DI/AAAAAAAABhE/qNaNueMVpCU/s144/button_bg.png'), -webkit-gradient(radial, 50% 100%, 0, 50% 100%, 100, from(rgba(241,192,52,1)), to(rgba(241,192,52,0))),-webkit-gradient(linear, 0% 0%, 0% 100%, from(#f9a746), to(#e18f2b));
}
/* Orange Button */
.gray.button{
color:#525252 !important;
border:1px solid #a5a5a5 !important;
background-color: #a9adb1;
background-image:url('https://lh6.googleusercontent.com/-4cWMlF-uqh4/TltCfL8C4DI/AAAAAAAABhE/qNaNueMVpCU/s144/button_bg.png'), url('https://lh6.googleusercontent.com/-4cWMlF-uqh4/TltCfL8C4DI/AAAAAAAABhE/qNaNueMVpCU/s144/button_bg.png'), -moz-radial-gradient(center bottom, circle, rgba(197,199,202,1) 0,rgba(197,199,202,0) 100px),-moz-linear-gradient(#c5c7ca, #92989c);
background-image:url('https://lh6.googleusercontent.com/-4cWMlF-uqh4/TltCfL8C4DI/AAAAAAAABhE/qNaNueMVpCU/s144/button_bg.png'), url('https://lh6.googleusercontent.com/-4cWMlF-uqh4/TltCfL8C4DI/AAAAAAAABhE/qNaNueMVpCU/s144/button_bg.png'), -webkit-gradient(radial, 50% 100%, 0, 50% 100%, 100, from(rgba(197,199,202,1)), to(rgba(197,199,202,0))),-webkit-gradient(linear, 0% 0%, 0% 100%, from(#c5c7ca), to(#92989c));
}
.gray.button:hover{
background-color:#b6bbc0;
background-image:url('https://lh6.googleusercontent.com/-4cWMlF-uqh4/TltCfL8C4DI/AAAAAAAABhE/qNaNueMVpCU/s144/button_bg.png'), url('https://lh6.googleusercontent.com/-4cWMlF-uqh4/TltCfL8C4DI/AAAAAAAABhE/qNaNueMVpCU/s144/button_bg.png'), -moz-radial-gradient(center bottom, circle, rgba(202,205,208,1) 0,rgba(202,205,208,0) 100px),-moz-linear-gradient(#d1d3d6, #9fa5a9);
background-image:url('https://lh6.googleusercontent.com/-4cWMlF-uqh4/TltCfL8C4DI/AAAAAAAABhE/qNaNueMVpCU/s144/button_bg.png'), url('https://lh6.googleusercontent.com/-4cWMlF-uqh4/TltCfL8C4DI/AAAAAAAABhE/qNaNueMVpCU/s144/button_bg.png'), -webkit-gradient(radial, 50% 100%, 0, 50% 100%, 100, from(rgba(202,205,208,1)), to(rgba(202,205,208,0))),-webkit-gradient(linear, 0% 0%, 0% 100%, from(#d1d3d6), to(#9fa5a9));
}


7. Go to blogger and click Layout 

8. Click Add Gadget and select ‘HTML/Javascript

9. Paste below code.

(You can use this code anywhere in your post.)

<a class="button big blue" href="Your Link" target="_blank">Live Demo</a>

<a class="button big orange" href="Your Link" target="_blank">Live Demo</a>

<a class="button big green" href="Your Link" target="_blank">Live Demo</a>

<a class="button big gray" href="Your Link" target="_blank">Live Demo</a>

Replace  with your links.

10. Now save your HTML/Javascript‘.you are done…

Enjoy Guys! and don’t forget to post your comments. � MyTricksTime.com

Add Facebook Like Button To Blogger Posts


Hello Friends,
Today is Last Date of this February and after many Days I going to share a small blogger widget (Facebook Like Button). Is is the most common widgets used by millions of Bloggers around  the World.As we all know facebook is one of the largest social media company in the word.If your blog have any fan page then it will help you a lot in increasing traffic on your blog. We are giving all types of facebook like buttons.i.e. vertical count,horizontal count and without count.You can add this button just below of of post tile and below of the post.Just follow my instructions carefully….


Note – This button will not like your fan page it will like and share your post

How To Add Facebook Like Button To Blogger Posts?

  1. Go to Blogger Dashboard > Design > Edit HTML
  2. First take a backup of your template
  3. Tick  the expand widget check box
  4. Find for below code in your template

<data:post.body/>


If you wish to add like button just below of post title the add the below code just before of<data:post.body/>

and if you wish to add this like button just below of your post then add below code justbelow of <data:post.body/>

Facebook Like Button Styles


You can add like button in three styles :


  • Vertical Count
  • Horizontal Count
  • Without Count


1. Vertical Count


<b:if cond=’data:blog.pageType != &quot;static_page&quot;’> <iframe allowTransparency=’true’ expr:src=’&quot;http://www.facebook.com/plugins/like.php?href=&quot; + data:post.canonicalUrl + &quot;&amp;send=false&amp;layout=box_count&amp;show_faces=false&amp;width=55&amp;action=like&amp;font=arial&amp;colorscheme=light&amp;height=62&quot;’ frameborder=’0′ scrolling=’no’ style=’border:none; overflow:hidden; width:55px; height:62px;’/> </b:if>


2. Horizontal Count


<b:if cond=’data:blog.pageType != &quot;static_page&quot;’> <iframe allowTransparency=’true’ expr:src=’&quot;http://www.facebook.com/plugins/like.php?href=&quot; + data:post.canonicalUrl + &quot;&amp;send=false&amp;layout=button_count&amp;show_faces=false&amp;width=90&amp;action=like&amp;font=arial&amp;colorscheme=light&amp;height=21&quot;’ frameborder=’0′ scrolling=’no’ style=’border:none; overflow:hidden; width:90px; height:21px;’/> </b:if>


3. Without Count


<b:if cond=’data:blog.pageType != &quot;static_page&quot;’> <iframe allowTransparency=’true’ expr:src=’&quot;http://www.facebook.com/plugins/like.php?href=&quot; + data:post.canonicalUrl + &quot;&amp;send=false&amp;layout=standard&amp;show_faces=false&amp;width=450&amp;action=like&amp;font=arial&amp;colorscheme=light&amp;height=35&quot;’ frameborder=’0′ scrolling=’no’ style=’border:none; overflow:hidden; width:450px; height:35px;’/> </b:if>


If you faced any problem, please do not hesitate to let me know. 🙂

Enjoy Guys! and don’t forget to post your comments. � MyTricksTime.com

Backup Blogger : How To Backup & Restore Complete Blogspot Blog Tutorial

Backup is very important thing for everything a self-honest and qualified peoples whenever make any plan or work they must make a backup because if anything get trouble backup is only the way to restore anything.
Blogger Backup is easy more than WordPress

Backup Blogger

[jbox color=”yellow”]Blogger Introduction[/jbox]
Blogger is the free source for build new blog and best platform to get experience about blogging before starting a blog a victim must have little experience about basic blog tips. To get start here how to make a blog.
[jbox color=”yellow”]Why Blogger Backup?[/jbox]
As I told backup is the most important part for everything same like that blogger backup is  also important why important I will tell you here below some reasons are listed why you should make backup for blogger.

1.         Blogger Can be get hacked any time
In Now a Days hackers growing day by day hackers have not any kind of loyalty they just find vulnerability or chance for destroy a web site blog. So you must need to make sure your blogs is secured and make backup always so if anytime destroyed restore it quickly. How to secure blogger blog & How to Secure WordPress Blog

2.      Code can be damage or destroy.
Your theme can be damage any time because of making little changes or if you add any widget or gadget to blogger it can be destroy theme or design function so be sure you have keep a backup for your blog.

3.      If you made some change any time need to restore default
If you made some changes in blog and after a long time you came to know your design is not good old was good so keep a backup file for a theme of blogger blog you can restore it any time.

4.      Some other Admin make some damage
If blog is running by multiple admin then many times they make little changes and because of them blogger can be go down so if you have backup you can quickly restore otherwise data will be lost.
So that all was reasons of why you should always make backup for blogs in backup field I had posted about how to wordpress backup to dropbox automatically.
Let�s start the tutorial here How to backup & Restore Blogger blog

[jbox color=”yellow”]How to Import and Export Blogger Contents / Posts[/jbox]
For Backup / Exporting Contents Posts.

Step 1 >>
Go to Blogger Dashboard old interface or new no matter but recommended to use new interface. Dashboard >> Other >> Click on Export Blog When you click on export blog your all content will be began start download.

[jbox color=”Blue”]How to Restore / Import Posts & Articles[/jbox]

Same Like that Go to Dashboard >> Other >> Import blog choose that file which you downloaded last time from clicking the export button. The Contents will be archive into once xml backup file this file can be import Into WordPress also easily by importing option.
That it�s all you have done only contents and articles backup.

[jbox color=”yellow”]How to Backup & Restore / Import & Export Template and Complete Design File.[/jbox]

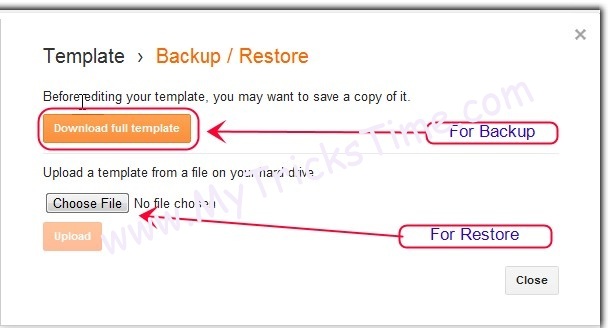
Step >> Go to Dashboard >> Template >> there you can see a button on right side on the top Backup / Restore inside setting (gear icon) click on that button a pop up will appear for download and export template you can press download button for simple download the template
For Restoration Simply click on choose file choose your template file and update it that�s it.

[jbox title=”The End”]That is it I shared My Experience with you i hope you like this please Keep Visiting my blog so get more tutorials about blogging and WordPress Kindly Leave a comment Your Comments Gives more energy to write something more Good. Thank You![/jbox]

Enjoy Guys! and don’t forget to post your comments. � MyTricksTime.com