How To Create and Track Google Analytics Campaigns

Create and Track Google Analytics Campaigns
How To Create and Track Google Analytics Campaigns

Google Analytics is no doubt the No.1 Website Analytics service. It provides enterprise class services to its users at free of cost. Later in 2005, Google bought the Urchin Tracking Service and re-labeled it as Google Analytics. Nowadays, there is no website who doesn�t use the Google Analytics. 
Google Analytics does not just give you the analytics data of your site, but it gives you a thorough report of your site, which no other tracking service offers now. Being a Google Product, it has so many advanced features which lets you see the deeply insight data of your site. However, some users do not take advantage of such features and use it only to track the amount of visitors.

One of the feature provided in Google Analytics is, CampaignsUTM (Urchin Tracking Module) tagging allows you to track the source of the links and provides data accordingly. By suffixing your site URLs with UTM tags, you can track the usage of that specific link with Google Analytics. The normal URL of any webpage would look like this MyTricksTime.com

This way, the site owner can know the referral of the link if he has already added these parameters in the URL.

Creating the UTM Tags is easy and you don�t want to be a geek to get it done. All you need to have is the basic knowledge of URLs. Thereafter, Go to http://utm.to. It is an online service which allows you to easily create the Google Analytics UTM tags. Additionally, It provides shortlinks of the URLwith the parameter added. Follow these instructions on the UTM.to website in order to create the URL.

On the homepage of the UTM. To, you will find few fields. In the first field, fill in the URL of the webpage of which you want to be tagged with UTM tags. Then, in the Source field, enter the source of the site, e.g., MyBlogName, etc. Then, add the medium of the link, e.g., postlink or banner. You can enter anything here, as it doesn�t affect the process. After filling out all the fields, just press the Generate button. Voila ! You have now come up with a UTM tagged URL and you can grab the shortlink for that, too. 

This is a free of cost service provided by the UTM to website and it really helps the webmasters totrack their site usage and to get the most insight data of the site.You can also check out Top 5 Free Web Traffic Analytics Tools and Services

Top 5 Web Traffic Analytics Tools

best Web Analytics Tools
Top 5 Web Traffic Analytics Tools

Web Traffic Analytics Tools are a great help for all of us who wish to keep their sites updated and be aware of the visitor statistics, which can help in defining goals and eventually result in growth of the website. Here in these post i m reviewing the top 5 web traffic analytics toolswhich are availabe at free of cost.A good statistics package will let you know significant information about the visitors visiting your website and we can also trace that where the visitors locations.

Here the Top 5 Web Traffic Analytics Tools which are being used by all bloggers.

1.Google Analytics:

Google Analytics is the enterprise-class web analytics solution that gives you rich insights into your website traffic and marketing effectiveness. Powerful, flexible and easy-to-use features now let you see and analyze your traffic data in an entirely new way. With Google Analytics, you’re more prepared to write better-targeted ads, strengthen your marketing initiatives and create higher converting websites. 


2.Bing Analytics:

Microsoft Bing Search Engine updates its webmaster tool on Thursday. It added excellent graphics, click and web Analytics segments that helps all user as well as Webmasters (SEOs).Bing Webmaster was already provided good information about back links, crawler errors and sitemaps and we can also see the page impressions,page indexed,page crawled of our blog.


3.Alex Analytics:

The Alexa Traffic Rank will show how popular the site is compared to yours, including Reach, Pageviews and more.Search Analytics will show you which terms your competition is using to get traffic.The Audience data will show you what kind of visitors your competition is attracting.The Clickstream data will show you where your competition is getting traffic from affiliate programs and partners.


4.Yahoo Web Analytics:

Yahoo! Web Analytics is a highly customizable, enterprise-level website analytics system designed to help website businesses increase sales and visitor satisfaction, reduce marketing costs and gain new insight on online customers. By storing data in raw, non-aggregated form, Yahoo! Web Analytics is more than simply a reporting tool. It is a powerful, and highly flexible, data analysis tool. Both near real-time and historical data can be segmented instantly and visualized with advanced graphs to help marketers and site designers answer specific business questions and find new insights to improve their business.


5.Piwik Web Analytics:

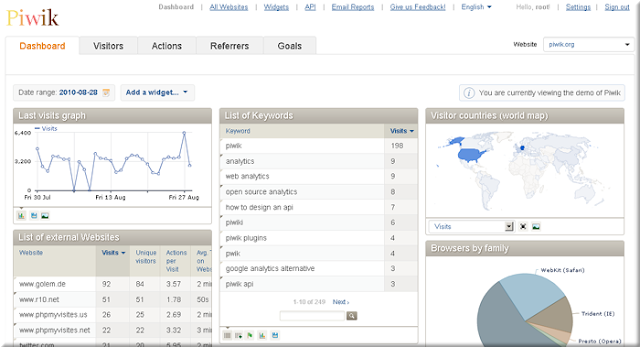
Piwik is another popular web traffic analytics tool which provides the detailed reports of our website visitors: the search engines and keywords they used, the language they speak, your popular pages etc.It has beautiful interface even the novice web user will navigate all thing which are available in the piwik dashboard.


I have more interest to share these kind reviews to all my web bloggers and thanks for giving the opportunity to me hope u may like the review.

How can I edit labels on multiple posts at once?

The Edit Posts page includes options for displaying posts by label, and for applying or removing labels on batches of posts. To get there, visit the Posting | Edit Posts tab, or just click the Manage Posts link on your dashboard


This page has all labels in use by this bloglisted on the left-hand side. Each individual post also has its particular labels marked in green next to its title. By default, posts with all labels are shown.


 (Note: You’ll only see the labels here if you have at least one post already labeled. You can label an individual post on the posting form.)
If you click the label links on the left-hand side, the list of posts will be narrowed down to show only posts with that particular label.
Each post has a checkbox next to it. If you want to make a change to multiple posts, first check all the ones that you want to affect. Then select an option from the “Label Actions…” menu.


This menu includes options for adding any of your labels to the select posts, as well as for removing labels already on the posts. You can also select “New Label…” if you want to create a label that you don’t already have.
If you want to edit a label across all posts, you can do so by removing it and then adding a new one. For instance, say you want to change the label “Books” to “Reading.” Just follow these steps:

  1. Click the “Books” label link on the left side of the page.
  2. Click the “Select All” link at the top of the list of posts.
  3. From the “Label Actions…” menu, choose “Remove label > Books.”
  4. From the “Label Actions…” menu, choose “Apply label > New Label…”
  5. Enter “Reading” as your new label. (If you already have some posts with the label “Reading,” you can simply apply that label, without making a new label.)

Amazing Blogger JQuery Featured Slideshow Slides Images And Videos

Featured Sliders also known as Slideshows, Image Sliders, Featured Posts Sliders and Carousels are very popular among bloggers.They can be used to link to featured content in your blog or just as an image carousel for your pictures.I have not really covered sliders or slideshows too much on Spice Up Your Blog.The main reason is there are so many tutorials already available for Blogger sliders, i did share 5 of my favorite Blogger Featured Sliders from other blogs not too long ago.

But over the coming weeks i have lined up some very unique Slideshow options including the one in this post that not only can slide through images but also accepts html as slides ! 

The main advantage of this is you can actually have YouTube videos (Or Any Videos) as part of the slideshow.That’s not a thumbnail or image linking to the video it’s the actual video that can be played within the slideshow, How cool is that.

The slider is called the ‘Anything Slider’ and was created by Chris Coyier of Css Tricks, Check them out.There are tons more features but first Lets look at the live demo, you will notice every second slide i have set to be a video.

View Demo Button

As you will have seen the slideshow has some cool extra features on the face such as it is both auto scroll and manual scroll, numbered tabs to jump to each slide are below, a start stop option is also available, the slide will also stop when your cursor hovers over a slide.

Add The Anything Slider To Blogger


Step 1. In Your Blogger Dashboard Click Design > Edit Html
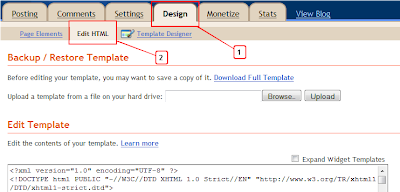
Design Edit Html Blogger

Step 2. Find the following piece of code in your blogs Html : (Click Ctrl and F for a search bar to help find the code – More Info)

]]></b:skin>


Step 3. Copy and paste the following code directly Above / Before ]]></b:skin>

/*start slider css http://www.spiceupyourblog.com for info*/
/*
AnythingSlider v1.4

By Chris Coyier: http://css-tricks.com
with major improvements by Doug Neiner: http://pixelgraphics.us/
based on work by Remy Sharp: http://jqueryfordesigners.com/
*/

/******* SET DEFAULT DIMENSIONS HERE ********/
div.anythingSlider {

width: 700px;
height: 390px;

margin: 0 auto;
}

/****** SET COLORS HERE *******/
/* Default State */
div.anythingSlider .thumbNav a.cur, div.anythingSlider .thumbNav a {
background: #777;
}
div.anythingSlider .anythingWindow {
border-top: 3px solid #777;
border-bottom: 3px solid #777;
}
/* Active State */
div.anythingSlider.activeSlider .thumbNav a.cur, div.anythingSlider.activeSlider .thumbNav a {
background-color: #7C9127;
}
div.anythingSlider.activeSlider .anythingWindow {
border-color: #7C9127;
}

/**** DO NOT CHANGE BELOW THIS LINE ****/
/* anythingSlider viewport window */
div.anythingSlider .anythingWindow {
overflow: hidden;
position: relative;
width: 100%;
height: 100%;
}
/* wrapper: 45px right & left padding for the arrows, 28px @ bottom for naviagation */
div.anythingSlider {
position: relative;
padding: 0 45px 28px 45px;
}
/* anythingSlider base UL */
ul.anythingBase {
background: transparent;
list-style: none;
position: absolute;
top: 0; left: 0;
margin: 0;
}
ul.anythingBase li.panel {
background: transparent;
display: block;
float: left;
padding: 0;
margin: 0;
}

/* Navigation Arrows */
div.anythingSlider .arrow {
top: 50%;
position: absolute;
display: block;
}
div.anythingSlider .arrow a {
display: block;
height: 120px;
margin-top: -60px;
width: 45px;
text-align: center;
outline: 0;
background: url(http://1.bp.blogspot.com/-GFdaM-H1TYo/TdCQntHQapI/AAAAAAAAD2w/ryWohRj6nqk/s1600/arrows-default.png) no-repeat;
text-indent: -9999px;
}
div.anythingSlider .forward { right: 0; }
div.anythingSlider .back { left: 0; }
div.anythingSlider .forward a { background-position: 0 -40px; }
div.anythingSlider .back a { background-position: -88px -40px; }
div.anythingSlider .forward a:hover, div.anythingSlider .forward a.hover { background-position: 0 -240px; }
div.anythingSlider .back a:hover, div.anythingSlider .back a.hover { background-position: -88px -240px; }

/* Navigation Links */
div.anythingSlider .thumbNav { margin: 0; }
div.anythingSlider .thumbNav li { display: inline; }
div.anythingSlider .thumbNav a {
color: black;
font: 11px/18px Georgia, Serif;
display: inline-block;
text-decoration: none;
padding: 2px 8px;
height: 18px;
margin: 0 5px 0 0;
background-image: url(http://4.bp.blogspot.com/-pd65Ao94js4/TdCOO4r6x_I/AAAAAAAAD2o/1xcQwMVsJDA/s1600/cellshade.png);
background-repeat: repeat-x;
text-align: center;
outline: 0;
-moz-border-radius-bottomleft: 5px;
-moz-border-radius-bottomright: 5px;
-webkit-border-bottom-right-radius: 5px;
-webkit-border-bottom-left-radius: 5px;
}
div.anythingSlider .thumbNav a:hover { background-image: none; }

/* slider autoplay right-to-left, reverse order of nav links to look better */
div.anythingSlider.rtl .thumbNav a { float: right; } /* reverse order of nav links */
div.anythingSlider.rtl .thumbNav { float: left; } /* move nav link group to left */
/* div.anythingSlider.rtl .start-stop { float: right; } */ /* move start/stop button – in case you want to switch sides */

/* Autoplay Start/Stop button */
div.anythingSlider .start-stop {
z-index: 10;
background: green url(http://4.bp.blogspot.com/-pd65Ao94js4/TdCOO4r6x_I/AAAAAAAAD2o/1xcQwMVsJDA/s1600/cellshade.png) repeat-x center top;
color: white;
padding: 2px 5px;
width: 40px;
text-align: center;
text-decoration: none;
float: right;
-moz-border-radius-bottomleft: 5px;
-moz-border-radius-bottomright: 5px;
-webkit-border-bottom-right-radius: 5px;
-webkit-border-bottom-left-radius: 5px;
}
div.anythingSlider .start-stop.playing { background-color: red; }
div.anythingSlider .start-stop:hover, div.anythingSlider .start-stop.hover { background-image: none; color: #ff0 }

/*end slider css http://www.spiceupyourblog.com for info*/


Note – Width And Height Are Highlighted At The Top Of The Code and can be easily changed.Those comfortable enough to do so can also change some of the appearance options.

Step 4. Find the following piece of code in your blogs Html : (Click Ctrl and F for a search bar to help find the code – More Info)

</head>


Step 5. Copy and paste the following code Directly Above / Before </head>

<!–start slider scripts–>
<script src=’http://ajax.googleapis.com/ajax/libs/jquery/1/jquery.min.js’ type=’text/javascript’/>
<script src=’http://spiceupyourblogextras.googlecode.com/files/jquery.easing.1.2.js’ type=’text/javascript’/>
<script charset=’utf-8′ src=’http://spiceupyourblogextras.googlecode.com/files/jquery.anythingslider.js’ type=’text/javascript’/>
<script type=’text/javascript’>

var slider2 = [&#39;Recipe&#39;, &#39;Quote&#39;, &#39;Image&#39;, &#39;Quote #2&#39;, &#39;Image #2&#39;];
function formatText(index, panel) {
return slider2[index – 1];
}

$(function () {

$(&#39;#slider1&#39;).anythingSlider({
width : 800, // Override the default CSS width
easing: &#39;easeInOutExpo&#39;
});

$(&#39;#slider2&#39;).anythingSlider({
width : 600, // if resizeContent is false, this is the default width if panel size is not defined
height : 350, // if resizeContent is false, this is the default height if panel size is not defined
resizeContents : false, // If true, solitary images/objects in the panel will expand to fit the viewport
autoPlay : false, // This turns off the entire slideshow FUNCTIONALY, not just if it starts running or not
navigationFormatter : formatText // Format navigation labels with text
})

$(&quot;#slide-jump&quot;).click(function(){
$(&#39;#slider2&#39;).anythingSlider(4);
return false;
});

});
</script>
<!–end slider scripts info : http://www.spiceupyourblog.com/–>


Step 5. Save your template.

We have now added the Css, jQuery and javascript to make the Featured Slider work next we need to add the actual content.

Adding The Slider And Content


You will want to add the slider below your header across your blog.This position is known as ‘crosscol’ or Cross Column.

cross column gadget blogger

Some templates may not have that section available, if your blog doesn’t you can see how to make it available here – Full Width Cross Column Gadget.

We all have it now so you can click ‘Add A Gadget’ and choose ‘Html/Javascript’.

Adding slides could not be easier, in your html/javascript gadget you add an opening tag which is <ul id=”slider1″> at the top and a closing tag </ul> at the bottom and the images or videos go in the middle wrapped in list tags :

<ul id=”slider1″>
<li>Place Image Or Video Code Here</li>
</ul>


This is the code for the slider on the demo page :

<ul id=”slider1″>

<li><iframe width=”640″ height=”390″ src=”http://www.youtube.com/embed/FFVSa4HEW1k?rel=0″ frameborder=”0″ allowfullscreen></iframe></li>

<li><a href=”http://www.spiceupyourblog.com/”><img src=”http://2.bp.blogspot.com/-bw_c8KpBko4/TdK2lnRjg8I/AAAAAAAAD4A/A-RjX-DdeQw/s1600/slide-civil-2.jpg” alt=”” /></a></li>


<li><iframe width=”480″ height=”385″ src=”http://www.youtube.com/embed/DbtrJmjXMOk?rel=0″ frameborder=”0″ allowfullscreen></iframe></li>


<li><a href=”http://www.spiceupyourblog.com/”><img src=”http://3.bp.blogspot.com/-xPits9ZP8Z0/TdK2yoE0JaI/AAAAAAAAD4I/0DhxMUWbQEw/s1600/slide-civil-1.jpg” alt=”” /></a></li>

<li><iframe width=”640″ height=”390″ src=”http://www.youtube.com/embed/bz9LOf9j-DA?rel=0″ frameborder=”0″ allowfullscreen></iframe></li> 

<li><a href=”http://www.spiceupyourblog.com/”><img src=”http://2.bp.blogspot.com/-6A5FpvDIeYA/TdK2_sYHuHI/AAAAAAAAD4Q/YzR7KrrWDEo/s1600/slide-env-2.jpg” alt=”” /></a></li>

</ul>


Highlighted in yellow you can see how the videos were added and highlighted in red you can see how the images were added.That’s it, a unique jQuery featured slider for both images and video.

Thanks to Css Tricks for the very cool Slideshow and there is actually another few versions of this slider we may cover in the future.

Drop Your Comments And Questions Below. 

Awesome New Google Search Style Search Bar For Blogger

I’m sure you will have noticed the new Google design as covered in the post Evolving the Google design and experience on the official Google blog.While the changes have been subtle some stand out like the new sleek search bar on results pages.The new search bar has a more modern minimalist look with rounded corners and hover effect.But one new feature i quiet like is as you type your text into the search field an X appears than can be clicked to remove your text.Yes it’s nothing major but still a neat feature none the less.So in this post i will show you how you can re-create the new Google search bar and use it on your blog.

Once on your blog it will look the very same, using jQuery for the X delete button and your blogs default search to generate results.This was covered on the Awesome Queness.Com design blog and with just a few changes i have it ready to go For Blogger.

Lets look at some screenshots and the live demo :

On Google 


On Blogger


On the demo page i have it wide across the top of the posts but you can also easily make it smaller to fit nicely into your sidebar.If you want to actually try it just search for one of the recent posts you can see in the sidebar of that blog.

View Demo Button 

Add The New Google Style Search Bar To Blogger


Remember Always Back Up Your Template Before You Make Changes – How To Back Up A Blogger Template 

Step 1. In Your Blogger Dashboard Click Design > Edit Html 

Design Edit Html Blogger

Step 2. Find the following piece of code in your blogs Html : (Click Ctrl and F for a search bar to help find the code – How To Find Code In Blogger Template Template) 

]]></b:skin>


Step 3. Copy and Paste the following code Directly Above / Before ]]></b:skin>

-Scroll Box Make Sure To Get All The Code.

/*Start Css For Google Style Search Box*/

/* div container containing the form */
#searchContainer {
margin:20px;
}

/* Style the search input field. */
#field {
float:left;

width:200px;

height:27px;
line-height:27px;
text-indent:10px;
font-family:arial, sans-serif;
font-size:1em;
color:#333;
background: #fff;
border:solid 1px #d9d9d9;
border-top:solid 1px #c0c0c0;
border-right:none;
}

/* Style the “X” text button next to the search input field */
#delete {
float:left;
width:16px;
height:29px;
line-height:27px;
margin-right:15px;
padding:0 10px 0 10px;
font-family: “Lucida Sans”, “Lucida Sans Unicode”,sans-serif;
font-size:22px;
background: #fff;
border:solid 1px #d9d9d9;
border-top:solid 1px #c0c0c0;
border-left:none;
}
/* Set default state of “X” and hide it */
#delete #x {
color:#A1B9ED;
cursor:pointer;
display:none;
}
/* Set the hover state of “X” */
#delete #x:hover {
color:#36c;
}
/* Syle the search button. Settings of line-height, font-size, text-indent used to hide submit value in IE */
#submit {
cursor:pointer;
width:70px;
height: 31px;
line-height:0;
font-size:0;
text-indent:-999px;
color: transparent;
background: url(http://4.bp.blogspot.com/-GX7E4j3jwR0/ThMXKjuQ9VI/AAAAAAAAEsE/rJE5Ip1qDEg/s1600/ico-search.png) no-repeat #4d90fe center;
border: 1px solid #3079ED;
-moz-border-radius: 2px;
-webkit-border-radius: 2px;
}
/* Style the search button hover state */
#submit:hover {
background: url(http://4.bp.blogspot.com/-GX7E4j3jwR0/ThMXKjuQ9VI/AAAAAAAAEsE/rJE5Ip1qDEg/s1600/ico-search.png) no-repeat center #357AE8;
border: 1px solid #2F5BB7;
}
/* Clear floats */
.fclear {clear:both}

/*End Google Style Search Bar – Info @ http://www.spiceupyourblog.com*/


Note – To change the width of the search bar simply change the line highlighted in yellow from 200px up or down.

Step 4. Find the following piece of code in your blogs Html : (Click Ctrl and F for a search bar to help find the code – How To Find Code In Blogger Template Template) 

</head>


Step 5. Now Copy And Paste This Code Directly Above / Before </head>

Note – If you have previously added jQuery script to your template you can remove the code highlighted in green.

<script src=’http://code.jquery.com/jquery-1.6.1.min.js’ type=’text/javascript’/>

<script type=’text/javascript’>
$().ready(function() {
// if text input field value is not empty show the &quot;X&quot; button
$(&quot;#field&quot;).keyup(function() {
$(&quot;#x&quot;).fadeIn();
if ($.trim($(&quot;#field&quot;).val()) == &quot;&quot;) {
$(&quot;#x&quot;).fadeOut();
}
});
// on click of &quot;X&quot;, delete input field value and hide &quot;X&quot;
$(&quot;#x&quot;).click(function() {
$(&quot;#field&quot;).val(&quot;&quot;);
$(this).hide();
});
});
</script>


Step 6. Save your template, we have the Css added to style the search bar and the jQuery for the X button now we add the html.

Step 7. Head back to your blogs design page and click Add A Gadget > Choose Html/Javascript.


Step 8. Copy and Paste the following code into the Html/Javascript gadget :

<div id=”searchContainer”>
<form name=”SUYB” action=”/search” method=”get”>
<input type=”text” id=”field” id=”s” name=”q”/>
<div id=”delete”><span id=”x”>x</span></div>
<input type=”submit” name=”submit” id=”submit” value=”Search” />
</form>
</div>


Step 9. Save the html/javascript gadget and you can drag and drop it into place.

And that is it ! A lot of steps but over all i think it was easy enough to implement.Thanks once again to Queness for the original design, make sure to check out more of our Blogger Gadgetsand jQuery tutorials.If your looking for something more basic we have a Simple yet stylish search bar for blogger.
Drop Your Comments And Questions Below.