How to Add NetworkedBlogs Widget in Blogger

Create and Add NetworkedBlogs Widget in Blogger. Traffic generation is the main concerns for every publisher in the current social media and social networking ear. NetworkedBlogs is an extension of the NetworkedBlogs Facebook Application to make user-generated blog directory accessible outside Facebook and provide more exposure to your blogs.


I have took some screen shots and prepared step by step tutorial and by using it, i will show you how you can add NetworkedBlogs Widget in your Blogger blog or if you are familiar with wordpress then you can add it to the wordpress also. You will definitely generate some traffic after adding this widget in your blog because there are 500,000 Blogs network is waiting for you.

Steps to Add NetworkedBlogs Widget in Blogger


Step 1. Open this link – http://www.networkedblogs.com/ and click on Add your Blog button.


Step 2. It will now ask your for your Facebook credentials, enter your facebook user name and password and go ahead.

Step 3. Now Open this link – http://apps.facebook.com/blognetworks/editblog.php and Add your blog or site details in it (see below screen shot) and click Next button.


Step 4. It will ask for Are you the author of ‘BLOG NAME’?, just click on YES button and move ahead.


Step 5. Now you need to choose the verification method to verify ownership of ‘BLOG NAME’?

– Ask friends to verify you (easy, but takes a little time)
– Use widget to verify ownership (instant, but some technical skills required)

Click on Use widget to verify ownership (instant, but some technical skills required).

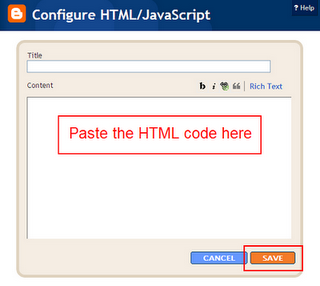
Step 6. Now Click on Install Widget >> button, and give the option to Copy the Following Code for Widget. Copy that code.

Step 7.Insert it into your blog template on the right-side column (not in a new post)

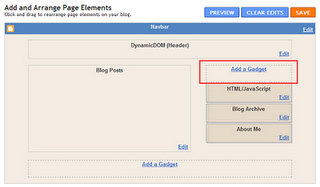
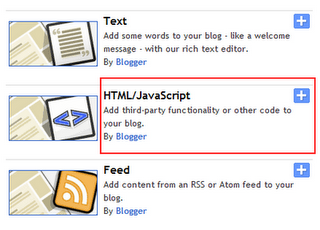
– To add the code in blogger, first Log-in to your blogger account and navigate to Layout >> Page Elements.


– Click “Add a Gadget”


– Paste the HTML code you copied from NetworkedBlogs into the text area and click save. You’re done.


Step 8. Click on Verify Widget button on Networkedblogs page and done!

– So now install your widget in your blog and start getting some extra traffic using Networkedblogs.

Labels: Blogger , Blogger Tips and Tricks , Blogger Widgets , Widgets

Add your blog to Google Blog Search


If you are a blogger, but not using Google’s Blogger (or Blogspot blog), even in that case, you can easily allow your blog to be shown in Google blog Search results.
 The Process is very simple, just visit this page [Google Blog Search Ping Service], and enter your blog’s url/address and click on the submit blog button.


Enjoy Guys! and don’t forget to post your comments. � MyTricksTime.com

Google +1 button optimized for mobile web

The Google +1 button, the public sharing tool which was introduced to the internet a few months back has now been thrown open for mobile web as well,. This development with respect to mobile phones comes after Google + was introduced for the iPhone in the second half of July. With this, net savvy users can publicly share what they like or recommend while on-the-go.

The +1 button works in a two-way manner. With this, users can share pages they like, find useful, or want to recommend for possible future use to others. This can be done within their circles, restricted to people viewing the +1ed pages in the profile or it can be shared with everyone.

The other way round, this button helps improve the Google search process by showing +1 recommendations in a separate category in the search results. Thus, users can refine and simplify their search process by seeing what pages from their search have been +1ed.

Users can also control the visibility of their +1s. They can easily change the settings to restrict the visibility to a select number of circles, while blocking a few. Also, +1s can be kept hidden in the profile where no one will get a view of a user�s list, while they remain publicly visible.

According to the update, the Google +1 button will appear automatically to anyone using Android version 2.1 or above and iOS 4.0 or higher browsers.

Add a Search Box to Your Blog (Header)

One of the important widgets in a blog is of course a search box, you may leave the archive widget, but do not miss a search box. With increasing number of posts, it is of course not possible for your readers to find a post from the never ending list in your blog archive, in that case only a search box can help them to find what they want.

According to my own blog statistics, out of every 500 page impressions at least 50 impressions belong to internal blog search.

Adding a search box to your blog is very easy. Simply Go to Layout and click on Add a Gadget, and select it as Search Box.
But just in case you want to edit/modify the search box, then you should better add it as an HTML element.


So go to Blogger -> 

Layout -> click on Add a Gadget and select it as HTML/JavaScript

and paste this code in to it:

<div>
<form action=’http://bloggerstop.net/search’ id=’searchthis’ method=’get’ style=’display:inline;’>
<span>Search This Blog</span>
<input id=’b-query’ maxlength=’255′ name=’q’ size=’20’ type=’text’/>
<input id=’b-searchbtn’ type=’submit’ value=’Search’/>
</form>
</div>

NOTE: Replace the code in RED with your blog’s address. You may customize the widget by modifying the text in BLUE.
That’s it save the widget.


In case you want to display the search box in the Header region, just like BloggerStop, follow these instructions:

Log in to  Blogger -> Layout -> Edit HTML and mark the ‘Expand Widget Templates‘ box.
Now find (CTRL+F) this:

#header {
…..
…..
…..
}

And immediately BELOW/AFTER it, paste this code:

#header .searchbox {
text-align:$endSide; //$endSide = Right & $startSide = Left
margin: 25px; // Distance from right or left side
}


Now search these lines:

<div class=’descriptionwrapper’>
<p class=’description’><span><data:description/></span></p>
</div>


Add the blue code BELOW it, like this:

<div class=’descriptionwrapper’>
<p class=’description’><span><data:description/></span></p>
</div>

<div class=’searchbox’>
<form action=’http://bloggerstop.net/search’ id=’searchthis’ method=’get’ style=’display:inline;’>
<input id=’b-query’ maxlength=’255′ name=’q’ size=’20’ type=’text’/>
<input id=’b-searchbtn’ type=’submit’ value=’Search’/>
</form></div>

That’s it, save the widget and let your visitors freely roam around your blog !

Add Three New Widgets At The Bottom Of Blogger/Blogspot Blog

You would have seen many new modified blogger templates with additional 3 widgets at the bottom (footer) of the blog, and they are very useful for bloggers, as you can place widgets like Recent posts, Recent comments, Top posts and Top commentators etc in these widgets.
It is very important to add these widgets in a blog, as when readers finish reading the post, they may  immediatly leave the blog if no other interesting article is found. Moreover these widgets help new visitors to understand the blog’s main content.


So if these widgets are not present in your blog, then follow these steps to add them yourself :

First log in to Blogger.com
Go to Layout -> Click on Edit HTML tab

Now search (CTRL+F) for these code line:

<div id=’footer-wrapper’>

<b:section class=’footer’ id=’footer’/>

</div>

REPLACE the entire red line in the above code, with this new code:

<div id=’footer-column-container’>
<div id=’footer2′ style=’width: 30%; float: left; margin:0; text-align: left;’>
<b:section class=’footer-column’ id=’col1′ preferred=’yes’ style=’float:left;’/>
</div>
<div id=’footer3′ style=’width: 40%; float: left; margin:0; text-align: left;’>
<b:section class=’footer-column’ id=’col2′ preferred=’yes’ style=’float:left;’/>
</div>
<div id=’footer4′ style=’width: 30%; float: right; margin:0; text-align: left;’>
<b:section class=’footer-column’ id=’col3′ preferred=’yes’ style=’float:right;’/>
</div>
<div style=’clear:both;’/>
<div id=’footer-bottom’ style=’text-align: center; padding: 10px; text-transform: lowercase;’>
<b:section class=’footer’ id=’col-bottom’ preferred=’yes’>
<b:widget id=’Text2′ locked=’false’ title=” type=’Text’/>
</b:section>
</div>
<div style=’clear:both;’/>
</div>

Now PREVIEW the template, and if no errors are displayed, then carry on:

Find this code:

]]></b:skin>


Then immediately BEFORE / ABOVE it, paste these lines:

#footer-column-container {
clear:both;
}

.footer-column {
padding: 10px;
}

Save the template, go to “Page Elements“, and add content to the three new widgets !