A Cool Any Size JQuery Powered Featured Posts Slider For Blogger

Over the last few weeks i have published some cool jQuery Gadgets and Widgets for your Blogs.In this post i have taken the jQuery Easy Slider, a stylish slide show with some neat options and turned it into a kinda mini slider with the option to go large.We previously published the Blogger jQuery Anything Slider that had the option to add videos or images as slides and a Simple But Stylish Blogger Featured Posts Slider.So i wanted to continue with a slide show that could be easily re sized from spanning the width of your blog to the miniature example i have here.

This jQuery Featured Posts Slider also has features like auto scroll, continues scroll plus next slide and previous slide buttons for manual scroll.The original Easy Slider script and code was created by the very cool Css Globe, below is a live demo of our version. 

View Demo Button

As you can see i have gone small in the demo but it could be even smaller and of course much much bigger.

Add The Any Size jQuery Slider To Blogger


Remember Always Back Up Your Template Before You Make Changes – How To Back Up A Blogger Template

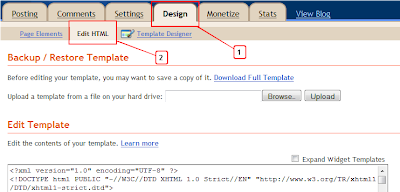
Step 1. In Your Blogger Dashboard Click Design > Edit Html
Design Edit Html Blogger

Step 2. Find the following piece of code in your blogs Html : (Click Ctrl and F for a search bar to help find the code – How To Find Code In A Blogger Template)

]]></b:skin>


Step 3. Copy and Paste the following code Directly Above / Before ]]></b:skin>

/*Slider Css*/
#slider{} 
#slider ul, #slider li{
margin:0;
padding:0;
list-style:none;
}
#slider li{ 

width:320px;
height:111px;

overflow:hidden; 

#prevBtn, #nextBtn{ 
display:block;
width:30px;
height:77px;
position:absolute;
left:-30px;

top:15px;


#nextBtn{ 
left:320px;

#prevBtn a, #nextBtn a{ 
display:block;
width:30px;
height:77px;
background:url(http://1.bp.blogspot.com/-fH1rGWYTkbU/Tf6MbKOD9JI/AAAAAAAAEbc/Wz-cdPzr2Ik/s1600/btn_prev.gif) no-repeat 0 0; 

#nextBtn a{ 
background:url(http://1.bp.blogspot.com/-5zuaXipw548/Tf6MahaUqII/AAAAAAAAEbY/rToQ90dXLU8/s1600/btn_next.gif) no-repeat 0 0; 

/*Slider Css Info @ http://www.spiceupyourblog.com*/


Change the size of the slider – The width and height are highlighted in yellow so you change these to your required dimensions.You will also have to change the position of the next and previous buttons which is a little more tricky.

Highlighted in red you can see i have the buttons 15px from the top, if you made the slider bigger you would increase the margin from the top.So for example if you made the slider 222px high you would make this 30px.You can try a few margins until you get it right.

Step 4. Find the following piece of code in your blogs Html : (Click Ctrl and F for a search bar to help find the code – How To Find Code In A Blogger Template)

</head>


Step 5. Now Copy And Paste This Code Directly Above / Before </head>

Note – If you have previously added jQuery to your template you can leave out the section in green.

<script src=’https://ajax.googleapis.com/ajax/libs/jquery/1.6.1/jquery.min.js’ type=’text/javascript’/>

<script src=’http://spiceupyourblogextras.googlecode.com/files/suyb-easyslider-blogger-v3.js’/>
<script>
$(document).ready(function(){ 
$(&quot;#slider&quot;).easySlider({
auto: true,
continuous: true 
});
});
</script>


That’s the Css and Script added for the slider now we add the Html for the actual images.

The Html, Links And Images


This is the html for the actual slider in the demo blog, you can see the links and images highlighted.You can copy and paste this code into a Html / Javascript gadget from your design page, add your links then save and drag and drop into position.

<div id=”slider”> <ul> 

<li><a href=”http://www.spiceupyourblog.com“><img src=”http://1.bp.blogspot.com/-u_WOZqWHpEU/Tf6MYCU1eXI/AAAAAAAAEbE/FIPXIj7ReFc/s320/01.jpg” width=”320px” height=”111px” /></a></li>

<li><a href=”http://www.bestbloggertemplates.net“><img src=”http://4.bp.blogspot.com/-oedOSjhiv5U/Tf6MYgwd2bI/AAAAAAAAEbI/9FMLkdZ-rck/s320/02.jpg” width=”320px” height=”111px”/></a></li>

<li><a href=”http://www.socialiconstudio.com“><img src=”http://2.bp.blogspot.com/-jImc67oxQp0/Tf6MZIdfrcI/AAAAAAAAEbM/BLfEQP710O0/s320/03.jpg” width=”320px” height=”111px” /></a></li>

<li><a href=”http://www.spiceupyourblog.com“><img src=”http://1.bp.blogspot.com/-wc4HttM7_jc/Tf6MZqCtRnI/AAAAAAAAEbQ/A5KrplnQrvU/s320/04.jpg” width=”320px” height=”111px” /></a></li>

<li><a href=”http://www.bestbloggertemplates.net“><img src=”http://2.bp.blogspot.com/-13IJB7gKbvY/Tf6MaGxbeII/AAAAAAAAEbU/fpQwnFerrLs/s320/05.jpg” width=”320px” height=”111px” /></a></li>

</ul>
</div>

Note – The links are in yellow and the image URLs in red, change these to your links and images.

Note 1 – If you do change the size of the slider you need to change the width and height in each slide above to the same dimensions.

Add More Slides – To add more slides you simply add another link and image like this after the <ul> tag above :

<li><a href=”http://www.bestbloggertemplates.net“><img src=”http://2.bp.blogspot.com/-13IJB7gKbvY/Tf6MaGxbeII/AAAAAAAAEbU/fpQwnFerrLs/s320/05.jpg” width=”320px” height=”111px” /></a></li>


That’s it for the versatile jQuery Easy Slider and this Blogger Tip.Once again thanks to Css Globe, and make sure to check out more of our jQuery Gadgets and Blogger Gadgets.

Drop Your Comments And Questions Below. 

How To Create A Multi-Tab Widget In BlogSpot/Blogger Blogs

New Multi-Tabbed Widgets For Blogger

One of the space efficient widget for blogs, is of course a multi-tabbed widget, which is almost a must for any blog. You can use it for Popular posts, Top commenters, Recent Posts, Recent Posts or any widget as you like.

Although you can find some other methods on Internet, but they are all quite confusing, so you can use this method, which is quite easy, but of course needs to tweak the template.

The complete process has mainly two steps:

1. Firstly, Log in to Blogger. Now go to Layout and then click on “Edit HTML” tab.

Then download the present template as a backup.
Now find [CTRL+F] this code:

]]></b:skin>

JUST BEFORE THIS CODE, paste the following code:

// Copyright (C) 2005 Ilya S. Lyubinskiy.
// All rights reserved.
// Technical support: http://www.php-development.ru/

div.TabView div.Tabs
{
height: 24px;
overflow: hidden;
}
div.TabView div.Tabs a
{
float: left;
display: block;
width: 90px; /* Width top main menu – Tab Buttons*/
text-align: center;
height: 24px; /* Height top main menu – Tab Buttons*/
padding-top: 3px;
vertical-align: middle;
border: 1px solid #000; /* Top Main menu border color */
border-bottom-width: 0;
text-decoration: none;
font-family: “Times New Roman”, Serif; /* Top main menu font */
font-weight: 900;
color: #000; /* Top main menu font color */
}
div.TabView div.Tabs a:hover, div.TabView div.Tabs a.Active
{
background-color: #F4F4F4; /* Top main menu background color */
}
div.TabView div.Pages
{
clear: both;
border: 1px solid #6E6E6E; /* Content Border color */
overflow: hidden;
background-color: #FBF1A4; /* Content background color */
}
div.TabView div.Pages div.Page
{
height: 100%;
padding: 0px;
overflow: hidden;
}
div.TabView div.Pages div.Page div.Pad
{
padding: 3px 5px;
}

The text in red color are comments, for your help, as you can edit those numbers or color codes yourself, so that they can match your blog’s layout.

Download this File: Tabview.zip
Then in your PC, unzip it (using Winzip or 7-Zip), and then upload it toMyDataNest.com, to get a DIRECT LINK to the file (Tabview.js).

Now find (CTRL+F) this in the template;

</Head>

And immediately BEFORE that paste this code

<script src=’http://mydatanest.com/……./tabview.js‘ type=’text/javascript’/>

Replace the link in RED, with the DIRECT LINK of the Tabview.js file

That’s it, Now SAVE the template.

2. The second part is for positioning the widget (whether in sidebar, above/below the post body etc.)
For this, click on “Page Elements” tab, and then “Add a Gadget” wherever you like.

Select the widget of the type “HTML/JavaScript

Now paste the following code in to the widget:

<form action=”tabview.html” method=”get”>
<div class=”TabView” id=”TabView”>
<div class=”Tabs” style=”width: 350px;”>
<a>Tab 1</a>
<a>Tab 2</a>
<a>Tab 3</a>
</div>
<div class=”Pages” style=”width: 350px; height: 250px;”>

<div class=”Page”>
<div class=”Pad”>

Content 1.1 <br />
Content 1.2 <br />
Content 1.3 <br />

</div>
</div>

<div class=”Page”>
<div class=”Pad”>

Content 2.1 <br />
Content 2.2 <br />
Content 2.3 <br />

</div>
</div>

<div class=”Page”>
<div class=”Pad”>

Content 3.1 <br />
Content 3.2 <br />
Content 3.3 <br />

</div>
</div>

</div>
</div>
</form>

<script type=”text/javascript”>
tabview_initialize(‘TabView’);
</script><span>widget by<a href=”http://bloggerstop.net”> BloggerStop</a></span>

You can change the colored content as per your wish, and to remove or add any further tabs,
Either delete Tab3 line, and 3.1, 3.2 and 3.3 lines
or Add Tab 4 and 4.1 etc lines.

Save the widget, drag and change it’s position if you want.

Credits: PHP Development

Why I Love Blogger | New Dynamic View Launched

The first good thing about Blogger it’s free, it’s easy to use, It’s secure then any other service, and you no need to think about new ideas and gadgets. Google always work on them. After i started on blogger they released template designer, recent post gadget, popular post, and total visits gadget. After some days the awesome feature stats released. Comment moderation and Mobile view, and now blogger has released dynamic view.


Although these views are not available for HackTheWorld without pawan’s permission but as soon as he will be free , we will try to try…..

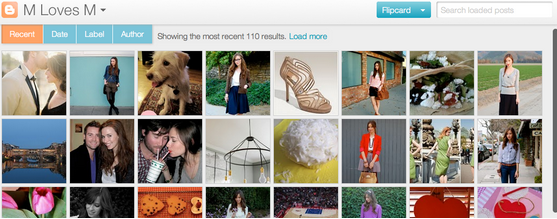
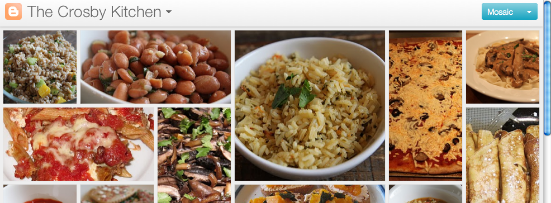
Blogger currently offers five dynamic views for its public blogs. These views are only accessible if allowed for by the blog author.
Flipcard: available at [blogURL]/view/flipcard
Mosaic: available at [blogURL]/view/mosaic
Sidebar: available at [blogURL]/view/sidebar
Snapshot: available at [blogURL]/view/snapshot
Timeslide: available at [blogURL]/view/timeslide

As an example, the URL for accessing the Sidebar view for Blogger Buzz would be http://buzz.blogspot.com/view/sidebar.

These views require modern browsers such as Internet Explorer 8+, Firefox 3.5+, Chrome or Safari. Many elements of these views will not work should you have an older browser.

In all views, search is available in the upper right hand corner. Clicking on the “>” arrow in the very top left of the header bar will slide the header bar across and allow you to choose different views for the current blog as well as type in a new blog URL.

Flipcard

  • Mouse over any of the cards to see the post title and comment count. As you scroll down, additional posts will continue to load.
  • Click on a card to see the post in full view. You can navigate through the posts using J (older post) and K (newer post) or the arrow keys. Hit escape or click Back to all posts to return to the Flipcard view.
  • In the upper left, click to sort by DateAuthor and Category.


Mosaic

  • Clicking on an individual tile will expand that post to the full width of the view, and clicking again will collapse the post back into its original position.
  • The exact position of the tiles is randomly determined each time the blog loads, but they will appear chronologically from top left to bottom right.
  • Once a tile is expanded, you can page down by using the “up” and “down” arrow keys as well as J and K.
  • This view is optimized for the tablet viewing, and supports screen rotation.

Sidebar

  • Optimized for quick reading and browsing.
  • Left sidebar is list of chronological posts, with comment counts and thumbnails for individual posts.
  • and arrow keys will navigate through the posts, and comments can be displayed on the same page by clicking the Show link.

Snapshot

  • This view will display only the posts which have images.
  • Clicking through any photo will display the full post page, with naviagtion links at the bottom for Newer and Older posts
  • Mousing over any photo will display a post snippet

Timeslide

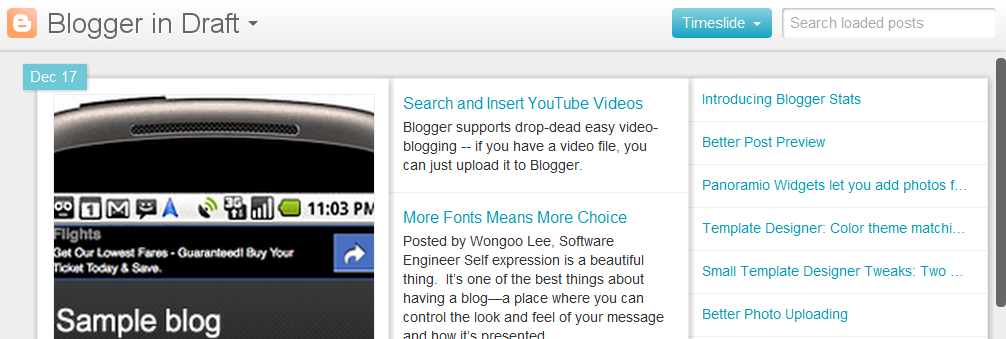
  • This view breaks the blog content down into three different areas:
    • Left column: Enlarged picture with a post snippet, title, and snipppet displayed in chronological order
    • Middle column: Displays just the post title and snippet
    • Right column: Displays just the individual post titles
  • When searching for posts in this view, the results will be highlighted

Enjoy Guys! and don’t forget to post your comments. � MyTricksTime.com

    Best 10 websites to store your images

    1.PHOTOSHOP.COM

    PHOTOSHOP.COM is
    an Adobe product. Photoshop Express is the online editor for
    the Photoshop.com services. You can upload, manage, edit and
    share your images on this website. Printing services are available
    only for US-based members. The website offers some of the
    best online image editing options. You can use Photoshop
    Elements to upload images on to the website. You can edit
    images from on your Facebook, Flickr, Photobucket, or Picasa
    accounts.
    The website supports collaborative photo blogging.
    2 PHOTO.NET
    THIS website is for amateur photographers who require
    online assistance. There are diff erent moderators overlooking
    each section of the website where images are posted. Apart
    from receiving insightful comments on your photography skills
    from resident experts, you will fi nd a lot of tips on buying the
    right equipment, basic and advanced tutorials, photography
    books, etc. You can order photo prints and gifts and purchase
    other photography related equipment like still cameras, lenses
    and tripods.
    3 SNAPFISH
    Although more of a photo store than an image
    hosting service, Snapfi sh nevertheless is a product from HP
    Labs which doubles up as photo sharing service. Apart from
    basic image fi xes, you can add image captions and invite your
    friends to view and add images to your album. You can order
    high quality prints and photo gifts from the site. Popular sites
    like photobucket and Picasa use Snapfi sh services for ordering

    photo prints and gifting requests from their existing users. The
    quality of prints is also excellent.

    4 PICASAWEB
    Coming from the Google stable, Picasa is one of the
    most popular photo storage and sharing websites. You can
    also make image based movies and collages using images
    stored online through the Picasa desktop application. The
    application also provides assistance to carry out basic image
    editing; collage creating, image blogging and uploading. You
    can run slideshows and order prints and photo gifts online
    too. Public images can be viewed directly but private images
    require invitation by the album owner. You can further secure
    your photographs by enabling the ‘Sign-in required to view’
    album option. This web service supports viewer comments and
    collaborative photo blogging too.
    5 WEBSHOTS
    WEBSHOTS is a very interactive photo sharing web
    portal. You can opt for a free or a premium account. Unlike other
    portals, there is no size-based limit but a number based limit
    (you can store and share 1,000 free and 5,000 personal photos
    on the premium account for starters.) Apart from printing your
    personal pictures as photo and on various photo gifts, you can
    also download and print photographs taken by professional
    photographers. The website has collaborated with PhotoWorks
    for photo and gift printing. Like Picasa, this website also has
    a provision to use desktop application for easy management
    of your online photos. The website also extends support for
    mobile updates.

    6.SHUTTERFLY
    JUST like Snapfi sh, shutterfl y is a web portal which is
    essentially a photo printing service rather than a photo sharing
    service. Nevertheless, you can use the website to back up your
    personal photos and share them too. Your friends don’t need
    to sign up to view your uploaded images; you can share the
    album link to enable a slideshow view of your photos. You can
    also organize, edit, upload and share photographs through its
    desktop application. Apart from basic image fi xes, you can add
    free borders and personalized captions to further customize your
    images. You can also print photos with short message on their
    reverse to keep the magical moments alive. The website supports
    collaborative photo blogging.

    7 MULTIPLY.COM
    INSTEAD of merely uploading, sharing and printing your
    photos, if you plan to host them on a web address of your own,
    then multiply.com is a good option to look at. You can get your
    own sub-domain, maintain your blog, network with your net
    friends, upload photos and videos and use your uploaded media
    in your blog posts. You can also order photo prints and photo
    gifts online. The website does not support collaborative photo
    blogging, but members can post comments on your media fi les.
    8 IMAGESHACK
    ALTHOUGH this web portal is tipped to be the 5th
    largest in its genre, certain features the site has to off er fall short
    of expectations. Image correction only includes rotating an image
    in either direction. You can add your images to your blog, create

    image slide shows and get codes for sharing images on email,
    forums, and websites. You can import your Flickr images to your
    Imageshack album. While their contemporaries off er a host of
    complimentary services, Imageshack acts as a mere repository
    where you can backup and share your images.

    9 PHOTOBUCKET
    Photobucket is said to be the one of the largest
    image sharing web portals in the world. This website supports
    collaborative photo blogging. Your visitors do not need to have to
    a Photobucket account to view images from shared albums. You
    can customize your Photobucket account using the listed themes.
    You can also edit images and add frames and other eff ects to
    them. You can search for images on the website. The portal off ers
    specialized services like printing photo gifts, creating collages or
    slideshows for your social networking profi les and blog sites. You
    can even create your own professional online scrap book though
    scrapblog.com.
    10 FLICKR.COM
    EVER since Yahoo! photos shut down operations, the
    company has focused its energies to provide similar features to
    its users via Flickr.com. You can create a Flickr account through
    your Yahoo! account. The website supports collaborative photo
    blogging, meaning you can invite your friends to a group for
    making changes to photos appearing in particular albums (called
    ‘sets’). The website provides basic image fi xing via picnik.com. You
    can also use uploaded images for photo gifts. The website has
    provisions to edit multiple images in a single batch. You can add
    locations tags to your images via Yahoo! Maps.
    Enjoy Guys!
    and don’t forget to post your comments. � MyTricksTime.com