Add Social Subscription Networks in List Style To Blogger

social networks list

Social media always help every site or blog to grow at faster speed. So it is important to use every possible way which is beneficial for us. I already publish many social plugins in different and amazing style in my Blogger Tutorials. But today i decide to publish an another widget for blogger for social networks.
This widget don’t include any image ,colorful code or any network logo. This widget is simply made in the form list. You can add your favorite networks in this list and add them easily on on your blog. If you want to live demo of this gadget must see at bottom in footer part of our blog at Our Networks gadget.

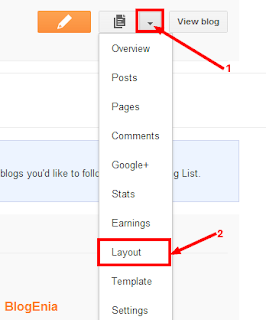
Steps To Add Social  List To Blogger

  • Go To Blogger Dashboard >> Then Layout
  • Click on Add a Gadget Button
  • Then Click on HTML/JavaScript
  • Now paste the below code in the gadget box

<!-- Starting Social Networks List By
MyTricksTime.com -->
<ul>
<li>&#8594; &#160;<a target="_blank" rel="nofollow"  href="http://feeds.feedburner.com/MyTricksTime">Subscribe on RSS feed </a></li>
<br/>
<li>&#8594; &#160;<a target="_blank" rel="nofollow"  href="http://www.facebook.com/
MyTricksTime">Join us on Facebook</a></li>
<br/>
<li>&#8594; &#160;<a target="_blank" rel="nofollow" href="https://plus.google.com/102588571388484646448">Circle us on Google+ </a></li>
<br/>
<li>&#8594; &#160;<a target="_blank" rel="nofollow"  href="http://www.youtube.com/user/
MyTricksTime">Join us on YouTube</a></li>
<br/>
<li>&#8594; &#160;<a target="_blank" rel="nofollow" href="http://www.stumbleupon.com/stumbler/
MyTricksTime">Join us on StumbleUpon </a></li>
<br/>
<li>&#8594; &#160;<a target="_blank" rel="nofollow"  href="http://www.pinterest.com/
MyTricksTime">Join us on Pinterest</a></li>
<br/>
<li>&#8594; &#160;<a target="_blank" rel="nofollow"  href="http://www.linkedin.com/in/
MyTricksTime">Join us on LinkedIn</a></li>
</ul>
<!-- End Social Networks List By
MyTricksTime.com -->

  • After pasting above code replace

             Replace This color code links with your Favorite networks User accounts

             Replace this color text with the your text which you want to display

  • Now click on Save Button and Refresh your blog and see changes

If you have any question must leave your comment.

Enjoy Guys! and don’t forget to post your comments. � MyTricksTime.com

Fast Loading Email Subscription Widget for Blogger

Almost every blogger knows the importance of email subscription widget in your blog. Email subscription helps your readers to reach your blog when you provide new article or update your blog. Moreover, an easy email subscription box attracts your readers to subscribe your blog straightforwardly. So today, this post is about adding a fast loading email subscription widget to your blog and i – See more at: http://labstrikes.blogspot.in/2013/04/fast-loading-email-subscription-widget-blogger.html#sthash.K7KMnmBu.dpuf

Almost every blogger knows the importance of email subscription widget in your blog. Email subscription helps your readers to reach your blog when you provide new article or update your blog. Moreover, an easy email subscription box attracts your readers to subscribe your blog straightforwardly. So today, this post is about adding a fast loading email subscription widget to your blog and it might be helpful for those who doesn�t like default blogger Follow by Email. – See more at: http://labstrikes.blogspot.in/2013/04/fast-loading-email-subscription-widget-blogger.html#sthash.K7KMnmBu.dpuf
Fast Loading Email Subscription Widget

Almost every blogger knows the importance of email subscription widget in your blog. Email subscription helps your readers to reach your blog when you provide new article or update your blog. Moreover, an easy email subscription box attracts your readers to subscribe your blog straightforwardly. So today, this post is about adding a fast loading
email subscription widget to your blog and it might be helpful for those who doesn�t like default blogger Follow by Email.

 
Fast Loading Email Subscription Widget

Please note: This email subscription widget adjusts the dimension automatically according to the place where it belongs to. But it�s better to have at least 300px if you�re focusing on sidebar. To prove it, if you own a demo blog, try to add this widget in your blog�s sidebar as well as footer to see its automatic dimension.

And you can easily customize your blogger sidebar width if it�s below 300px via Customise.
 Access path: Blogger Dashboard � Template � Customise � Adjust widths � Right sidebar.

Add this Email Subscription Box to your Blog
It�s for guys, who�s experienced adding widgets to their blog earlier. Kindly follow simple steps provided below.

  •     Go to Blogger Dashboard � Layout
  •     Click on Add a Gadget
  •     Copy & paste the below code in it (leave the title column blank)

<style type='text/css'>#sidebar-subscribe-box {
background: url(http://1.bp.blogspot.com/-IyEBRR8yOQQ/UBhYdBd23PI/AAAAAAAAFTU/aeW3JdAlrCs/s1600/colored-strip.png) repeat scroll 0 0 transparent;
border: 1px solid #aaa;
border-radius: 3px;
padding: 3px 0;
}
.sidebar-subscribe-box-wrapper {
background: url(http://2.bp.blogspot.com/-tUlo5p5gP8o/UBhYciGNgwI/AAAAAAAAFTM/x22pIuNLVPw/s1600/bg-pattern.png) repeat scroll 0 0 #f7f7f7;
color: #111;
font-size: 14px;
line-height: 20px;
padding: 1px 20px 10px;
text-align: center;
text-transform: uppercase;
}
.sidebar-subscribe-box-form {
clear: both;
display: block;
margin: 10px 0;
}
form.sidebar-subscribe-box-form {
clear: both;
display: block;
margin: 10px 0 0;
width: auto;
}
.sidebar-subscribe-box-email-field {
-moz-border-radius: 4px;
-webkit-border-radius: 4px;
background: #fff url(http://1.bp.blogspot.com/-JMYdQsIa9WQ/UDZqxqqrTEI/AAAAAAAAFho/AocEv70U8K8/s1600/sprites.png) no-repeat 0 -27px;
border: 1px solid #ccc;
border-radius: 4px;
color: #444;
margin: 0 0 15px;
padding: 10px 40px;
width: 68%;
}
.sidebar-subscribe-box-email-button {
background: #09f;
border: 1px solid #007fff;
box-shadow: 0 1px 0 rgba(255,255,255,0.3) inset, 0 1px 0 transparent;
color: #fff;
cursor: pointer;
font-family: verdana;
font-weight: 700;
padding: 10px;
text-shadow: 1px 1px 0 rgba(0,0,0,.4);
text-transform: uppercase;
width: 100%;
}
.sidebar-subscribe-box-email-button:hover,.sidebar-subscribe-box-email-button:focus {
background: #1ca4ff;
}
.sidebar-subscribe-box-email-button:active {
-moz-box-shadow: 0 1px 4px rgba(0,0,0,0.5) inset;
-webkit-box-shadow: 0 1px 4px rgba(0,0,0,0.5) inset;
box-shadow: 0 1px 4px rgba(0,0,0,0.5) inset;
outline: 0;
}
iframe,object,embed,.yt-border iframe,.yt-border object,.yt-border embed,table {
width: 100%;
}
embed {
border-radius: 3px;
-moz-box-shadow: 0 2px 4px rgba(0,0,0,0.2);
-webkit-box-shadow: 0 2px 4px rgba(0,0,0,0.2);
background: #FFF;
border: 1px solid #ddd;
box-shadow: 0 2px 4px rgba(0,0,0,0.2);
margin: 0;
padding: 4px 4px 4px;
}
#footer-section {
background: #f5f5f5 url(http://1.bp.blogspot.com/-n5s9Bu0JCgg/UA_AfQ5qLkI/AAAAAAAAFMU/G9FOuh4SP7k/s0/bg-pattern.png) repeat top left;
border-top: 1px solid #aaa;
box-shadow: inset 0 4px 6px -3px #aaa;
font-family: cambria;
font-size: 14px;
height: 100px;
margin: 10px -30px 5px;
padding: 0 30px;
text-align: center;
width: 100%;
}</style>
<div id="sidebar-subscribe-box"><div class="sidebar-subscribe-box-wrapper"><p>Subscribe to our email newsletter & receive updates right in your inbox.
</p><div class="sidebar-subscribe-box-form"><form action="http://feedburner.google.com/fb/a/mailverify?uri=MyTricksTime"
class="sidebar-subscribe-box-form" method="post" onsubmit="window.open('http://feedburner.google.com/fb/a/mailverify?uri=MyTricksTime',
'popupwindow', 'scrollbars=yes,width=550,height=520');return true" target="popupwindow">
<input name="uri" type="hidden" value="MyTricksTime" /><input name="loc" type="hidden" value="en_US" />
<input class="sidebar-subscribe-box-email-field" name="email" autocomplete="off" placeholder="Enter your email address :)"/>
<input class="sidebar-subscribe-box-email-button" title="" type="submit" value="Subscribe Now!" /></form></div></div></div>

Don�t forget to replace MyTricksTime [line no: 86, 87 & 89] with your FeedBurner username. Hope you added this attractive subscription widget to your blog. In case you need any more customization, feel free to mention via comment provided below

Almost every blogger knows the importance of email subscription widget in your blog. Email subscription helps your readers to reach your blog when you provide new article or update your blog. Moreover, an easy email subscription box attracts your readers to subscribe your blog straightforwardly. So today, this post is about adding a fast loading email subscription widget to your blog and it might be helpful for those who doesn�t like default blogger Follow by Email. – See more at: http://labstrikes.blogspot.in/2013/04/fast-loading-email-subscription-widget-blogger.html#sthash.K7KMnmBu.dpuf

Enjoy Guys! and don’t forget to post your comments. � MyTricksTime.com

10 stylish email subscription widget for Blogger

Email subscription widgets help you to get more subscribers to your blog. These widgets not only increase your traffic but also helps you to grow a loyal community. You can use these emails any time to make your reader updated about your services or posts.

Even some online gurus consider email as the best marketing strategy. And even stats shows that email are used more than any social media sites and clicks generated through emails are much more than through social media sites like Facebook or twitter.

Email Subscription Widget For Blog spot Blogs

Many social media and email subscription widgets are available for blogger on internet and even blogger itself host some widgets. In this post, I have gathered all amazing and stylish social media and email subscription widgets for blogger blogs. Most of these widgets are made by MBT.

1. Mashable social media and email subscription widget for blogger

Mbt first released Mashable sharing widget V1 and after modifying it they converted it into version 2 which you can see in the image below and check it here.

Social media with email subscription widget for blogger

This widget contains almost all important social media subscription buttons like Facebook, twitter and Google plus following button and also contain email subscription and RSS subscription icons. This is all in one email with social media widget treat.

2. Word press like social media with email subscription widget for blogger  

Social media with email subscription widget for blogger

This widget is modified for BlogSpot blog from word press subscription widget. This beautiful widget contain social media icons and a simple email subscription form. It also shows total number of feed subscribers.

3. Popup subscription box for blogger 

Social media with email subscription widget for blogger

This is an Aweber style pop up email sign up forms. Whenever some visitor visit your blog this subscription widget will pop up on the screen and asks for email subscription. This is very helpful plugin for blogger blog as it will help you to get maximum results with minimum effort.
Here is a quick demo

4. Simple widget with RSS and social icons

Social media with email subscription widget for blogger

If you want a simple, clean design subscription widget then this is the best choice for you as it contains only three buttons i.e. RSS, twitter and Facebook icon and a simple email form.
Click here to see it live

5. Simple email subscription form for BlogSpot blogs

Social media with email subscription widget for blogger

This is a simple widget which can be added in the side bar or footer of any blog. This will keep your design simple and clean. Its coding is simple and it is easy to edit.
Live demo

6. No ordinary social media with email subscription widget

Social media with email subscription widget for blogger

This awesome widget (Live demo) is really not ordinary. This widget is made with the aim to increase traffic, social media subscription and email subscription. It includes a smart email form with social media icon, Share box and Facebook like box. This widget can be used just after the header or it can be added below post area to make your blog more professional.

7. Attractive email subscription widget below post

Social media with email subscription widget for blogger

This subscription widget is made with the aim of increasing email subscribers. Whenever a visitor reads a complete article, he/she will come across this awesome subscription box.
Check it here

8. “Do you like this story” Subscription widget for blogger

Social media with email subscription widget for blogger

This widget contains email subscription box, Facebook like and send button to share and like your blog post and social media icons. This widget can be used below post to get more shares from the visitors.
Live demo

9. Attractive email subscription box below post

Social media with email subscription widget for blogger

This is a fast loading subscription form with awesome look.

10. Word press style subscription widget for Blogger

Social media with email subscription widget for blogger

Simple yet an effective subscription box which can be added below post or in the start of post.

These are some awesome email and social media subscription widgets for Blog Spot blogs. These widgets can be used in the side bar, above or below the post or in the footer.

Comment below if you find some problem and don’t forget to share this awesome collection with your friends.

Enjoy Guys! and don’t forget to post your comments. � MyTricksTime.com

Unique Email Subscription Box Widget for Blogger

If you are a Blogger, I am sure you must be aware of advantage of having a Blog subscription box. Subscription box is a widget that simply allows the readers to subscribe to your blog, either via RSS or Email and to connect with you on various other social networking sites. So, it is an essential widget for every blog.

This subscribe box is simple yet loved by many as it features Facebook, Google + and Twitter in a miniature. All those who like to have this widget, just follow the below steps to have it on your blog.

Read Also:

How to Get it:

Step1. Log in to your blogger account.

Step2. From the dashboard click on the drop down menu and select the Layout option.

Step3. Click on Add a Gadget.

Step4. A new window will open. Now click on HTML/JavaScript.

Step5. Now paste the below code in the Content box.

<div align=’CENTER’class=”bd_widget”>

<div align=”left” id=”bd-text”><h3>JOIN US
</h3>
<div id=”bd-subscribe-box”>
<div class=”email-box”>
<h4>Subscribe FREE updates on your <a href=”http://feedburner.google.com/fb/a/mailverify?uri=MyTricksTime” target=”_blank”>Email</a> | <a href=”http://feeds.feedburner.com/MyTricksTime” target=”_blank”>RSS</a></h4>
<form onsubmit=”window.open(‘http://feedburner.google.com/fb/a/mailverify?uri=MyTricksTime‘, ‘popupwindow’,
‘scrollbars=yes,width=700px,height=700px’);return true” target=”popupwindow” method=”post” action=”http://feedburner.google.com/fb/a/mailverify”>
<input name=”email” onblur=”if (this.value == &#39;&#39;) {this.value = &#39;Enter your email address&#39;;}” onfocus=”if (this.value == &#39;Enter your email address&#39;)
{this.value = &#39;&#39;;}” value=”Enter your email address” class=”txt” />
<input type=”hidden” name=”uri” value=”MyTricksTime” />
<input type=”hidden” value=”en_US” name=”loc” />
<input type=”submit” value=”Subscribe” class=”btn” />
<div style=”clear:both;”></div>
</form>
    </div>
<div class=”fb-like-box”>
<iframe src=”//www.facebook.com/plugins/like.php?href=http%3A%2F%2FMyTricksTime%2F&amp;send=false&amp;layout=button_count&amp;width=450&amp;show_faces=false&amp;font&amp;colorscheme=light&amp;action=like&amp;height=21&amp;appId=408184442589211″ scrolling=”no” frameborder=”0″ style=”border:none; overflow:hidden; width:80px; height:21px;” allowtransparency=”true”></iframe>
<a href=”http://www.facebook.com/MyTricksTime” target=”_blank” rel=”nofollow” style=”color: #3B5998; font-family: arial; font-size: 15px; font-weight: bold; line-height: 20px;”> Like us on Facebook </a><div class=”clear”></div>
    </div>
    <div class=”gplusone”>
<div style=”float:left;width:90px;”>
<g:plusone href=”http://www.MyTricksTime.com“></g:plusone>
</div>
<a href=”https://plus.google.com/1062174130577068740” target=”_blank” rel=”nofollow” style=”color: #d00; font-family: arial; font-size: 17px; font-weight: bold; line-height: 24px;”>Circle us on Google+</a><div class=”clear”></div>
</div>
<div class=”twitter-follow”>
<a href=”https://twitter.com/MyTricksTime” class=”twitter-follow-button”>Follow @MyTricksTime</a>
<script src=”//platform.twitter.com/widgets.js?4a2793″ type=”text/javascript”></script>
    </div>
</div></div>
<style type=”text/css”>
/* BD Style sheet for subscription box */
#bd-subscribe-box .fb-like-box { border: 1px solid #EBEBEB; padding: 5px; background:#fff;}
    #bd-subscribe-box .gplusone { background: #f7fcfc; border: 1px solid #EBEBEB; border-top: 1px solid #fff; color: #000; font-size: 10px; line-height: 1px; padding:5px;}
    #bd-subscribe-box .twitter-follow { background: #eef9f9; border: 1px solid #dff6f6; border-top: 1px solid #fff; padding:5px 11px;}
    #bd-subscribe-box .email-box {background:#e3edf4; padding:11px;}
        #bd-subscribe-box .email-box h4{color: #555;font-family: Arial;font-size: 11px; margin: 0 0 10px;}
        #bd-subscribe-box .email-box .txt,#bd-subscribe-box .email-box .txt:focus{background:#fff; float:left; color:#92c3c3; border:1px solid #E36B0A; border-radius: 3px; padding: 7px 10px 8px; width: 150px;}
        #bd-subscribe-box .email-box .btn,#bd-subscribe-box .email-box .btn:focus{background:#E36B0A; border:1px solid #AD5513; color:#fff; border-radius: 3px; float: right; font-size: 12px; font-weight: bold; padding: 8px 8px; text-shadow: 1px 1px 0 #D08D00;}
            #bd-subscribe-box .email-box .btn:hover{background:#FF9b00;}
input, textarea {
font-family: Georgia, “Times New Roman”, Times; font-size: 1em;}
#bd-text {
background:#369;
border: 1px solid #CCC;
box-shadow: 0 0 5px
#EEE;
line-height: 10px;
margin: 10px 10px 15px 0;
padding: 10px;
width:280px;
}
#bd-text h3 {
color:white;
border-bottom: 1px dotted
white;
line-height:1.385em;
font-size: 18px;
padding: 0;
margin: 0 0 10px;
border-bottom: 1px dotted
#AAA;
font-wieght: bold;
text-transform: uppercase;
letter-spacing: 0;
}
</style></div>

Now make sure that you changed the Red Colored user ids with your own.

Done!!

You can also adjust the width and colours as per your requirements. If you want any adjustments or having any doubt comment below, I will try to resolve it soon.
Enjoy Guys! and don’t forget to post your comments. � MyTricksTime.com

Add “Do You Like This Article” Box Under Blogger Post

Adding any type of social sharing buttons, follow button and  follow by email box differently covers lot of space. Sometime we also feel difficulty while arranging them correctly to get more response from visitors side for more subscribe, shares and follows equally but if you feel that you are losing your visitors without getting better results in subscription list and also not getting any shares. Then here is solution of your problem.

Today i am going to introduce a beautiful and amazing social sharing box with follow buttons also. This “Do You Like This Article” box contains Email Subscription box which helps to increase your email readers with three icons of RSS, Twitter and Facebook. I also add “Add This” Widget in box which help to get more share. This combination make this box amazing and best widget for using it under every Post.

Steps To Add Box Under Every Blogger Post

Before Starting Must See a Demo of This Box from below given button and see how its Looks

If you like this box and want to add This widget then follow below given steps

  • Go Blogger Dashboard >> Then Template Tab
  • Now Click The Edit HTML
  • Then search the code which something look like this 
<div class='post-footer-line post-footer-line-2'>

  • This code may comes 2,3 times always choose which code at last place
  • Then paste the Below given code just Below/After the code we search.


<b:if cond='data:blog.pageType == "item"'>
<style>
form.emailform{
margin:20px 0 0;
display:block;
clear:both;
}
.sttext{
background:url(https://lh5.googleusercontent.com/-vcHjElVD5zk/UeA8LA2cTFI/AAAAAAAAC_M/E7hdJq0gxj0/s28/box-mail.png) no-repeat scroll 4px center transparent;
padding:7px 15px 7px 35px;
color:#666;
font-weight:bold;
text-decoration:none;
border:1px solid #D3D3D3;
-moz-border-radius: 4px;
-webkit-border-radius: 4px;
border-radius: 4px;
-moz-box-shadow: 1px 1px 2px #CCC inset;
-webkit-box-shadow: 1px 1px 2px #CCC inset;
box-shadow: 1px 1px 2px #CCC inset;
}
.STbutton{
color:#666;
font-weight:bold;
text-decoration:none;
padding:6px 15px;
border:1px solid #D3D3D3;
cursor: pointer;
-moz-border-radius: 4px;
-webkit-border-radius: 4px;
-goog-ms-border-radius: 4px;
border-radius: 4px;
background: #fbfbfb;
background: -moz-linear-gradient(top, #fbfbfb 0%, #f4f4f4 100%);
background: -webkit-gradient(linear, left top, left bottom, color-stop(0%,#fbfbfb), color-stop(100%,#f4f4f4));
background: -webkit-linear-gradient(top, #fbfbfb 0%,#f4f4f4 100%);
background: -o-linear-gradient(top, #fbfbfb 0%,#f4f4f4 100%);
background: -ms-linear-gradient(top, #fbfbfb 0%,#f4f4f4 100%);
filter: progid:DXImageTransform.Microsoft.gradient( startColorstr=&#39;#FBFBFB&#39;, endColorstr=&#39;#F4F4F4&#39;,GradientType=0 );
background: linear-gradient(top, #fbfbfb 0%,#f4f4f4 100%);
}
#Box-outer {
-moz-border-radius: 10px 10px 10px 10px;
-webkit-border-radius: 10px 10px 10px 10px;
-goog-ms-border-radius: 10px 10px 10px 10px;
border-radius: 10px;
background: none repeat scroll 0 0 transparent;
border: 1px solid #D3D3D3;
background:#EEEEEE;
padding: 8px;
-moz-transition: all 0.3s ease-out;
-o-transition: all 0.3s ease-out;
-webkit-transition: all 0.3s ease-out;
-ms-transition: all 0.3s ease-out;
transition: all 0.3s ease-out;
width:555px;
}
#Box-outer:hover{
background: none repeat scroll 0 0 #FFF;
-moz-box-shadow: 1px 1px 2px #CCC inset;
-webkit-box-shadow: 1px 1px 2px #CCC inset;
box-shadow: 1px 1px 2px #CCC inset;
}
#Box-outer td{
padding:3px 0;
}
</style>
<div id='Box-outer'>
<div id='Box'>
<table width='100%'>
<span style='font-style: italic; font-size: 22px; font-family: arial,sans-serif, verdana; color:orange;'>Do you Like this article? Spread our words!</span>
<br/><br/>If you enjoyed Our Post then Help us and share our post on social networks Or Must Join Us Our Latest Updates By Email and Social Networks.
<tbody>
<tr>
<td>
<!-- AddThis Button BEGIN by MyTricksTime.com -->
<div class='addthis_toolbox addthis_default_style '>
<br/>
<a class='addthis_button_facebook_like' fb:like:layout='button_count'/>
<a class='addthis_button_tweet'/>
<a class='addthis_button_google_plusone' g:plusone:size='medium'/>
<a class='addthis_counter addthis_pill_style'/>
</div>
<script src='http://s7.addthis.com/js/250/addthis_widget.js' type='text/javascript'/>
<!-- AddThis Button
by MyTricksTime.com -->
</td>
</tr>
<tr align='left'>
<td> <p style='color:#666; font-style:italic; margin:0px 0px 5px 0px; '>Get Free Email Updates Daily!</p>
<form action='http://feedburner.google.com/fb/a/mailverify' class='emailform' method='post' onsubmit='window.open(&apos;http://feedburner.google.com/fb/a/mailverify?uri=MyTricksTime&apos;, &apos;popupwindow&apos;, &apos;scrollbars=yes,width=600,height=520&apos;);return true' style='margin: 0pt;' target='popupwindow'>
<input name='uri' type='hidden' value='MyTricksTime'/>
<input name='loc' type='hidden' value='en_US'/>
<input class='sttext' name='email' onblur='if (this.value == &quot;&quot;) {this.value = &quot;Enter your email...&quot;;}' onfocus='if (this.value == &quot;Enter your email...&quot;) {this.value = &quot;&quot;}' type='text' value='Enter your email...'/>
<input alt='' class='STbutton' title='' type='submit' value='Submit'/>
</form>
</td>
<td>
<p style='color:#666; font-style:italic; margin:0px 0px 5px 0px;'>Follow us!</p>
<a href='http://feeds.feedburner.com/MyTricksTime' rel='nofollow' target='_blank' title='Suscribe to RSS Feed'><img src='https://lh6.googleusercontent.com/-kI84uiBE0zM/UeA8xqkTHhI/AAAAAAAAC_c/gym5mfbJc_0/s40/box-rss.png'/></a>
<a href='http://twitter.com/MyTricksTime' rel='nofollow' target='_blank' title='Follow us on Twitter'><img src='https://lh6.googleusercontent.com/-JcC7aQHTodM/UeA8xuInqRI/AAAAAAAAC_Y/dh1wcnTsLvk/s40/box-twt.png'/></a>
<a href='http://www.facebook.com/MyTricksTime' rel='nofollow' target='_blank' title='Follow us on Facebook'><img src='https://lh3.googleusercontent.com/-rh6VRO2cye8/UeA9CZ4VkYI/AAAAAAAAC_k/uwLWEsysdXA/s40/box-fb.png'/></a>
</td>
</tr>
</tbody></table></div></div>
</b:if>

  • Now replace usernames

MyTricksTime with your feed burner id which comes 2 times

MyTricksTime with Facebook username

MyTricksTime with Twitter username

  • Replace them accurately with same color code as mention above.
  • After Replacing these Username Save Your template.

Enjoy Guys! and don’t forget to post your comments. � MyTricksTime.com