Where to upload the .js files or javascript files so as can be used by us for running it succesfully without bandwidth problems.As i post many hacks and tricks with the usage of .js files,i was having many accounts on googlepages and geocities and use to share that bandwidth and storage with my readers but after the upcoming news that both the google and yahoo have decided to close there services of googlepages and geocities,its been difficult for me to find an good server to with enough bandwidth and share with our readers.
So i am asking my readers now to upload these files to there own server as mine will not be working because of bandwidth problems.But many of them dont know where to upload these .js files,so i have started a list of sites to share where these .js files can be uploaded and used but these sites have limited bandwidth but its sufficient for single blog user.So you can join these below sites and use there hosting services,if it dont full fill your requirement just upload your files to different servers below to distribute the bandwidth.
Here Goes The List :-
1)Sigmirror:-It provides 5Gb Webspace and 7Gb Bandwidth/month
2)Hotlinkfiles:-It provides 1Gb Webspace and 4Gb Bandwidth/month.
3)Ripway:-It provides only 30Mb Webspace and 150Mb Bandwidth/day or 4.5Gb/month.
4)Boxstr:-It provides 5Gb Webspace and 1Gb Bandwidth/daily.Just upload your file and get the direct link to make it work.
5)Fileave:-It provides 30Mb Webspace and 1Gb Bandwidth.You can prefer to use it only for some of your file with usage of 1Gb bandwidth.
6)Mydatanest:-It provides 2Gb Webspace and 20Gb Bandwidth/month.You can prefer to use it for most of your file as bandwidth is much more than above sites.
7)Getdropbox:-It provides 2Gb Webspace and Bandwidth is unknown To me.
8)Yourjavascript:-New Provider as no need of account just host any script and get its link.
I got only these sites but they are very less i would like to get more sites listed here so if you are using or knowing any other site to host .js files please leave them in comments i will update the list.
Blog Tricks
4 Crucial Reasons To Build An Email List For Blog
We have discussed many�ways to make money online�here at MBT but never touched email marketing and how crucial it is to build an email list of your own. So lets take up this topic today. Email list is basically your email subscribers that have opted in to get your blog’s content via emails they have provided.
Its one of those marketing techniques that have played wonders for popular bloggers online today. Name any, may it be�Darren Rowse, or a young entrepreneur�Micheal Dunlop, they all use email list as their one of the major sources of income.
Email list is something that you own to a very extent. Its something that you could use till you death to market your blog, increase traffic and earn tons via promoting affiliate links.
Why Email Lists?
1- Know Your Readership
Its the strong way that you would know your reader individually. At least you would have their records. In case something goes unplanned with the blog, you could always notify the loyal readership by shooting them out an email.
People often present a point that email marketing is dieing out as social media has taken over, as a way we socialize and keep in touch with our readers. True it is to some extent. But have you ever thought of the percentage of people that have signed up for these social networks as compared to those who have email accounts?��

In fact, its the email address that is needed to make an account with Social networks (or mostly any where online). So why not to target directly those who have email accounts. Obviously its just one of the techniques to market your content to readers, in addition to social networks, but its a solid one.
2-Great Marketing Tool
Secondly strong email list can be a huge income stream. By talking Affiliate marketing, its just not promoting products via your blog posts, or banners in the sidebars. Here is where email list shows its real potential. You don’t want to over do the advertisement through the list, but its always a good strategy to through out an offer 3-4 times a month.
3-Driving Traffic
Email lists can play a strong role in bring huge amounts of traffic to your blog. You could send out a link of the recent post to email subscribers and it would take them back to the blog to read out the full article. This technique makes sure that people who often read their emails much more than the visiting a blog, gets attracted over.
4-Power Of Association
Think for a minute. You have an establised blog with thousands of email subscribers. And now you wish to start a new blog. Here is how that golden email subscribers would help you give a base to your new blog. You could promote your new blog and a solid loyal readers would be ready to read what you got there. Even though many would not support the idea, as they only subscribed to get updates of a particular blog, but it works to a great extent.
When Daren started his photography blog after�problogger, why do you think it was a sudden hit? Its just like those popular YouTubers. The moment they start out a new Channel, the name associated with that channel bring out followers faster than we could imagine. Thats the power of association.
So this building an email list is vital for a bloggers success. Ill be sharing few strong techniques by which we could increase our email subscribers list in a most effective way. That would help you put things together.
How to Create a Stickybar with “Close Button”?
Create a Sticky Bar With Close Button in Blogger
The steps are really simply as we already discussed in our previous tutorials. I will be not be discussing on how to change the font colors and background color of the bar because you can find all such details on my previous tutorials. Kindly have a look at them later in order to change the CSS style properties:
- Create a StickyBar and add it to Top
- Add a StickyBar at Bottom of your page
Follow these easy steps:
-
Go To Blogger > Design > Edit HTML
-
Backup your template
-
Search for this
]]></b:skin>
4. Just above it paste the following CSS code,
#mbt_bar{
background:#333 url(‘http://3.bp.blogspot.com/-zQeUG7PU9Uw/TmkiptyZ1eI/AAAAAAAAE98/At4tRBC9HQc/s400/stickybar.png’) repeat-x;
width:100%;
margin:0 auto;
text-align:center;
padding:0px 0;
border-bottom: 1px solid #888888;
-moz-box-shadow: #666666 0px 1px 3px;
-webkit-box-shadow: #666666 0px 1px 3px;
box-shadow: #666666 0px 1px 3px;
z-index: 999;
height: 28px; position:fixed;
line-height: 1.85em;
vertical-align: baseline;
letter-spacing: 1px;
color:#fff;
font-size:13px;
font-weight:bold;
font-family: arial,”Helvetica”,sans-serif;
}
#mbt_bar a{
text-decoration:underline;
color:#E2E504;
}
#mbt_bar a:hover{
text-decoration:none;
}
#mbt_bar p {margin:0; list-style:none;}
#mbt_bar img {vertical-align: middle;
margin-right: 6px;}
5. Next search for </head> and paste the following Javascript code just above it
<script type=’text/javascript’>
//<![CDATA[
var mbt_arr = new Array();
var mbt_clear = new Array();
function mbtFloat(mbt) {
mbt_arr[mbt_arr.length] = this;
var mbtpointer = eval(mbt_arr.length-1);
this.pagetop = 0;
this.cmode = (document.compatMode && document.compatMode!=”BackCompat”) ? document.documentElement : document.body;
this.mbtsrc = document.all? document.all[mbt] : document.getElementById(mbt);
this.mbtsrc.height = this.mbtsrc.offsetHeight;
this.mbtheight = this.cmode.clientHeight;
this.mbtoffset = mbtGetOffsetY(mbt_arr[mbtpointer]);
var mbtbar = ‘mbt_clear[‘+mbtpointer+’] = setInterval(“mbtFloatInit(mbt_arr[‘+mbtpointer+’])”,1);’;
mbtbar = mbtbar;
eval(mbtbar);
}
function mbtGetOffsetY(mbt) {
var mtaTotOffset = parseInt(mbt.mbtsrc.offsetTop);
var parentOffset = mbt.mbtsrc.offsetParent;
while ( parentOffset != null ) {
mbtTotOffset += parentOffset.offsetTop;
parentOffset = parentOffset.offsetParent;
}
return mbtTotOffset;
}
function mbtFloatInit(mbt) {
mbt.pagetop = mbt.cmode.scrollTop;
mbt.mbtsrc.style.top = mbt.pagetop – mbt.mbtoffset + “px”;
}
function closeTopAds() {
document.getElementById(“mbt_bar”).style.visibility = “hidden”;
}
//]]>
</script>
6. Finally search for <body> and just below it paste the following HTML code
<div id=’mbt_bar’> WRITE YOUR TEXT HERE
<span style=’padding:0px; float:right’>
<img align=’absmiddle’ border=’0′ onClick=’closeTopAds();return false;’ src=’http://1.bp.blogspot.com/-MSEzL6EtjrM/Tt-hrSkKVnI/AAAAAAAAFiQ/AGUGFpnSUHk/s400/cancel.png‘ style=’cursor:hand;cursor:pointer;’/></span></div>
<br/><br/>
To write an announcement, update news or notice to readers, just replace the yellow highlighted text with your message. If you wish to change the Close button image then simply replace the bolded black link with your button’s link.
7. Save your template
8. You are all done!
Visit your blog to see it fixed to the top just beautifully with a close button waiting to be clicked!
How it works?
The close button when clicked triggers the function closeTopAds(); which then searches for function definition. The function is defined such that it sets visibility of bar to hidden. That’s how the bar hides once the button is clicked and reappears only upon page refresh. Indeed a pretty neat way to make a user friendly bar.
Need help?
You are most welcomed to ask for any help if needed. If you wish to share the tutorial and scripts above with your readers then kindly attach attribution to MBT blog. Peace and blessings pal! 🙂
How To Host Files on Google Code For Free?
I must remind you that you can upload anything you want under the limit of 200MB per file. May it be Java, php, MySQL or even pyThon.
Google Project Hosting
This free service is called Google project hosting. We will need to create an account/project first with gmail ID. Lets begin
- Log into this link with your Gmail ID
- Then give your Project a name without spaces and fill up remaining blanks as shown below,
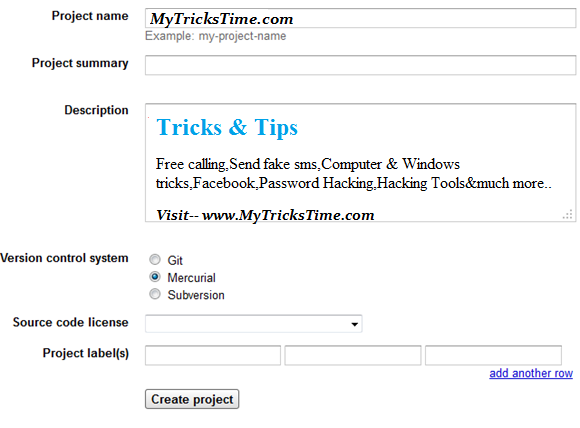
3. Fill up the areas simply with your blog title and choose MIT as the license and choose Mercurial version.
4. Hit “Create Project“
5. On the next window click the New Download link under the Downloads Tab. See the screenshot below:

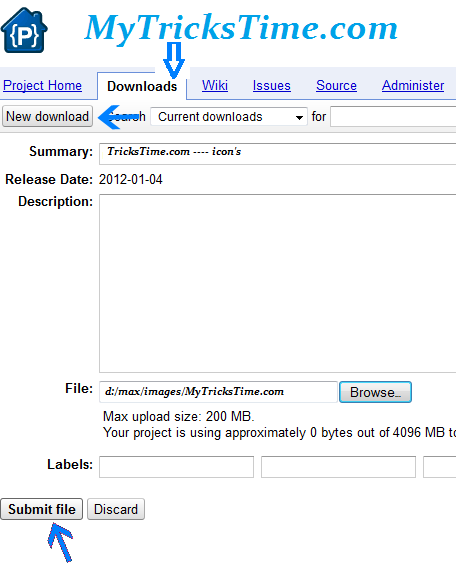
6. Next to summary field give your file a name and hit the browse button to locate your file. Click submit file and bingo you are done!
7. Click your uploaded file and you will be taken to a new page.
8. Clicking it again will popup a download window but we don’t need to download it. Instead rightclick the file and choose “Copy link location” This link is what you would need when linking to the file through your blogger Edit HTML section.

Advantage
I will ask you in future to save your javascripts here in order to make the tutorial length precise and make things look more simple. It wont slow down your widgets load time because the script is located on Google servers with 100% uptime. You can save javascripts on Blogger too but its better to keep your template clean rather pasting large chunks of code inside it. Have fun pals! 🙂
How to Add NetworkedBlogs Widget in Blogger
Create and Add NetworkedBlogs Widget in Blogger. Traffic generation is the main concerns for every publisher in the current social media and social networking ear. NetworkedBlogs is an extension of the NetworkedBlogs Facebook Application to make user-generated blog directory accessible outside Facebook and provide more exposure to your blogs.


I have took some screen shots and prepared step by step tutorial and by using it, i will show you how you can add NetworkedBlogs Widget in your Blogger blog or if you are familiar with wordpress then you can add it to the wordpress also. You will definitely generate some traffic after adding this widget in your blog because there are 500,000 Blogs network is waiting for you.
Steps to Add NetworkedBlogs Widget in Blogger
Step 1. Open this link – http://www.networkedblogs.com/ and click on Add your Blog button.
Step 2. It will now ask your for your Facebook credentials, enter your facebook user name and password and go ahead.
Step 3. Now Open this link – http://apps.facebook.com/blognetworks/editblog.php and Add your blog or site details in it (see below screen shot) and click Next button.

Step 4. It will ask for Are you the author of ‘BLOG NAME’?, just click on YES button and move ahead.
Step 5. Now you need to choose the verification method to verify ownership of ‘BLOG NAME’?
– Ask friends to verify you (easy, but takes a little time)
– Use widget to verify ownership (instant, but some technical skills required)
Click on Use widget to verify ownership (instant, but some technical skills required).
Step 6. Now Click on Install Widget >> button, and give the option to Copy the Following Code for Widget. Copy that code.
Step 7.Insert it into your blog template on the right-side column (not in a new post)
– To add the code in blogger, first Log-in to your blogger account and navigate to Layout >> Page Elements.
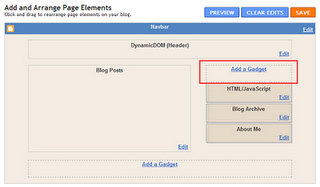
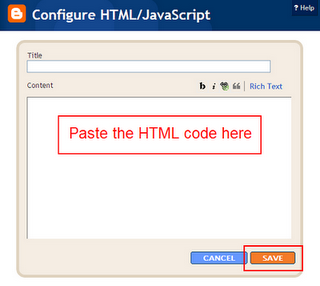
– Click “Add a Gadget”
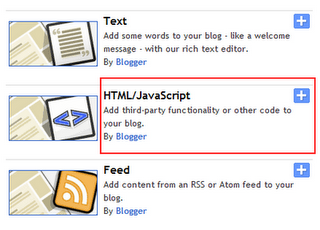
– Paste the HTML code you copied from NetworkedBlogs into the text area and click save. You’re done.
Step 8. Click on Verify Widget button on Networkedblogs page and done!
– So now install your widget in your blog and start getting some extra traffic using Networkedblogs.
Labels: Blogger , Blogger Tips and Tricks , Blogger Widgets , Widgets