 Over the last few weeks i have published some cool jQuery Gadgets and Widgets for your Blogs.In this post i have taken the jQuery Easy Slider, a stylish slide show with some neat options and turned it into a kinda mini slider with the option to go large.We previously published the Blogger jQuery Anything Slider that had the option to add videos or images as slides and a Simple But Stylish Blogger Featured Posts Slider.So i wanted to continue with a slide show that could be easily re sized from spanning the width of your blog to the miniature example i have here.
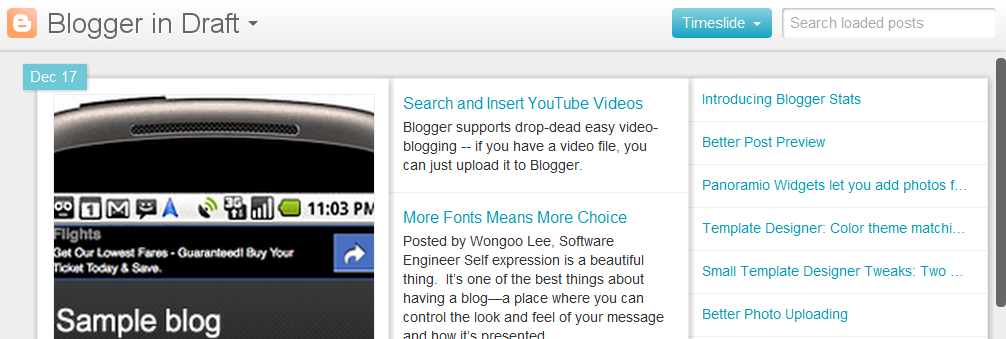
This jQuery Featured Posts Slider also has features like auto scroll, continues scroll plus next slide and previous slide buttons for manual scroll.The original Easy Slider script and code was created by the very cool Css Globe, below is a live demo of our version.

As you can see i have gone small in the demo but it could be even smaller and of course much much bigger.
Add The Any Size jQuery Slider To Blogger
Remember Always Back Up Your Template Before You Make Changes – How To Back Up A Blogger Template
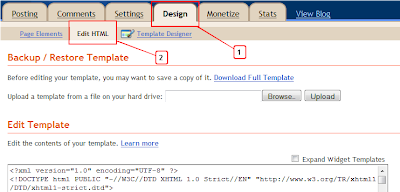
Step 1. In Your Blogger Dashboard Click Design > Edit Html
Step 2. Find the following piece of code in your blogs Html : (Click Ctrl and F for a search bar to help find the code – How To Find Code In A Blogger Template)
]]></b:skin>
Step 3. Copy and Paste the following code Directly Above / Before ]]></b:skin>
/*Slider Css*/
#slider{}
#slider ul, #slider li{
margin:0;
padding:0;
list-style:none;
}
#slider li{
width:320px;
height:111px;
overflow:hidden;
}
#prevBtn, #nextBtn{
display:block;
width:30px;
height:77px;
position:absolute;
left:-30px;
top:15px;
}
#nextBtn{
left:320px;
}
#prevBtn a, #nextBtn a{
display:block;
width:30px;
height:77px;
background:url(http://1.bp.blogspot.com/-fH1rGWYTkbU/Tf6MbKOD9JI/AAAAAAAAEbc/Wz-cdPzr2Ik/s1600/btn_prev.gif) no-repeat 0 0;
}
#nextBtn a{
background:url(http://1.bp.blogspot.com/-5zuaXipw548/Tf6MahaUqII/AAAAAAAAEbY/rToQ90dXLU8/s1600/btn_next.gif) no-repeat 0 0;
}
/*Slider Css Info @ http://www.spiceupyourblog.com*/
Change the size of the slider – The width and height are highlighted in yellow so you change these to your required dimensions.You will also have to change the position of the next and previous buttons which is a little more tricky.
Highlighted in red you can see i have the buttons 15px from the top, if you made the slider bigger you would increase the margin from the top.So for example if you made the slider 222px high you would make this 30px.You can try a few margins until you get it right.
Step 4. Find the following piece of code in your blogs Html : (Click Ctrl and F for a search bar to help find the code – How To Find Code In A Blogger Template)
</head>
Step 5. Now Copy And Paste This Code Directly Above / Before </head>
Note – If you have previously added jQuery to your template you can leave out the section in green.
<script src=’https://ajax.googleapis.com/ajax/libs/jquery/1.6.1/jquery.min.js’ type=’text/javascript’/>
<script src=’http://spiceupyourblogextras.googlecode.com/files/suyb-easyslider-blogger-v3.js’/>
<script>
$(document).ready(function(){
$("#slider").easySlider({
auto: true,
continuous: true
});
});
</script>
That’s the Css and Script added for the slider now we add the Html for the actual images.
The Html, Links And Images
This is the html for the actual slider in the demo blog, you can see the links and images highlighted.You can copy and paste this code into a Html / Javascript gadget from your design page, add your links then save and drag and drop into position.
<div id=”slider”> <ul>
<li><a href=”http://www.spiceupyourblog.com“><img src=”http://1.bp.blogspot.com/-u_WOZqWHpEU/Tf6MYCU1eXI/AAAAAAAAEbE/FIPXIj7ReFc/s320/01.jpg” width=”320px” height=”111px” /></a></li>
<li><a href=”http://www.bestbloggertemplates.net“><img src=”http://4.bp.blogspot.com/-oedOSjhiv5U/Tf6MYgwd2bI/AAAAAAAAEbI/9FMLkdZ-rck/s320/02.jpg” width=”320px” height=”111px”/></a></li>
<li><a href=”http://www.socialiconstudio.com“><img src=”http://2.bp.blogspot.com/-jImc67oxQp0/Tf6MZIdfrcI/AAAAAAAAEbM/BLfEQP710O0/s320/03.jpg” width=”320px” height=”111px” /></a></li>
<li><a href=”http://www.spiceupyourblog.com“><img src=”http://1.bp.blogspot.com/-wc4HttM7_jc/Tf6MZqCtRnI/AAAAAAAAEbQ/A5KrplnQrvU/s320/04.jpg” width=”320px” height=”111px” /></a></li>
<li><a href=”http://www.bestbloggertemplates.net“><img src=”http://2.bp.blogspot.com/-13IJB7gKbvY/Tf6MaGxbeII/AAAAAAAAEbU/fpQwnFerrLs/s320/05.jpg” width=”320px” height=”111px” /></a></li>
</ul>
</div>
Note – The links are in yellow and the image URLs in red, change these to your links and images.
Note 1 – If you do change the size of the slider you need to change the width and height in each slide above to the same dimensions.
Add More Slides – To add more slides you simply add another link and image like this after the <ul> tag above :
<li><a href=”http://www.bestbloggertemplates.net“><img src=”http://2.bp.blogspot.com/-13IJB7gKbvY/Tf6MaGxbeII/AAAAAAAAEbU/fpQwnFerrLs/s320/05.jpg” width=”320px” height=”111px” /></a></li>
That’s it for the versatile jQuery Easy Slider and this Blogger Tip.Once again thanks to Css Globe, and make sure to check out more of our jQuery Gadgets and Blogger Gadgets.
Drop Your Comments And Questions Below.