Google�s Play Store is your official Android portal for apps, games, movies and TV, books and magazines, and more. But Google Play isn�t just about content; it�s also a valuable tool for managing your various Android devices, setting notifications for apps and services, enabling automatic software updates, and personalizing your Android experience.Here are ten tips and tricks for getting more practical value out of Google Play.
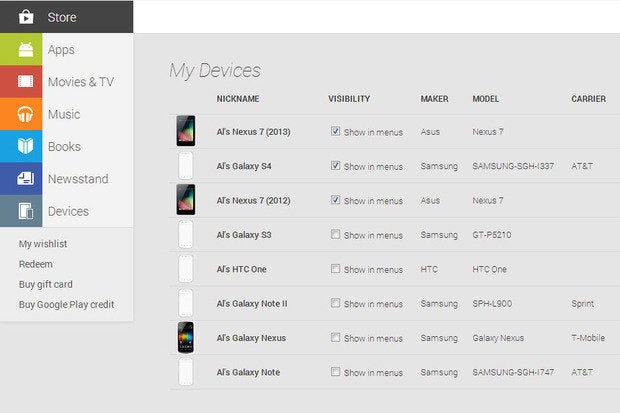
1 Manage your devices via the Web
In addition to accessing the on-device app store, you can reach Google Play via your Web browser. The Web interface offers an array of options that aren�t available through the Android-based app store, including the ability to see and manage all of the Android devices associated with your Google account.To see a list of all your Android devices, visit Google Play at play.google.com. Click a content option in the vertical menu on the left side to see a Settings icon that looks like a small gear in the top-right of your display. Click that icon to view a list of your registered devices. (If you don�t see the Settings icon, try choosing another content option from the content menu.)
To change the name of a device in the list, click the Edit option, type the new name in the Nickname text field, and click Update to save your changes
2. Manage mail preferences and notifications
The Play Settings screen also lets you update your email preferences and notification settings. Open the Web-based Play settings, using the process described above, and then scroll down to the bottom of the screen, where you�ll see two check boxes. If you want to receive news and promotions from Google Play, fill in the first box. If you want to receive email notifications from developers seeking feedback on the apps you use, check the second box.
3. Review orders, report problems, and request refunds
To see a handy list of all of your paid transactions on Google Play, first click the Play Settings icon�but this time, instead of choosing the Settings option, click My Orders.
The orders list provides details about the specific content you�ve purchased or downloaded, including the item�s full name, price, transaction date, content type, and status (complete, cancelled, shipped, or whatever). To filter your purchases by content type, use the All Orders menu in the top left corner, above the list of purchases.
To report a problem with an app, product or service, or to request a refund, find the specific purchase in the orders list and hover your pointer over that name in the list. A set of three vertical dots will appear to the right of the name. Click the dots and choose the Report a Problem option. A popup box with a drop-down menu and a set of options specific to the content type will appear. Choose the appropriate option from the menu, and you�ll see a list of possible resolutions. If the suggestions don�t help, fill in the text field with appropriate details and submit your request. You should receive some type of email receipt after submitting a request.
4. Password-protect your orders
It�s a good idea to password-protect your Google Play account, to avoid unwanted or accidental purchases�especially if multiple people (including children) frequently use your device or devices.To enable Play password protection, open the Google Play app on your Android device, tap the three vertical dots in the top right corner of your display, and choose Settings. In the User Controls section, you�ll see a box next to Password. Enter a password there, and then confirm it to enable the setting.
After turning on password protection, you�ll be prompted for your password whenever you make a Play purchase. You can make additional purchases without reentering your password for up to 30 minutes after your most recent purchase.
Some devices enable password protection by default. If the Password box is checked, your account is already protected.
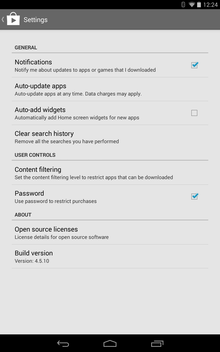
5. Automatically update your Google Play apps
Google Play�s ‘Auto-update apps’ setting lets you automatically update your apps and games so you don�t have to update them manually. Activating this option will reduce the number of (potentially annoying) update notifications you receive, too.
To enable automatic app updates, click the Menu icon (the three vertical dots) in the top right corner of your Google Play Android app and choose Settings. Under the General section, you�ll see an option for Auto-update apps. Tap that option and confirm it in the popup box.
You may still occasionally receive notifications to approve app updates if permissions change, but most of your apps will automatically update after you enable this setting.
6. Automatically add widgets for new apps
Widgets are among the best things about Android apps. They bring app features onto your Android home screen for quick viewing. And Google Play lets you automatically add a widget to your home screen for any new app you download, assuming that the app has a widget.
If you frequently download lots of apps, this setting may be a bit much, because unlimited widgets can become too much of a good thing. But it�s a good way to quickly determine which apps have widgets and whether they�re useful to you. And deleting widgets you don�t want is quite easy.
To enable the auto-widget option, open your Google Play app, tap the three-dot menu icon in the top right corner of your screen, and choose Settings. Then fill in the box next to Auto-app widgets, in the General section.
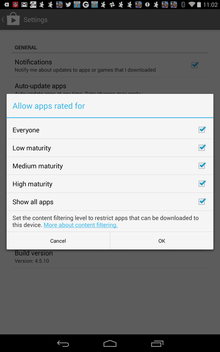
7. Filter Google Play content
To view and modify your content settings, open the Google Play app, click the three-dot menu icon and choose Settings. Under User Controls, choose Content filtering options. You can customize those settings by checking or un checking the boxes next to the five filter options under ‘Allow apps rated for’, which include ‘Everyone’, ‘Low maturity’, ‘Medium maturity’, ‘High maturity’, and ‘Show all apps’.
8. Browse for new apps and send them to your device from the Web
Sometimes it�s easier to search for new Android apps, games or media by using your Web browserthan by using the mobile app. If you use both an Android phone and an Android tablet�or various Android devices�you can use the Play Web interface to send new apps and content to specific devices quickly and easily.
When you find an app or other download you�re interested in while using the Web interface, tap the Install or Buy button on the download page. After logging in to your Google account, you�ll see a pop-up box containing a list of the app permissions and, at the bottom of the box, a drop-down menu listing all of the Android devices linked to your account. Choose the device you want to send the app to and confirm the download. If you want to download the app to multiple devices, walk through the process again, but this time choose another device from the drop-down menu.
9. Remove devices from menus
All Android devices you connect to your account show up in your Google Play devices lists, but you can remove them from menus by modifying your Visibility settings. For example, if your last phone was a Samsung Galaxy S3, but you recently updated to a Galaxy S4 and no longer want the GS3 to show up when you download new apps in the Web interface, you can remove the old GS3.
Using the Web interface, open your Settings menu (as described in tip 1 above). On the My Devices page, under the Visibility column, uncheck the boxes next to the device or devices you want to remove from your menus. Then refresh the page and confirm that the boxes are still unchecked; if necessary, uncheck them again.
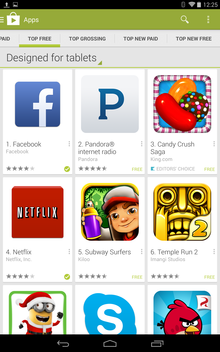
10. Filter tablet-optimized apps
Finding apps that are designed for tablets in Google Play is simple, thanks to a newish Designed for Tablets section in Google Play. To access that section, open the Google Play app on your tablet and tap the Apps option at the top of the page. Drag a finger to the left of your screen to scroll from the homepage to one of the following pages, and choose Designed for Tablets from the drop-down menu at the top of a page.
Enjoy Guys! and don’t forget to post your comments. � MyTricksTime.com
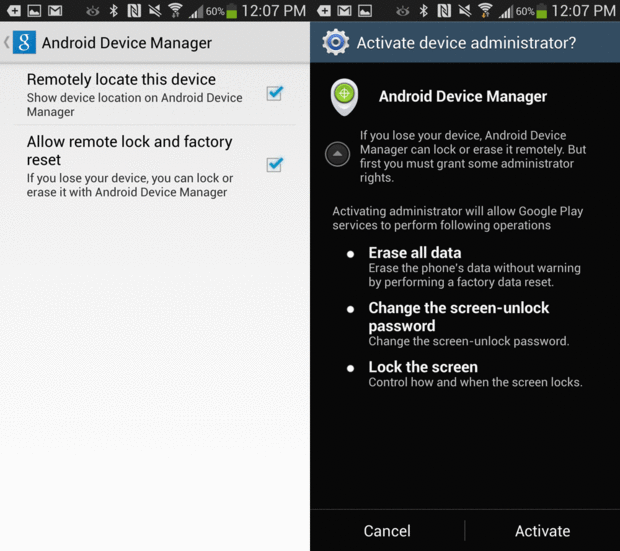
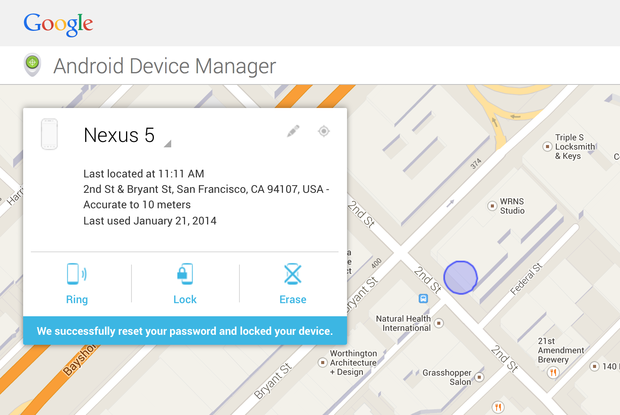
 If you�ve ever needed to find a misplaced Android device, or if you�ve ever feared that it has fallen into the wrong hands, good news: Android has a few security features that are relatively simple to turn on and use, thanks to Google�s Android Device Manager. The only catch is that you need to enable these settings now, because you can�t do so remotely once your device has been lost or stolen. So let�s get going.