Free High Quality Flash Clocks For Your Blogs

A clock gives a beautiful look to a website. A clock is a must for a personal homepage, forum, blog etc. Isn�t it exciting when you get a highly quality flash Clock absolutely Free?FreeFlashclocks.eu is offering Free download plus embedding of hundreds of highly professional Clocks in different shapes, sizes, colors, themes and styles. Below I have shared some of the clocks from FreeFlashclocks.eu and have provided the embedding code. Simply copy the code below each clock and past that code in Edit Html Section of your blogger editor to display the clock in your posts just like I did! See a Screenshot below,

edit-html
To add a clock to your sidebar simply paste the code provided in HTML/JavaScript Page Element . Go To Layout > Click Add a Gadget > From the list Select HTML/JavaScript
See screen shots below,
Layout
add-a-gadget
html-javascript
You add these clocks to your websites just the way you embed  YouTube Videos. I have altered the code so that it may work just perfectly alright in your BlogSpot blogs.
  1. A Clock plus a Calendar
<object><param name=”movie” value=”http://flash-clocks.com/free-flash-clocks-for-websites/free-flash-clock-1.swf”> <embed src=”http://flash-clocks.com/free-flash-clocks-for-websites/free-flash-clock-1.swf” width=”150″ height=”250″ wmode=”transparent”></object>
2.     A rotating Silver Clock
<object><param name=”movie” value=”http://flash-clocks.com/free-flash-clocks-for-websites/free-flash-clock-11.swf”><embed src=”http://flash-clocks.com/free-flash-clocks-for-websites/free-flash-clock-11.swf” width=”150″ height=”150″ wmode=”transparent”> </embed></object>
3.     A rotating Red belt Round the Clock
<object><param name=”movie” value=”http://flash-clocks.com/free-flash-clocks-for-websites/free-flash-clock-58.swf”><embed src=”http://flash-clocks.com/free-flash-clocks-for-websites/free-flash-clock-58.swf” width=”150″ height=”150″ wmode=”transparent”></embed></object>
4.     An Open space Clock with attracting face
<object><param name=”movie” value=”http://flash-clocks.com/free-flash-clocks-for-websites/free-flash-clock-63.swf”><embed src=”http://flash-clocks.com/free-flash-clocks-for-websites/free-flash-clock-63.swf” width=”150″ height=”150″ wmode=”transparent”> </embed></object>
5.     Wooden Clock, with A Light Brown Outline
<object><param name=”movie” value=”http://flash-clocks.com/free-flash-clocks-for-websites/free-flash-clock-15.swf”><embed src=”http://flash-clocks.com/free-flash-clocks-for-websites/free-flash-clock-15.swf” width=”150″ height=”150″ wmode=”transparent”> </embed></object>
6.      A Clock with a Lively touch to it
<object><param name=”movie” value=”http://flash-clocks.com/free-flash-clocks-for-websites/free-flash-clock-8.swf”><embed src=”http://flash-clocks.com/free-flash-clocks-for-websites/free-flash-clock-8.swf” width=”150″ height=”150″ wmode=”transparent”> </embed></object>
7.     Analogue Plus Digital
<object><param name=”movie” value=”http://flash-clocks.com/free-flash-clocks-for-websites/free-flash-clock-28.swf”><embed src=”http://flash-clocks.com/free-flash-clocks-for-websites/free-flash-clock-28.swf” width=”150″ height=”150″ wmode=”transparent”> </embed></object>
8.    A Clicking Digital Clock (The ticking Sound that you hear is from this Clock)
<object><param name=”movie” value=”http://flash-clocks.com/free-flash-clocks-for-websites/free-flash-clock-33.swf”><embed src=”http://flash-clocks.com/free-flash-clocks-for-websites/free-flash-clock-33.swf” width=”150″ height=”150″ wmode=”transparent”> </embed></object>
9.      Simple yet Attracting
<object><param name=”movie” value=”http://flash-clocks.com/free-flash-clocks-for-websites/free-flash-clock-23.swf”><embed src=”http://flash-clocks.com/free-flash-clocks-for-websites/free-flash-clock-23.swf” width=”150″ height=”150″ wmode=”transparent”> </embed></object>


10.     Finally a beautiful Clock with a Think Black Outline
<object><param name=”movie” value=”http://flash-clocks.com/free-flash-clocks-for-websites/free-flash-clock-24.swf”><embed src=”http://flash-clocks.com/free-flash-clocks-for-websites/free-flash-clock-24.swf” width=”150″ height=”150″ wmode=”transparent”> </embed></object>

Learn How To Show Post Summary using The �Read More Link� or �Continue Reading link�

Totally Exceptional!!A good blogger can be identified by the way he manages his blog and organizes his posts. The homepage is the most important part of every blog. The homepage must contain up to 5-6 posts in order to seize the attraction of reader as much as possible. Keeping a reader busy for a longer time is what I call a blogging success. Showing 5-6 posts is load-time and user friendly only if you show a summary of each post. On my homepage you must have seen a Read More Link, clicking which expands the entire post. Look at a screen shot Below,

read-more1
This link just adds beauty to your blog along with some pro spice to it. So lets learn how to summarize your posts and give them the expandable functionality.
The steps that must be followed for planting this TNT are,
  • Go to layout > Edit HTML
layout-edit-html

Now The Most Important Step �> Back Up Your Template
By backing up your template I mean that you must save a copy of your current template in your computer hard drive. If in case something goes wrong, you can restore your template and have everything working as normal as before.
To backup your template click on the link saying Download Full Template , as shown below
backup-template
If suppose something goes wrong , you will simply click the Browse button, locate your saved template and then simply click the Upload button to restore your template back to normal.
  • Click on “Expand Widget Templates” at the top right hand corner of your Edit HTML page
expand-widgets 
  • Now find this code ]]></b:skin> 
Tip: Pressing Ctrl + F  and then paste this code into the search box, as shown below,
Search-code
The search box is an easy way of finding codes in your template.
Just after 
]]></b:skin> copy paste the code below,
Tip: Highlight the code below and then press Ctrl + c to copy the entire code and then pressCtrl + v to paste the code
<style>
<b:if cond=’data:blog.pageType == “item”‘>
span.fullpost {display:inline;}
<b:else/>
span.fullpost {display:none;}
</b:if>
</style>

Now find this code  <data:post.body/>
And just after <data:post.body/> add the code below,
<!–READ-MORE-STARTS–>
<b:if cond=’data:blog.pageType != “item”‘>
<a expr:href=’data:post.url’>
<div style=”text-align: right;”>Read More ->></div></a>
</b:if>
<!–READ-MORE-STOPS–>

You can replace the text in red with anything you like, e.g: Continue ReadingKeep Reading
If you want to shift the “Read More->>” text to the extreme-left side, use this code:
<!–READ-MORE-STARTS–>
<b:if cond=’data:blog.pageType != “item”‘>
<a expr:href=’data:post.url’>
<div style=”text-align: left;”>Read More ->></div></a>
</b:if>
<!–READ-MORE-STOPS–>

Save your template and you are Done!

Read Further to know How to Apply this TNT in your Posts
Now whenever you want to write a post in windows Live Writer, follow the procedure below,
Once you had finished writing your post, as shown below,
Readmore1

Just after completing your post click on the 
source button at the bottom of your windows live writer page,
readmore2
You will see something like this,
 source code for your post
Now use the code below to hide the portion of your post that you don�t want to be shown on your homepage
<span class=”fullpost”>
</span>
Now suppose if you want to show the post only till the lines
I have explained everything in these images so read carefully!
So you will add the codes as shown below,
the highlighted source code refers to the hidden text
You can see in the image above that I have added <span class=”fullpost”> just above the part of the post I wanted to hide. The text that I want to hide is the one below,
�Please use windows live writer only for writing quality posts. This TNT of Read More link works best with windows Live writer. Blogger Editor is simply annoying and this trick simply just don�t work efficiently with it. If you still want to use blogger editor rather than windows live writer than frustration is what you will encounter! �
I added </span> to the part where the entire post completes or source code ends
In short add <span class=”fullpost”> just before the text to be hidden and add </span>just after it
That�s All!
You can use some of the Images below instead of that Read More �>> text
 read-more with a black outline simple readmore text image read-more with a blue drop shadow read more text with black drop shadowread-more black and orange
To add an image instead of text simply replace Read More ->> in the code above with this,
<img border=”0″ alt=”read more” src=”URL Of Your Image”/>
Replace URL Of Your Image with your image link.
Update:-
I have created some high quality Read More Buttons, may be you will like them more. Visit these links,

  1. Blinking Read More Buttons
  2. Animated Read More Buttons
  3. Arrow Head Read More Buttons

12 Useful Tips To Reduce Your Blog Load Time

blog-load-time
Almost every newbie blogger fails when it comes to reducing blog load time. Most of the tutorials that are available on reducing the time taken for a website to load are often un-clear or incomplete. We decided to share our way of solving this problem. Below are 11 really interesting and important tips to decrease the load time of your blogs by almost 90%.

  1. Link To All images Inside Your Template From Blogger

    I shared an important tip tomorrow about creating an Image Backup in Blogger and then Linking to All Images From there. Most of you use templates that are not officially provided by Blogger. These templates often contain images that are saved on services like tinypic or photobucket. When your blog loads the browser has to connect to all servers which link to your images, as a result leading to immense delay in the loading time of your blog. What you must do is replace all such images with those that you have saved inside blogger as explained in the my previous post. The advantage of doing so will be this that the browser will need to connect only to blogger while loading your images. Thus saving time.
  2. Save All Images in GIF or PNG Format

    GIF stands for �Graphics Interchange Format� and PNG stands for �Portable Network Graphics� Both these formats are well compressed, smaller in size and widely supported by all browsers. But if size is concerned PNG compresses far better than GIF. In typical cases up to 5-25%.  There are some transparency issues with PNG in IE6 but since IE7 is widely used these days, transparency is nor more an issue. Using any of these image formats will tremendously reduce the load time of your blogs by 60% i.e 70-90KB The size is an approximate for my blog and true size depends on the number of images you use.
  3. Give Proper Dimensions To Images

    Giving each image a specific width and height will make it easy for the browser to load the image quickly. Always decrease the size of an image if the original size is larger. The general HTML code for an image looks like the one below,

    <img width=�� height=�� src=�URL Of Image� />


    The width and height will require a value in pixels. One pixel equals a dot on the screen. A Full size image on my blog will have a width=�590px� and height can be as long as I want. 590px almost equals the width of my posts. Hope that gives you an idea on how to choose width and height values for your images. Browsers find it easy to load images whose dimensions are specified. Make sure you make it your habit to specify a proper size for your images. If you use 
    Windows Live Writer your life will become far easy.

  4. Don�t Use An Image As A Background

    If you are using any image as a background then kindly remove it. A background Image repeats itself horizontally and vertically and is responsible for 50% slow load time. Just remove it and see the difference. To remove a background image simply find this CSS code inside your template,                (Tip:- Its located just at the top of your blog. Simply search for body)

    body { background: #7AA1C3 url(http://xyz.com/blabla.jpg);
    width: 980px;
    color: #333;
    font-size: 14px;
    font-family: Georgia;
    margin: 0 auto 0;
    padding: 0; }

    This code will look different in your template but you should be concerned only with thebolded black text. Simply Delete url(http://xyz.com/blabla.jpg) and save your template. Give a simple color to your background. #7AA1C3 refers to Background Color. You can change it by using my Hexadecimal Color Chart

  5. Save All JavaScript Inside Blogger

    Why should you link to external sites for storing your JavaScript whilst you can easily save it in Blogger! Save All your JavaScript codes inside your templates just above </head> using the code below,

    <script type=’text/javascript’>
    //<![CDATA[
    Paste Your JavaScript Code Here
    //]]>
    </script>
    The bolded text is where you must paste the JavaScript code that you use in your template by linking to an external site.
    To find a JavaScript URL that links to external site, search for <script type=’text/javascript’> inside your template (Make sure to check �expand widget templates� box at top-right corner). Once you find such linking, open that link in a browser. You will see large piece of complex text in the window and that is your JavaScript code. Simply copy it and paste it in the code shared above. Replace All JavaScript codes inside your template with the code above, ensuring that you have extracted the code from the link and pasted it in the code above.
  6. Always Accept Quality and Well Scripted Blogger Templates

    The major mistake most bloggers make is to upload any template that attracts them. Most un-official Blogger templates that are available in blogosphere are often created by people who are not well aware with proper use of HTML and JavaScript. A improper scripted template with empty tags ,unwanted tags and broken JavaScript often make Job tough for search engine spiders to crawl the content of your weblog. Further Browsers also waste precious time in reading broken scripts. If a JavaScript is not well coded or optimized, it can cause a readers PC to hang! Imagine this happening to readers accessing your blog. In Short use templates from authorities who have respect in blogosphere and from those who are certified professionals.
  7. Use Limited Advertisements

    If you are blogging only to get paid by displaying large chunks of ads from several sources than you are surely misusing this beautiful experience of blogging. Don�t make a blog a Fish Market. Display only few ads at major areas in your blog. Doing so will keep your blog interface clean and easy to be crawled and browse able. Each add that you display uses JavaScript that prolongs the page Load time. Make sure you limit all your ads to three.
  8. Don�t Link To Blog Directories

    It is a wrong perception that linking to several blog directories will bring you immense Traffic. When you link to several blog directories on your homepage, search engines loose trust on your blog due to excessive linking and browsers find it difficult to browse those tiny images that link to blog directories. All blog directories ask you to link back using a small image link on your blogs but doing so will only damage the success of your blog. I believe only on blogcatalog and mybloglog as relevant authorities to expect Traffic from. If you really want some amount of traffic from blog directories then trust only on blogcatalog and mybloglog. Moreover accept only the small piece of meta tag from them rather linking to them.
  9. Don�t Use Widgets From Blog Directories that Use Images

    I refer to the famous recent Viewers widget by blogcatalog and mybloglog. These widgets use JavaScript that link to these sites and also display images that add up to the load time of your blog. I use meta tags provided by them rather using their widgets. This helps in reducing the time taken for my pages to load. If you really want to use these widgets then try displaying few images on them, as low as 10.

  10. Summarize your Posts Using The Read More Link

    Full Length Posts at homepage is one of the biggest reasons why a blog has high load time. Summarize all your posts by using the continue Reading Link or Read More Link. To know how to add it, read this post-> Read More Link

  11. Show Only Four-Five Posts At Home Page

    Don�t show more than 4-5 posts at Homepage. Doing so will keep your readers busy reading different posts and they will also find it interesting to see how fast the homepage loads.

  12. Eliminate External Links

    Don�t use widgets that are from external sites other than blogger. Get rid of stat counters and use Google Analytics. Don�t store images on other services but Blogger. Save all JavaScript code inside blogger as discussed above. Don�t add links from blog directories, they don�t bring Traffic with exception of blogcatalog and mybloglog.


Note:-

Don�t Mess Up CSS and HTML Code By Removing The Line Breaks
Many Bloggers who are not well aware with web designing think that by removing the gaps between lines inside blogger template will reduce the size of a template. What they don�t realize is the fact that doing so will only reduce the template size by 2-4KB or even less, which is almost negligible reduction when it comes to fast browsers present today. Removing the line breaks between the codes inside blogger will distort the overall presentation of your template, making it difficult to edit it. Kindly avoid all such un-professional tips and always take suggestion from an expert before taking any such step.

Attractive Read More Button Images For Blogger and Blogspot blogs �Arrow Head

Thankfully I am again proud to present another unique blogger resource entitled Arrow Head Read More Image Buttons which are barely available in the blogosphere. I have created a set of 12 Images each of different colour and taste. Get rid of that Read More Link text and replace it with a cool MBT Read More Image button.
First have a look at them in the screen display below,


Blogger Arrow Head Read More Button Images
Read More button Images for blogger/blogspot blogs


To replace you Read More Link with one of these button images then do the following,
1. Go to Layout > Edit HTML
2. Back up your template
3. Press Ctrl + F , and in the search box write the read more text. You know it better whether to search for Read More or Continue Reading. Depends what text are you using.
Once you find the read more text in your blogger template then replace the text with the code below,
<img width=”120px” height=”32px”   src=”URL Of Your Read More Button Image/>
Replace the bolded text in blue with the image link of the read more button. To know how to get Image URLs , read this post �> Create Image Backup In Blogger & Get Image URLs
You can also resize the image. The default size is 120px by 32px. If you want a smaller one than you can use these proportions:
width=�100px� height=�27px�
width=�80px�  height=�21px�
if you like this post…
please give us comment below….

Make a Free Android Application for Your Blog

make android app
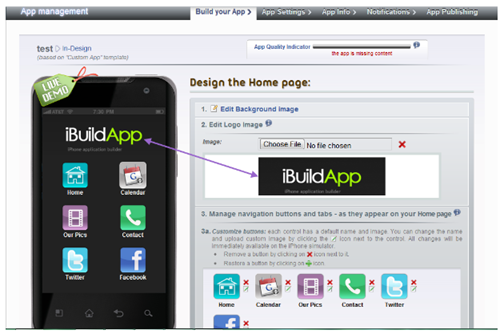
In this post i will teach you how to make a free App of your blog for Android and Nokia Touch Phones. First little description on its importance :
As we all know that Mobile Internet is getting more craze from Internet Users. Many people just use their Mobile Phones to surf internet. An App is a shortcut for a user to search for his requirement. Such as a currency converter app makes it easy for a user to get the results fast either by going to internet explorer and surfing internet to find your currency rate.
I personally build an Android and Nokia Apps of my Blog and it really help me little in my traffic but more than traffic, it gives your Blog a professional Look. If your app receives good stats than you can have an Advertiser to make some revenue from your App. Now let’s get started!

Building an Android App

1- First of all go to ibuildapp.com and go to Account Login
log in ibuildapp
2- No need to create account, simply Log in through your Facebook account.
3- Click on CREATE APP
4- Continue with Native iPhone/Android App
5- Now you will see a list of different menus. Simply scroll down and select CUSTOM APP and continue.
6- Give your App a name ( Note: This name is shown on Phone. For Example : Camera ). Select Android and continue.
7 – Now the work is very very very easy 🙂 First see the picture below.
ibuild app tutorial
8- Choose a Logo, change Background Image ( You can upload your Own ). Now you have Six options as you can see on the left side. It is a Live Demo where you can test your app. Remember, you must have this Six Options, you cannot delete any otherwise you cannot proceed further. You can change the Icons, their names and functions.
app options
To change the icons, click on edit and change the name and icon. 
9- To change the functions of these icons, click on any icon on the live demo and than click on CHANGE PAGE TYPE to see the list of different functions. Give a title to your Page Type.
android app building
android functionality
NOTE: When adding Twitter or Photobucket feed, you have to validate it first fromfeedvalidator . You will get a new URL and you have to use it.
And in case of RSS Feed Burner URl, u have to add.
http://feeds.feedburner.com/TntByStc?format=xml
Replace TntByStc with your feedburner title. The Red one is extra code to run it on the App
Now i will show you my customized App
build android application
As you can see i put the above options. I uploaded my own icons and gave them a unique name and changed their functions from default. The home tab is my feed burner Url. My readers can easily read all the latest news through this app. Also i placed Facebook page, Contact and Website. You can customize it as you want. Just choose from the menus mention in step 9 and place whatever you want. After every change do not forget to SAVE. After completing all the six features, save your app and hit continue.
10 – Next step is your APP Setting. Choose Android option and a beautiful Splash screen. Leave the Advertising option with NO because the other options are useless because if you have to join those ad networks than your app should have huge stats which at time being you do not have because your app is not published on Android Market so leave it with NO but if your app gets good stats than you can get Advertisers as you can see the fourth option ( HTML – create custom ad ). You can place advertiser’s banner with his URL. To use Ad Networks, you must publish your App in Android Market ( Further written below about Publishing the app in Market )
11- Save and Continue
12- Now give your app some Information
make android app
App logo is that logo which appear on Phone
13- Save and continue to the next step of Notifications. After giving a Notification message, continue to the next and final step.
14- I do not have to explain this step 🙂 it is very easy and you can follow the instructions given to you by them.
YOUR APP IS READY ! But you must try it first with Live Demo From MY APPS link.
Now some important things: If you wish to publish your app to android market, you have to pay a one time fee of 25 dollars but it is not necessary because you can download your app and can upload it on any file hosting and than you can give that link to others. You can test my app on your Android Phones or you can test my App Online
If you wish to make changes to your app than you can do it by going to My Apps Link and than click App Management. You do not have to download the app again and again after every change. The change will happen automatically to all the users because this app is connected to internet.
Now you can share this app with your readers. Enjoy 🙂