Facebook Timeline has Officially started Replacing Old Layouts

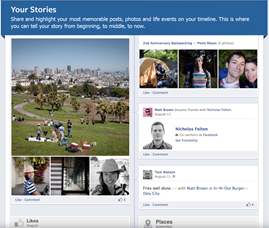
Remove Facebook TimelineThe most awaited Timeline Update is soon to roll out all over the world starting its first major release from New Zealand. On 6th December 2011, all old Facebook profiles in new Zealand were replaced with the new Timeline layout that displays a hierarchy of all your experiences  date-wise like post updates, photos and video uploads. The activation will be applied to the remaining 800 Million accounts this month and it will be completed hopefully before the start of 2012.


What is Timeline?

Here is the Facebook Official video link which will describe you, what is timeline. Watch this:
You can also add interesting new Social Apps to your timeline profile that lets you show the things you like to do on your timeline. Things like the music you enjoy listening to, the recipes you try, the runs you take, the movie that you decide to watch today, the Cinema that you select for outgoing and much more! Watch it:

Official Release Note:

On their official blog post Facebook’s Product manager stated:

UPDATE on Tuesday, December 6, 2011: Beginning Timeline Rollout in New Zealand
We announced Timeline in September and made it available to developers building apps on our platform. Since then, over a million people have signed up for the developer beta to access Timeline. The feedback we’ve received so far has been invaluable. Starting today, we are making Timeline more widely available as we measure speed and other types of performance. We’ll begin by making it available to people in New Zealand and then roll it out more broadly in the near future.The Timeline has also slowly started rolling out in Uk, USA, India,  Pakistan and Sri Lanka. It has been applied to our public profile:

How to delete it after being lunched?

Unfortunately once the launched is made official then there is no way you can remove the Timeline Feature and revert back to old Profile. Those who have Enabled the Timeline feature using the Developers page would be forced to use the new layout even if they try to remove or delete the app. There is no option available at present that lets you to use Old Facebook profile just like how Facebook changed the Chat column and provided no option to switch to old Chat layout.
If you want to enable it before the launch then read this:
Enable Facebook Timeline

This is one way to remove the Timeline using the App method which wont work for countries where timeline has already been activated.

Man I honestly hate the new layout just like any user out there! Let us know what you think of this new feature and how can you favor the new Profile look over the old. Peace pals! 🙂

Enable Facebook Timeline For your Profile Now!

Facebook new and amazing development just to arrive and this amazing Profile layout change method is called “Timeline” This new feature displays a hierarchy of all your experiences  date-wise like post updates, comments, photo and video uploads.  Timeline is your collection of photos, posts and apps that tell your story. You can see what you did in last year or last month. All Facebook status updates that you made or the fun you had so far can be reviewed by rolling back to the old days using this brilliant new feature. At present this feature can be enabled only through the developers page and will be visible to only those people who have enabled Facebook developers App. However very soon Facebook will publically enable the Profile Timeline for all. So why wait when you can try it now!

How To Enable Time Line Feature?

The steps are extremely simple and needs no expert skills. Carefully follow these,
  1. In your Facebook Search book write ” Developer” and hit enter
  2. Activate the App if you have previously not activated the Developer App
  3. Click on the Create new app button towards your top-right-corner side
  4. Give your app a name and name space. You can keep any name you want for example I kept “Timeline” as the app name  and “Ahmedzai” as the name space.
  5. Follow the easy instructions and submit the security captcha code. Hit continue and you have successfully created the app and almost done
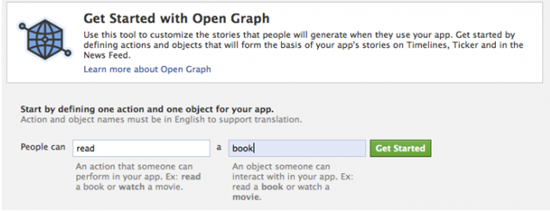
  6. Now you can see your App name on your app page. Towards the left side Look for the “Open Graph” Link, and click the “Get Started using open graph” link. Fill the blanks as shown below,
time line settings
Fill the first blank with anything say for example Read and the second with Book.  Hit Get Started and You will see three Edit Settings Page. Go through all of them if you wish to change something but you can leave them as default if you wish. I only changed the layout look on the second page.
    Now visit your Facebook Homepage and you will see an invitation at the top saying:
Introducing Timeline – a New Kind of Profile
   7.  Hit the Get it Now button and start exploring this brilliant new feature! Enjoy! 🙂

Notification Bar For BlogSpot With Facebook Like Button

notification bar
Most of you liked the new sticky notification bar which is an important way of seizing visitor attention towards an important headline, news or any update or announcement you may wish to share. Today we will take a step further by adding Facebook like button to the sticky bar. This is a great way of increasing your fans on FB. All visitors will be able to see the bar at the top of your blogger header and it will stay fixed their and would scroll as the user scrolls down. It will always be attracting your visitors to like your blog. Lets first see a demo.

Scroll to the bottom of this demo page to see it:

Add Notification bar to Blogger

Go To Blogger > Design > Edit HTML

Backup your template

Search for this,

]]></b:skin>

4. Just above it paste the follow code,

#mbt-stickybar{
background:#FF0000 url(‘http://3.bp.blogspot.com/-zQeUG7PU9Uw/TmkiptyZ1eI/AAAAAAAAE98/At4tRBC9HQc/s400/stickybar.png’) repeat-x;
width:100%;
margin:0 auto;
text-align:center;
padding:0px 0;
border-bottom: 1px solid #888888;
  -moz-box-shadow: #666666 0px 1px 3px;
  -webkit-box-shadow: #666666 0px 1px 3px;
  box-shadow: #666666 0px 1px 3px;
  z-index: 999;
height: 28px;
line-height: 1.85em;
vertical-align: baseline;
letter-spacing: 1px;
}
#mbt-stickybar a{
text-decoration:none;
color:#fff;
font-size:13px;
font-weight:bold;
font-family: arial,”Helvetica”,sans-serif;
line-height: 24px;
}
#mbt-stickybar a:hover{
text-decoration:underline;
}
#mbt-stickybar p {margin:0; list-style:none;}
#mbt-stickybar img {vertical-align: middle;
      margin-right: 6px;}

To change the background color of the sticky bar, simply change  #FF0000  with any hexadecimal color of your choice. Try our color chart.

5.  If you wish to add the bar above header then search for this code

<body>

else if you wish to add the bar below footer then search for this code

</body>

and  Just below it paste the following code,

<div id=’mbt-stickybar1′>
<div style=’float:left; width:400px;’>
<a href=’#’>Receive Free Updates Via Email. Subscribe Now!</a>
</div>
<div style=’float:right; width:300px;’>
<table style=’margin:0; padding:0;’>
<tr>
<td>
<div id=’fb-root’/><script src=’http://connect.facebook.net/en_US/all.js#xfbml=1’/><fb:like font=” href=’BLOG LINK’ layout=’button_count’ send=’false’ show_faces=’false’ width=’80’/>
</td>
</tr>
</table>
</div>
</div>

Replace with your RSS link and replace

Replace BLOG LINK with your blog homepage URL. If you wish to replace the link with your Facebook like page URL then better read the post on link like button to like page.

   6.   Save your template and you are all done!

Visit your blog to see it hanging either at top or at bottom as you may have set it up. Have fun buddies. do let me know if you needed any help.
Make Sticky Bar For BlogSpot

Make a stickybar with close button
You can add sticky notification bar in blogger blogs by showing the bar either at the top of header or just below the footer. A sticky bar can is now used widely by all blogs and sites(mashable for instance) for notifying visitors of important updates, offers, coupons and latest news. You can even add your RSS link there and ask you visitors to subscribe to your blog. In this tutorial I will try to keep things simply and will share how to create such a sticky bar widget with simple text and image. I have added drop shadow effects to it using CSS3. The widget is compatible with all browsers. View the demo below and on the demo page scroll to the top to see the bar.


Add Sticky Bar To Blogger


Go To Blogger > Design > Edit HTML


Backup your template


Search for this,


]]></b:skin>


   4.  Just above it paste the CSS code below,


#mbt-stickybar{ 
background:#0080ff url(‘http://3.bp.blogspot.com/-zQeUG7PU9Uw/TmkiptyZ1eI/AAAAAAAAE98/At4tRBC9HQc/s400/stickybar.png’) repeat-x; 
width:100%; 
margin:0 auto; 
text-align:center; 
padding:0px 0; 
border-bottom: 1px solid #888888; 
  -moz-box-shadow: #666666 0px 1px 3px; 
  -webkit-box-shadow: #666666 0px 1px 3px; 
  box-shadow: #666666 0px 1px 3px; 
  z-index: 999; 
height: 28px; position:fixed;
line-height: 1.85em; 
vertical-align: baseline; 
letter-spacing: 1px;
}
#mbt-stickybar a{ 
text-decoration:none; 
color:#fff; 
font-size:13px; 
font-weight:bold; 
font-family: arial,”Helvetica”,sans-serif; 
line-height: 24px; 
}
#mbt-stickybar a:hover{ 
text-decoration:underline; 

#mbt-stickybar p {margin:0; list-style:none;} 
#mbt-stickybar img {vertical-align: middle; 
      margin-right: 6px;}


To change the background colour of the bar then simply change this #0080ff  Use our Color code generator for doing this.     


5.  Next search for this code


<body>


 6.  Just below it paste the following code,


<div id=’mbt-stickybar’> 
<a href=’#’>ADD TEXT HERE</a> 
</div>


Now replace # with your text link (can be your RSS link, important post link etc.) and ADD TEXT HERE with anything you wish to write.


      7.    Save your template and bingo you are done! 🙂
If you wish to add an image next to the link of text just like the one in the demo page, then use this code instead of the one shared in 
Step#6,


<div id=’mbt-stickybar’> 
<img src=’IMAGE LINK’/><a href=’#’>ADD TEXT HERE</a> 
</div>


Simply replace IMAGE LINK with the URL of your image, picture etc.
Advance versions


In my coming posts I will be sharing more on this topic. We will also learn how to add plugins like FB Like and G+ buttons. We will also learn how to add this sticky bar to the bottom of your blog homepage, how to hide it on specific pages and how to add a close button to it. So it would be great fun trying new versions. Kindly let me know if you needed any further help.